Cloning Windows XP
|
|
The best way to understand disk imaging is to walk through the entire process; you'll learn more about this process later in this chapter, though (see Figure 13-1 as you're working through these steps):
-
Install Windows XP on the sample computer.
Install the operating system from a fully customized distribution folder, as you learned in Chapter 12, "Deploying with Answer Files." Doing so ensures that you can regression test your disk images after fixing problems. Do not join the computer to a domain; just join a workgroup.
-
Log on to the computer as Administrator, and do any of the following:
-
Install and customize each application you want to include in the disk image. For example, install Office XP. As a rule, don't customize per-user settings on a disk image; save those for a network-based default user profile (see Chapter 10, "Deploying User Profiles").
-
Install any third-party device drivers that are not included in Drivers.cab, the file in which Microsoft distributes the Windows XP device drivers, and that you didn't add to your distribution folders.
-
-
Customize the %SYSTEMDRIVE%\Sysprep folder.
Copy Sysprep.exe and Setupcl.exe to this folder. Also, copy the Sysprep.inf file, which you build ahead of time. Sysprep.inf automates Mini-Setup Wizard, a stripped-down version of the full setup program that runs when users start a computer to which you've deployed the disk image. I'll tell you where to get these files in the next section.
-
Run Sysprep.exe, select the Mini-Setup check box, and then click Reseal.
If the computer is ACPI-compliant, Sysprep automatically shuts down the PC; otherwise, turn off the computer when you see a message that says it's safe to shut down the computer.
-
Clone the disk to an image file.
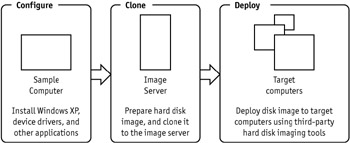
Figure 13-1: Using disk imaging, you deploy the contents of a sample computer's hard disk to many other computers' hard disks. It's an effective way to deploy many desktops.
After you deploy the disk image to users' computers and they turn them on, Mini-Setup Wizard starts. First the wizard detects the computers' Plug and Play devices. Then the wizard prompts users to accept the license agreement, type their name and organization, join a domain or workgroup, specify regional options, configure TAPI, and choose the networking protocols and services to install. The wizard can skip some or all of these settings if you configure them in Sysprep.inf. Last, Mini-Setup Wizard removes %SYSTEMDRIVE% \Sysprep and restarts the computer. The whole process takes less than five minutes.
Before we move on to actual techniques, I'm going to introduce you to the tools necessary for doing the job. You'll find everything you need for preparing disk images on Windows XP's CD. The following sections describe these tools, their limitations, and a list of third-party disk imaging suites to evaluate. (Third-party tools are necessary to duplicate disk images after you prepare them.)
Windows XP Tools
Disk imaging has two phases: preparing the disk image and cloning the disk image. All the tools you need for preparing a disk image are on the Windows XP CD in the Deploy.cab file. This file is in the Support\Tools folder; extract its contents by opening the file in Windows Explorer. The disk imaging tools in Deploy.cab include:
-
Sysprep.exe. Prepares the disk for duplication by configuring Windows XP so that Setupcl.exe runs the next time it starts.
-
Setupcl.exe. Regenerates the computer's security identifier (SID) because every computer on the network must have a unique SID. It also starts Mini-Setup Wizard to configure Windows XP on the computer.
-
Sysprep.inf. Automates Mini-Setup Wizard by providing settings for users.
The tools are a given, but I'm jazzed about the documentation in the file Deploy.cab—it's a huge improvement over the deployment documentation for Windows 2000. First Ref.chm describes how to build answer files and includes a reference that describes all the settings you can use. Second Deploy.chm describes how to use the disk imaging tools in Deploy.cab. It also contains a complete reference for all the settings you can use in answer files. This is the resource from which you're going to learn the most about disk imaging.
Sysprep Limitations
Due to the nature of disk imaging—copying a hard disk's image to other computers—Sysprep has a few requirements (call them limitations if you like):
-
The sample and target computers must have the identical hardware abstraction layers (HALs). For example, a disk image created on a computer using a single processor HAL is not compatible with one that uses a multiprocessor HAL.
-
The sample and target computers must have compatible BIOS types. For example, a disk image created on a computer with an ACPI BIOS is not compatible with a computer that has an APM BIOS. A disk image created using an APM BIOS is often compatible with a computer that has an ACPI BIOS, though.
-
The target computer's hard disk must be the same size or larger than the sample computer's hard disk. If the target computer's hard disk is larger, you can set ExtendOEMPartition in Sysprep.inf to extend the disk image to the end of the disk. The Sysprep.inf sample on the facing page shows an example of using this setting to extend a partition.
-
Sysprep only prepares the disk image; it doesn't clone the disk. Thus, to deploy the disk image, you'll have to use a third-party disk imaging product. The sidebar "Third-Party Disk Imaging Suites," on the facing page, gives you choices to evaluate. My preference is Symantec Ghost, but there are many good products.
Windows XP's documentation also says that the mass-storage controllers (IDE, SCSI, and the like) must be identical on the sample and target computers. This isn't so if you tell Sysprep in advance about the mass-storage controllers you're anticipating. For more information, see the section titled, "Reducing Image Count," later in this chapter. I've had good luck building images using one mass-storage controller and deploying to computers with completely different mass-storage controllers.
The sample and target computers' remaining devices do not have to be the same. That includes Plug and Play devices, such as modems, sound cards, network cards, video adapters, and so on. If you anticipate devices for which Windows XP doesn't include native support (the device doesn't have a driver in Drivers.cab), you should include those device drivers in your image so that Mini-Setup Wizard can detect and install them during installation. This usually includes devices that come to market after Windows XP. Chapter 12, "Deploying with Answer Files," describes how to deploy third-party device drivers with Windows XP.
| Tip | Often, device drivers that you download from a vendor's Web site aren't suitable for deployment. They install from package files, so you can't easily extract the device driver files and then figure out which files are necessary and which aren't. You can almost always get the latest device drivers from Windows Update, though, and these device drivers are in a suitable format for deployment through an answer file and on a disk image. The trick is to use the Windows Update Catalog. In Internet Explorer, click Tools, Windows Update. In the Web page's left pane, click Personalize Windows Update. In the right pane, select Display The Link To The Windows Update Catalog under See Also, and click Save Settings. Now you'll see the Windows Update Catalog link in left pane of the Windows Update Web site, and you can search for and download device drivers that are packaged and ready for deployment. |
Sysprep only prepares disks for duplication; it doesn't clone them. Thus, you're going to need a third-party tool to deploy disk images. A small selection of the tools with which I'm familiar includes the following:
-
Symantec Ghost. http://www.symantec.com
-
Altiris eXpress 5. http://www.altiris.com
-
Phoenix ImageCast. http://www.it-infusion.com
-
PowerQuest DeployCenter. http://www.powerquest.com
Symantec Ghost is at the top of the list because it's the tool that I know best and the one I use most often. It's a robust disk imaging tool that does much more than just clone disk images. For example, you can deploy a disk image to a remote computer without ever getting up from your desk. You can use it to manage configurations, too, not just disk images. When I talk to administrators around the world, this is the tool that 90 percent of them use, whereas the other tools tend to have a small but loyal following. Regardless, the disk imaging process is roughly the same with all these tools, and most of them are high quality.
|
|
EAN: 2147483647
Pages: 185