Customizing Shell Folders
Customizing Shell Folders
Some folders you see in Windows Explorer, Control Panel, or on the desktop don't actually exist on the file system. They're objects based on classes registered in the key HKCR\CLSID. Some folders and files that do exist on the file system (the History and Briefcase folders for example) have special capabilities that come from objects based on classes registered in HKCR\CLSID. A class is essentially a template for creating something real, like an object in the user interface, and CLSID is the location where those classes are registered so Windows knows about them.
Third-party programs might register additional classes, and you can easily spot interesting ones in HKCR\CLSID because they have the subkey ShellFolder and the value Attributes in that subkey. Appendix A, “File Associations,” describes the value Attributes and how to understand each bit in it. Figure 4-1 shows what this subkey and value look like in the registry. Class registrations containing the value LocalizedString are likely candidates for customization because they contain this value only if objects based on that class appear in the user interface. These classes have a variety of purposes, and you'll use them frequently to hack Windows.
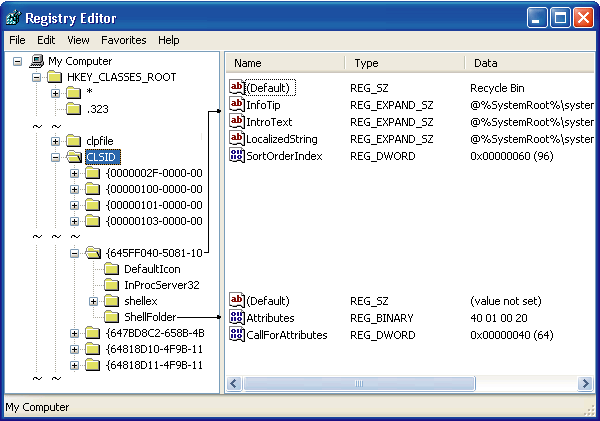
Figure 4-1 You can find interesting object classes by searching for ShellFolder subkeys that contain the value Attributes. Look for LocalizedString, too.
Table 4-2 lists the classes registered in HKCR\CLSID that I find the most interesting. I divided this table into four sections. The first is shell folders. These are special-purpose folders, such as My Computer and My Network Places. The second section is Control Panel folders–for example, Administrative Tools and Scheduled Tasks. The third section is Control Panel icons. The fourth section lists other interesting classes, such as the Run dialog box. Objects created from classes in the first two sections are folders. Objects created from classes in the last two sections are usually dialog boxes, but sometimes they add capabilities to files and folders, as Briefcase does. The first column is the class's name, and the second column is the class's GUID, or class identifier. 've italicized those that aren't useful for hacking but that you run into frequently while hacking the registry.
Object | Class Identifier |
Shell folders | |
ActiveX Cache | {88C6C381-2E85-11D0-94DE-444553540000} |
Computer Search Results | {1F4DE370-D627-11D1-BA4F-00A0C91EEDBA} |
History | {FF393560-C2A7-11CF-BFF4-444553540000} |
Internet Explorer | {871C5380-42A0-1069-A2EA-08002B30309D} |
My Computer | {20D04FE0-3AEA-1069-A2D8-08002B30309D} |
My Documents | {450D8FBA-AD25-11D0-98A8-0800361B1103} |
My Network Places | {208D2C60-3AEA-1069-A2D7-08002B30309D} |
Offline Files | {AFDB1F70-2A4C-11D2-9039-00C04F8EEB3E} |
Programs | {7BE9D83C-A729-4D97-B5A7-1B7313C39E0A} |
Recycle Bin | {645FF040-5081-101B-9F08-00AA002F954E} |
Search Results | {E17D4FC0-5564-11D1-83F2-00A0C90DC849} |
Shared Documents | {59031A47-3F72-44A7-89C5-5595FE6B30EE} |
Start Menu | {48E7CAAB-B918-4E58-A94D-505519C795DC} |
Temporary Internet Files | {7BD29E00-76C1-11CF-9DD0-00A0C9034933} |
Web | {BDEADF00-C265-11D0-BCED-00A0C90AB50F} |
Control Panel folders | |
Administrative Tools | {D20EA4E1-3957-11D2-A40B-0C5020524153} |
Fonts | {D20EA4E1-3957-11D2-A40B-0C5020524152} |
Network Connections | {7007ACC7-3202-11D1-AAD2-00805FC1270E} |
Printers and Faxes | {2227A280-3AEA-1069-A2DE-08002B30309D} |
Scanners and Cameras | {E211B736-43FD-11D1-9EFB-0000F8757FCD} |
Scheduled Tasks | {D6277990-4C6A-11CF-8D87-00AA0060F5BF} |
Control Panel icons | |
Folder Options | {6DFD7C5C-2451-11D3-A299-00C04F8EF6AF} |
Taskbar and Start Menu | {0DF44EAA-FF21-4412-828E-260A8728E7F1} |
User Accounts | {7A9D77BD-5403-11D2-8785-2E0420524153} |
Other classes | |
Add Network Places | {D4480A50-BA28-11D1-8E75-00C04FA31A86} |
Briefcase | {85BBD920-42A0-1069-A2E4-08002B30309D} |
{2559A1F5-21D7-11D4-BDAF-00C04F60B9F0} | |
Help and Support | {2559A1F1-21D7-11D4-BDAF-00C04F60B9F0} |
Internet | {2559A1F4-21D7-11D4-BDAF-00C04F60B9F0} |
Network Setup Wizard | {2728520D-1EC8-4C68-A551-316B684C4EA7} |
Run | {2559A1F3-21D7-11D4-BDAF-00C04F60B9F0} |
Search | {2559A1F0-21D7-11D4-BDAF-00C04F60B9F0} |
Windows Security | {2559A1F2-21D7-11D4-BDAF-00C04F60B9F0} |
You can do a lot when armed with the information in Table 4-2. You can customize which folders you see in My Computer, for example. You can rename the icons you see on the desktop and even configure which icons appear on the desktop at all. For example, administrators might put the Administrative Tools folder on their desktops for quicker access. See the upcoming sections for information about the different ways 've found to use these classes.
Renaming Desktop Icons
On the desktop, you can rename the My Computer, My Network Places, My Documents, and Internet Explorer icons. Assuming you see these icons on your desktop, right-click them, and then click Rename. No Rename command is available for other icons, like the Recycle Bin.
You rename an icon without a Rename command by editing its class registration. Change the value of LocalizedString. Here's an example: in Table 4-2, you see that the Recycle Bin's class ID is {645FF040-5081-101B-9F08-00AA002F954E}. To rename the Recycle Bin icon “Trash Can,” set the value of LocalizedString in the key HKCR\CLSID\{645FF040-5081-101B-9F08-00AA002F954E} to Trash Can. Then click the desktop, and press F5 to refresh its contents. The value LocalizedString usually contains something like @%SystemRoot%\system32\SHELL32.dll,-8964, which means that Windows uses the string with the ID 8964 from the file Shell32.dll. Just replace all that with the new name.
TIP
LocalizedString is a REG_EXPAND_SZ value, so you can use environment variables in it. For example, set LocalizedString to %UserName%'s Garbage, and the user Jerry sees “Jerry's Garbage” below the icon. You can do this for other icons as well. My Computer's class ID is {20D04FE0-3AEA-1069-A2D8-08002B30309D}. Change LocalizedString in HKCR\CLSID\{20D04FE0-3AEA-1069-A2D8-08002B30309D} to % UserName%'s Computer, and the user Jerry sees “Jerry's Computer” instead of My Computer; the user Sally sees “Sally's Computer.”
In some class registrations, you don't see the value LocalizedString. The absence of this value indicates that Microsoft didn't intend to display the names of those objects in the user interface. To rename a class that doesn't contain this value, change the default value of HKCR\CLSID\classID, or better yet, add LocalizedString to it. When Windows looks for an object's name, it looks first for LocalizedString and then for the class registration's default value.
Using Custom Icon Images
Each class registration you see in Table 4-2 contains the subkey DefaultIcon. This subkey's default value is the icon that Windows uses when it displays objects based on that class. For example, the default value of DefaultIcon in HKCR\CLSID\{20D04FE0-3AEA-1069-A2D8-08002B30309D} is the icon that Windows displays when it creates the My Computer object in the user interface, such as in Windows Explorer or on the desktop.
To use a different icon, change the default value of DefaultIcon. You can use the path and file name of an icon file, which has the .ico extension, or you can use a resource path. A resource path is either Name, Index or Name ,-resID. Name is the path and name of the file containing the icon, which is usually a DLL or EXE file. Most of the icons that Windows uses come from %SystemRoot%\System32\Shell32.dll. Index is the index number of the icon, beginning with 0, and resID is the resource identifier (resource ID) of the icon. Programmers assign resource IDs to resources that they store in program files, such as icons, strings, and dialog boxes.
TIP
My favorite tool for finding icons in program files is PE Explorer from Heaven Tools. You can download an evaluation copy from the Web site at http://www.heaventools.com. This tool can even extract all of the icons from DLL and EXE files so that you can use them individually.
Adding Desktop Icons
Windows now has a much cleaner desktop than earlier versions of Windows did. By default, you see only the Recycle Bin icon. You can add the typical icons, though. On the Display Properties dialog box, click the Desktop tab, and then click Customize Desktop. In the Desktop Items dialog box, choose the icons that you want to display on the desktop. You can add the My Documents, My Computer, My Network Places, and Internet Explorer icons. To open the Display Properties dialog box, right-click the desktop, and then click Properties.
If the icon you want to add isn't one of those four choices, or if you want to script these changes, or if you want to add icons to other special folders, you must edit the registry. All the hacks you learn about in this section are in the branch SOFTWARE\Microsoft\Windows\CurrentVersion\Explorer. Change this branch in HKLM to affect all users; change it in HKCU to affect an individual user. Figure 4-2 shows the contents of this branch.
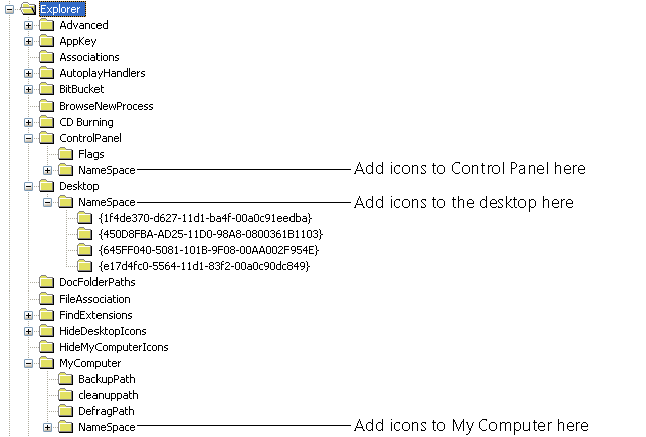
Figure 4-2 The NameSpace subkeys of Explorer\ControlPanel, Explorer\Desktop, and Explorer\MyComputer determine the contents of each corresponding folder.
You add icons to Control Panel or the desktop, for example, by editing the subkeys indicated in Table 4-3. Create a new subkey in NameSpace, and name it with the class ID of the object you want to add. For example, to add to the desktop an icon that opens the Run dialog box, add a new subkey called {2559A1F3-21D7-11D4-BDAF-00C04F60B9F0} to Desktop\Namespace. (See Table 4-2.) Then refresh the desktop by clicking it and pressing F5. As shown in Figure 4-3, you can add folders to My Computer, too. In this case, I added the Administrative Tools and Network Connections folders to My Computer. The only objects that are good to place in My Computer are folder objects, so pick class IDs from the first two sections of Table 4-1. Add class IDs from the second and third sections of the table, and you'll see only those objects in the right pane of Windows Explorer. Objects based on classes in the second and third sections of Table 4-1 are good choices for Control Panel.
Folder | Subkey |
Control Panel | ControlPanel\NameSpace |
Desktop | Desktop\NameSpace |
My Computer | MyComputer\NameSpace |
My Network Places | NetworkNeighborhood\NameSpace |
Remote Computer | RemoteComputer\NameSpace |
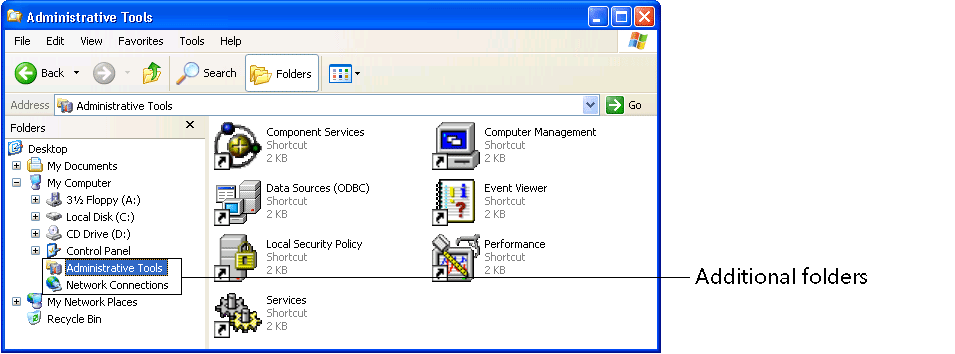
Figure 4-3 By editing the registry, you can reorganize the contents of Windows Explorer.
Hiding Desktop Icons
In earlier versions of Windows, you removed icons from the desktop by removing their subkeys from the key NameSpace. This often caused problems, especially when removing the Network Neighborhood icon from the desktop.
Windows makes a special provision for hiding desktop icons. You remove icons from the desktop or from My Computer by editing in HKLM or HKCU the branch SOFTWARE\ Microsoft\Windows\CurrentVersion\Explorer. To hide icons in My Computer, add a REG_DWORD value to HideMyComputerIcons. The name will be the class ID of the icon you want to hide. Then set the value to 0x01. Refresh Windows Explorer to see your changes.
Hiding desktop icons is a bit more complicated. In HideDesktopIcons, you see two subkeys: ClassicStartMenu and NewStartPanel. The first subkey determines which icons to hide when Windows is using the classic Start menu. The second determines which icons to hide when Windows is using the new Start menu. Add a REG_DWORD value named for the icon's class ID to either subkey to hide it in that view. Set the value to 0x01. For example, to hide the Recycle Bin icon when the new Start menu is in use, create a REG_DWORD value called {645FF040-5081-101B-9F08-00AA002F954E} in the subkey HideDesktopIcons\NewStartPanel, and then set it to 0x01. Click the desktop, and then press F5 to refresh.
TIP
When adding a class ID to HideMyComputerIcons or HideDesktopIcons, use the default value of that subkey to remind you which icon you're hiding. Windows doesn't use this subkey's default value, so using the icon's name in it will help you figure out which subkey to remove in order to show that icon. For example, you can add notes to the default value of the HideDesktopIcons key to indicate which values belong to the different icons.
EAN: 2147483647
Pages: 186