Regedit
Regedit
With all its power, Regedit is still a simple program with a straightforward user interface. Its few menus are simple. It has a status bar that displays the name of the current key. Its window contains two panes, split by a divider that you can drag left or right to change the size of both panes. (If you double-click the divider, the column will automatically resize so the longest value is displayed.) On the left is the key pane; on the right is the value pane. As discussed in Chapter 1, “Learning the Basics,” the key pane displays the registry's keys and subkeys, analogous to folders and subfolders in Windows Explorer. This is the registry's hierarchy. The value pane displays the settings that each key contains. Click a key in the key pane, and you see that key's values in the value pane. Again, this is so similar to Windows Explorer that if you know how to use one, you probably can easily use the other. Figure 2-1 is a snapshot of Regedit.
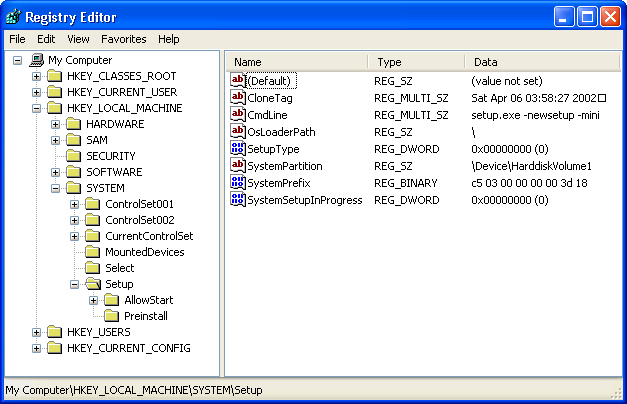
Figure 2-1 Regedit is much easier to use when you maximize its window, which helps you see the full names of subkeys and each value's data in its entirety.
Regedit saves its settings every time you close it. The next time you start Regedit, the window will open to its last position, and the window and panes will be the same size. The columns will also be the same size. Regedit reselects the last key that you selected. Sometimes, though, you won't want Regedit to use these settings—when, for example, you're writing a book about the registry and are capturing screens. Chapter 11, “Scripting Registry Changes,” shows you how to prevent Regedit from highlighting the last key: you create a script that automatically removes the key HKCU\Software\Microsoft\Windows\CurrentVersion\Applets\Regedit. (You can't just remove this key using Regedit, though, because Regedit creates this key each time you close it, and it will use the current settings to do so.)
The following sections describe each pane in more detail, including special tips for working on each side of Regedit's window.
Key Pane
The key pane displays the registry's hierarchy. It is organized much like an outline, with each key's child keys, or subkeys, indented immediately below it. At the top, you see My Computer, which represents the local computer. When you connect to another computer's registry over the network, you see that computer's name at the top level of the key pane, too. Immediately under My Computer, you see each of the local registry's root keys. Following each root key are its subkeys. The term branch refers to a key and all its subkeys.
Click the plus sign (+) next to a key to expand that branch. Click the minus sign (–) next to a key to collapse that branch. Click any key to see its values in the value pane. You can use the mouse to explore the registry, but using the keyboard is much more efficient when you know the keyboard shortcuts that are available. Table 2-1 describes the keyboard shortcuts that you can use. Of all the shortcuts available, I use the RIGHT Arrow and Left Arrow keys the most. These are quick ways to move around the registry while expanding and collapsing entire branches at the same time. The other shortcut I find most helpful is CTRL+F, which quickly opens the Find dialog box.
Key | Description |
Searching | |
CTRL+F | Opens the Find dialog box |
F3 | Repeats the last search |
Browsing | |
Keypad + | Expands the selected branch |
Keypad – | Collapses the selected branch |
Keypad * | Expands all the selected branch's subkeys |
UP ARROW | Selects the previous key |
DOWN ARROW | Selects the next key |
LEFT ARROW | Collapses the selected branch if it's not collapsed; otherwise, selects the parent key |
RIGHT ARROW | Expands the selected branch if it's not already expanded; otherwise, selects the key's first subkey |
HOME | Selects My Computer |
END | Selects the last key that's visible in the key pane |
PAGE UP | Moves up one page in the key pane |
PAGE DOWN | Moves down one page in the key pane |
TAB | Moves between the key and value panes |
F6 | Moves between the key and value panes |
Other | |
DELETE | Deletes the selected branch or value |
F1 | Opens Regedit's Help |
F2 | Renames the selected key or value |
F5 | Refreshes the key and value panes |
F10 | Gives focus to Regedit's menu bar |
SHIFT+F10 | Opens the shortcut menu for the selected key or value |
ALT+F4 | Closes Regedit |
As you learned in Chapter 1, “Learning the Basics,” Windows stores different parts of the registry in different hive files (files containing portions of the registry). Regedit displays all the hive files together to show a single, unified registry. In Regedit, you can see when a branch is its own hive because its name is capitalized. For example, all the subkeys under HKLM are hives, so their names are capitalized. You find each subkey's hive file in %SystemRoot%\System32\config. Notice in Figure 2-1 that all the subkeys under HKLM are capitalized, because they are also hives. You find most of those hive files in %UserProfile%\NTUSER.DAT. When you change a value in Regedit, Windows updates the appropriate hive file. While you're editing, you don't really care which hive file a particular setting belongs to, though. Refer back to Chapter 1 if you need a refresher on how Windows stores the registry on disk.
Value Pane
The value pane displays the selected key's values. In this pane, you see three columns: Name, Type, and Data. You can change the size of each column by dragging the dividers left or right. I typically use about half the pane to display the Name and Type columns and the remainder of the pane to display the Data column. Each row contains a single value. The first value in the value pane is always (Default), which is the key's default REG_SZ value.
For more information about default values, see Chapter 1, “Learning the Basics.”
The value pane displays the name, type, and data for each value. The Name column contains the value's name. Next to the name, you see one of the icons in Table 2-2 that indicates the value's type: string or binary. The Type column indicates the type of data in that value. Unlike earlier versions of Regedit, the current version properly displays all the different data types that Windows supports in the registry, and you can edit most of them. That includes not only REG_SZ, REG_DWORD, and REG_BINARY, but also REG_EXPAND_SZ, REG_MULTI_SZ, and so on. The Data column displays the value's contents. You'll easily recognize REG_DWORD and REG_SZ values in this column, but REG_BINARY and other types of values are much more difficult to view in their entirety. To get a better glimpse of binary values, click the View menu, and then click Display Binary Data.
Icon | Description |
| Binary values, including REG_DWORD and REG_BINARY |
| String values, including REG_SZ and REG_MULTI_SZ |


EAN: 2147483647
Pages: 186