Applying a Plug-In to a File
As noted at the very beginning of this chapter, plug-ins generally work in limited ways, enabling you to open or save files in different formats or to apply custom filters to an image. This section shows an example of using a filter that falls into each category.
Applying by Opening or Saving
If a filter enables you to use Photoshop to work with files of different formats, the filter typically adds the format into the Files of Type list of the Open dialog box or the Format list of the Save As dialog box. The following steps show one example ”using a filter that enables you to save files in the Windows icon format (.ico). Before you begin the steps, be sure you open the file to which you want to apply the plug-in.
| Note | In other cases, plug-ins that work with file formats appear on the Import or Export submenus of the File menu. |
-
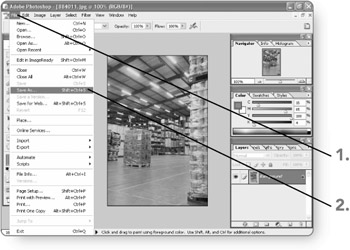
Click on File . The File menu will appear.
-
Click on Save As . The Save As dialog box will open.
-
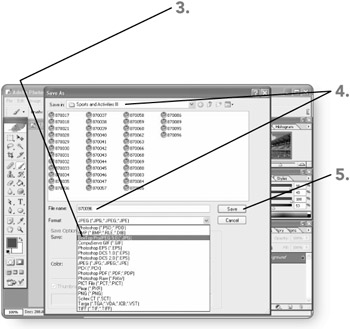
Click on the down arrow beside the Format drop-down list and then click on the file format provided by the plug-in (in this case, BoxTop ProJPEG 5.0). The selected format will be used for the save operation.
-
Change the File name and Save in location , if necessary. The newly saved file will use the name and location you specify.
-
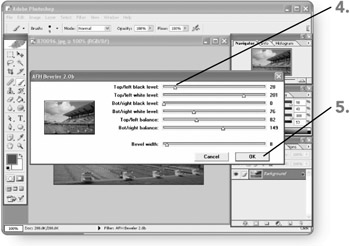
Click on Save . The Save As dialog box will close, and one of two things will happen. Either the file will be saved immediately in the new format, or a dialog box for the plug-in will appear to prompt you to specify additional settings for the saved file.
-
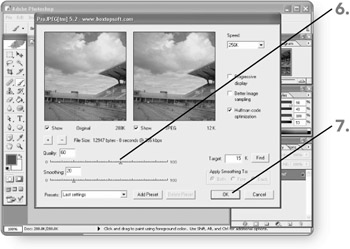
Adjust settings as necessary. In many cases, an image preview or output settings will change to show the impact of the new settings on the image file that will be created.
-
Click on OK or Save . The dialog box will close, and the image will be saved. You can then close and use the image.
Applying a Filter Plug-In
In most cases, installing a plug-in installs a new filter or group of filters. Photoshop typically adds the new filter choices or groups (submenus) to the bottom of the Filter menu, making added filters as easy to access as default filters. Like the default filters, some plug-in filters will display a dialog box prompting you to choose additional settings, whereas others will take effect immediately. The following steps show an example of a freeware plug-in filter.
-
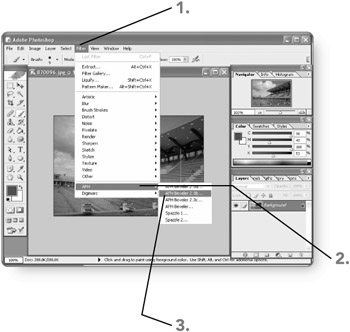
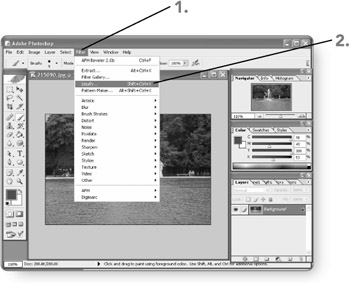
Click on Filter . The Filter menu will appear.
Note As with other commands and effects in Photoshop, many filters require that an image be using a particular color mode. For example, the image shown here had to be converted to RGB color at 8 bits per channel before the plug-in filter could be used.
-
Point to the name for the filter group, if necessary. The group submenu will appear.
-
Click on a filter . The filter will appear, or the filter dialog box will open.
-
Adjust filter settings as necessary. Either a preview area in the filter dialog box or the image window itself will preview the filter changes.
-
Click on OK . Photoshop will apply the filter settings to the image.
Using the Liquify Plug-In
The Liquify plug-in appears as a standalone command (rather than as part of a submenu) on the Filter menu. The Liquify plug-in offers a variety of settings for distorting and manipulating an image. The Turbulence tool represents one new enhancement to this filter, enabling you to place distortion along with a "jitter" effect. You can view a mesh that illustrates the distortion as well. The following steps illustrate some of the basics for working with this important plug-in.
-
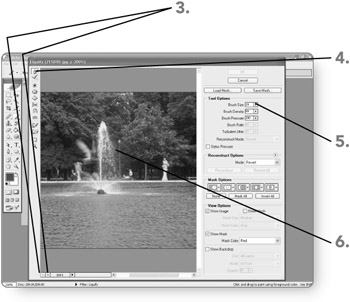
Click on Filter . The Filter menu will appear.
-
Click on Liquify . The Liquify dialog box will open.
-
Adjust the zoom setting for the image, if necessary. The image will appear at the new zoom.
-
Click on the desired tool . The tool will be selected. In this example, the Turbulence tool is selected.
-
Adjust the tool options as needed. The mouse pointer will change in size or appearance accordingly when you move the pointer over the image.
-
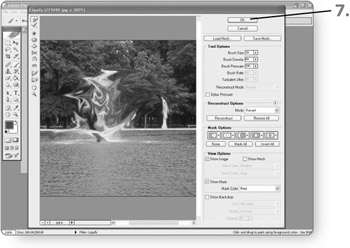
Drag on the image at the desired location(s). The image will be distorted according to the selected tool, its settings, and the amount of dragging.
-
Click on OK . The Liquify dialog box will close, and the image will appear with its new distortion in Photoshop.
EAN: 2147483647
Pages: 179