IIS Web Roots and Applications
An ASP.NET application consists of a collection of resources such as configuration information, global application files, compiled components , and other ASP.NET resources (pages, web services, and so on). These applications are defined using IIS application roots in the same manner as classic ASP. By default, the root directory of a web site in IIS is an application root . This is the root level of a particular web site. For example, on a default Windows 2000 IIS 5.0 installation, the root directory of the default web site is http://localhost/ or http://< servername >, while the physical path of the root directory is C:\Inetpub\ wwwroot .
An application root is the starting point of an ASP.NET application and contains resources like the global.asax file and the \bin directory. We will discuss these in detail later in this chapter.
We can create applications in IIS by using the IIS Microsoft Management Console ( MMC ) snap-in. Alternatively, both Visual Studio .NET and the command line scripts included with IIS can be used to create web applications.
Let's look at two of the most common ways of creating an application:
-
Create a new web site: By default, the root directory of the web site will be an application root.
-
Mark a folder (virtual or physical) as an application: The root of the folder will be defined as an application root.
The IIS MMC displays both physical and virtual directories:
-
A physical directory lives within the web site, for example, C:\Inetpub\wwwroot\Wrox\ , where C:\Inetpub\wwwroot\ is the physical directory and Wrox is a directory beneath it. This appears on the web server as http://localhost/Wrox/ .
-
A virtual directory is an alias that points to a physical directory on the server. It appears as a directory in the web site, but it exists in a separate physical path. For example, C:\Wrox\ appears to be a directory available through the server as http://localhost/Wrox/ . This is in fact a virtual directory, since C:\Wrox\ 's physical path is obviously not part of the root directory of our web site. For this reason, virtual directories are very useful, since multiple virtual directories can point to a common set of files or live on the same file share. Virtual directories also hide the actual path of the files on the server from a user , and hence increase security.
Although we will go through the steps of creating both virtual directories and IIS applications, this is only necessary if you want to create ASP.NET applications in directories other than the web root directory, (usually C:\Inetpub\wwwroot\ ), as the web root is, by default, an application root. Most likely, you will be creating applications that are part of an existing site. For example, to host the HR site for your company, you'd have separate applications defined for Benefits, Claims, Hiring, and so on.
Let's walk through creating a virtual directory and an IIS application.
Creating IIS Virtual Directories
Let's say you have a physical directory, C:\Wrox\ , and want to expose that directory as a virtual directory in the web root of your web site, for example http://localhost/Wrox.
To create a virtual directory you need to use the IIS MMC, available from Start Programs Administrative Tools Internet Services Manager, or by selecting Start Run and then typing inetmgr. You will get a screen similar to Figure 12-1:
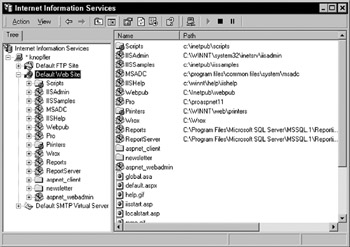
Figure 12-1:
To create the Wrox virtual directory in the Default Web Site (highlighted), rightclick on Default Web Site and select New Virtual Directory. This opens the Virtual Directory Creation Wizard, where you need to go through the following steps:
-
When the wizard opens, select Next to get past the opening screen. You will then be asked for the alias to use with the virtual directory. For this example, enter Wrox, but this can be anything you like “ you are not restricted to using the same name as the physical directory.
-
You are then asked for the path to an existing directory to use as a virtual directory. Enter C:\Wrox ( assuming you have already created it).
-
Next, you're asked for the access permissions for the directory. The only required selections are Read and Run scripts (such as ASP). These defaults already selected by default.
-
Finally, you are told that the virtual directory has been created. Press the Finish button to exit the wizard.
Now, if you view the available folders in Default Web Site, you will find a folder named Wrox . There are three types of icons next to folders in the root of this web site:
-
Normal explorer-style folders: For example, if FrontPage server extensions are installed, you will see folders named _vti_cnf , _vti_log , and so on. These folders exist as physical directories on the web server.
-
Normal explorer-style folders with small globes in the bottom right corner :These are virtual directories. Some common virtual directories include Scripts and _vti_bin .
-
Web application folders: These folders are represented by a package icon. Any virtual or physical directory on our server can be converted to a web application. By default, the virtual directories we create are web application folders.
So, the Wrox virtual directory that you just created is a web application as well. The fact that it is a web application takes precedence over it being a virtual directory, so it is represented by a package icon, as shown in Figure 12-2:
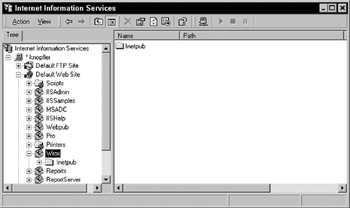
Figure 12-2:
Marking a Folder as an Application
Instead of creating the Wrox directory as C:\Wrox and marking it as a virtual directory, you could have created a directory C:\Inetpub\wwwroot\Wrox . Wrox is then a physical directory for the Default Web Site.
| Important | The default directory of the Default Web Site is C:\Inetpub\wwwroot\. |
C:\Inetpub\wwwroot\Wrox is a physical directory. Therefore, to use it as an ASP.NET application root, you will have to manually mark it as an application. You can do this by right-clicking on any virtual or physical folder in any IIS web site and selecting Properties.
This brings up a properties dialog for that folder and is shown in Figure 12-3:

Figure 12-3:
This displays the settings for the Wrox folder, the Local Path value, and the permissions that the folder allows. In this case, the default permissions of Read, Log visits , and Index this resource are set.
The lower half of the dialog box is the Application Settings section . This is of interest, because these settings enable the physical directory as a web application. To do this, press the Create button. This changes some of the settings in the Application Settings section, as shown in Figure 12-4:
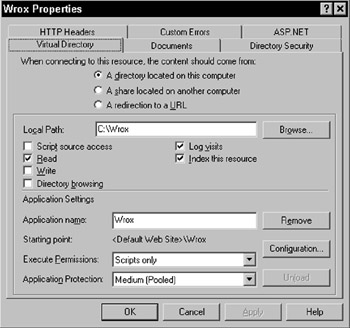
Figure 12-4:
The Application name value has changed from Default Application (the name of the parent web application for this folder) to Wrox. The Starting point value has changed from <Default Web Site> to <Default Web Site>\Wrox, again noting that the application has changed. For simplicity, we will skip over the smaller, unimportant changes, except to note that the Create button has now become a Remove button.
| Important | For more detailed information on what the remaining options within the Properties dialog do, please see the Internet Information Server documentation, as they do not relate to further discussions of ASP.NET in this chapter. The only exception is mapping custom extensions to ASP.NET, covered later in the Advanced Topics section. Users familiar with the Application Protection settings should note that these do not affect ASP.NET, since that runs in its own process, which is separate from IIS. Please see the IIS documentation for more information on this option. |
Finally, click Apply and then OK. The Wrox folder is now an application root, just as it was when you created it as a virtual directory.
Removing the Application
Removing a web application is just as simple, if not easier than creating it. Right-click on a folder marked as an application and select Properties. Within the Application Settings section of the dialog, click the Remove button, then select Apply and OK. In the Tree view of the Default Web Site, you will now see the standard virtual or physical folder icon for Wrox.
| Note | When we remove the application, we are simply changing a configuration option in IIS. Removing the application does not delete any associated files. |
Windows Server 2003
ASP.NET 1.1 ships with Windows Server 2003. Windows Server 2003 also includes the latest version of Internet Information Server (IIS) version 6.0. IIS 6.0 and ASP.NET 1.1 are designed to integrate seamlessly and ASP.NET now defaults to the new IIS 6.0 worker process model.
Installing IIS 6.0 and ASP.NET 1.1
ASP.NET 1.1 is not installed by default, nor is IIS. To install ASP.NET you will need to either run the Configure Your Server Wizard or manually install IIS and ASP.NET.
The Configure Your Server Wizard
To use the Configure Your Server Wizard select Configure Your Server from the Administrative Tools group . The first two screens include a welcome screen and an overview of what the Wizard does. On the third screen shown in Figure 12-5, you have the option of picking a Server Role:
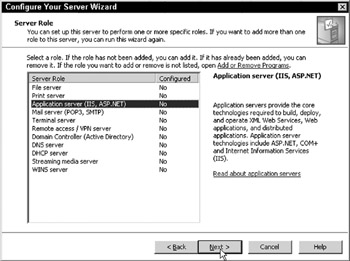
Figure 12-5:
Selecting a Server Role will instruct Windows Server 2003 to configure and optimize your server for a specific task, such as an Application server for running IIS and ASP.NET. In this case, select Application server (IIS, ASP.NET) and then click Next. The next screen gives you the option to install FrontPage Server Extensions and ASP.NET. Make sure the Enable ASP.NET checkbox is checked before clicking Next.
The wizard will take you through some more screens. After the wizard has completed, both IIS 6.0 and ASP.NET 1.1 will be installed on your server.
Installing IIS and ASP.NET Manually
To install IIS and ASP.NET without using the Configure Your Server Wizard, open the Control Panel and select Add/Remove Windows Components. The Windows Components Wizard opens; see Figure 12-6:
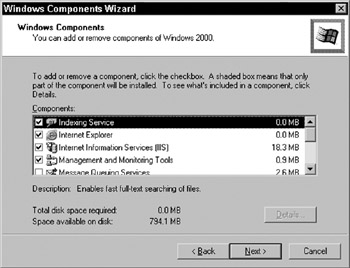
Figure 12-6:
Select the Application Server option and then click the Details button. When the Details dialog is displayed, check ASP.NET. Press OK to close the dialog. The selected components are now installed.
Configuring IIS 6.0 for ASP.NET
There are several recommended changes you should make to IIS 6.0 before running ASP.NET applications:
-
Configuring worker process memory limits.
-
Configuring worker process recycling.
Configuring Worker Process Memory Limits
The ASP.NET 1.0 worker process model placed a limit upon how much memory the worker process was allowed to use “ 60%. ASP.NET 1.1 uses the new IIS 6.0 process model, which defaults to no fixed limit. This can cause problems for ASP.NET applications. For example, if your application uses the Cache extensively, the Cache's scavenging algorithm will never kick in, because the process will never report that it is memory constrained. We recommend that you configure the IIS 6.0 worker processes to work within a memory limit based on the available memory in your server.
To configure the memory limits, open Internet Information Server Manager (from the Administrative Tools menu) and expand the new Application Pools node, shown in Figure 12-7:

Figure 12-7:
Next, right-click on items within the application pool (if you are only using one application pool, this will be DefaultAppPool) and select Properties. This brings up the property dialog, shown in Figure 12-8:
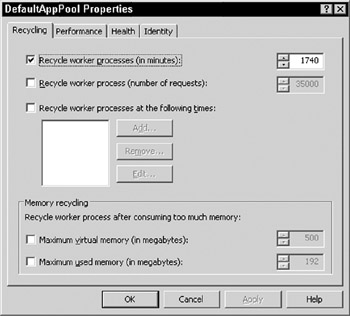
Figure 12-8:
Check Maximum used memory (in megabytes) and set the value to 60 percent of the physical memory (or less, depending upon how you want your server configured). We recommend that the value never be larger than 800MB when using a 2 GB address space. However, if you have 3GB of addressable memory, you can set the limit to as high as 1,800MB.
Configuring Worker Process Recycling
Worker process recycling is different for the IIS 6.0 worker process model. The IIS 6.0 worker process is automatically configured to recycle the process every 29 hours. This is much too aggressive for an ASP.NET application and the ASP.NET team recommends that the automatic worker process recycling feature of IIS 6.0 be disabled.
To disable worker process recycling, follow the same steps for configuring worker process memory limits to view the properties of an Application Pool. By default, the Recycle worker process (in minutes): is checked. Simply uncheck this option and click OK.
For more information on running ASP.NET 1.1 and IIS 6.0 together, please review the Running ASP.NET 1.1 and IIS 6.0 article at http://www.asp.net/faq/AspNetAndIIS6.aspx.
Now that you have had a quick overview of creating a web application in IIS as well as using IIS 6.0 on Windows Server 2003, let's look at how this is related to ASP.NET.
EAN: 2147483647
Pages: 243