Interoperability
No matter how much you'd like to do all your coding in .NET, you have to face reality. There is an enormous amount of traditional ASP and COM code being used, and businesses cannot afford to just throw that away. The success of MTS/COM+ Services as a middle- tier business object layer has led to a large number of COM objects being used as data layers , abstracting the data management code from the ASP code. With .NET, Microsoft has provided good interoperability for several reasons:
-
To preserve existing investment :Compatibility with existing applications means you can continue to use existing code, as well as preserve your existing investment.
-
Incremental migration :There is no need to migrate everything at once if your new code can exist alongside other applications.
-
Some code will never change :There is probably plenty of code where the investment, time, or skill to migrate is not available.
Although .NET is independent from COM, Microsoft realized the need for interoperability, and provided ways to use COM objects from within .NET, and also .NET components from within COM. They've realized that there had to be a way to call down to the Windows API, for those that need to.
This chapter gives an introduction into the interoperability issues. For a detailed look consult the book Professional Visual Basic Interoperability - COM and VB6 to .NET , ISBN 1 -861005 -65 -2, by Apress.
| Note | This chapter uses the term COM as a generic term for COM and COM+ purely to improve legibility. |
Crossing the Boundary
You know that .NET code is managed by the CLR, and that COM code is not, so there has to be some way to cross the managed/unmanaged code boundary. This is one of the major problems is the conversion of data types, but the CLR handles this for us, as shown in Figure 23 -1:
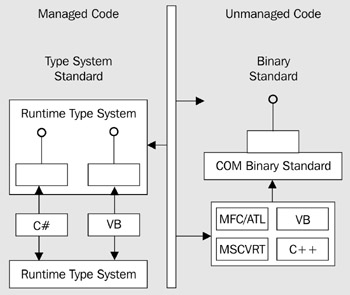
Figure 23-1:
When crossing this boundary you have to think about the differences between the two systems. Architecturally, these are:
| Unmanaged Code has | Managed Code has |
|---|---|
| Binary standard | Type standard |
| Type libraries | Meta data |
| Immutable types | Version binding |
| DLL hell | Versioned assemblies |
| Interface based | Object based |
| HResults | Exceptions |
| GUIDS | String names |
Additionally, the programming differences are as follows :
| Unmanaged Code has | Managed Code has |
|---|---|
| CoCreateInstance | new operator |
| QueryInterface | Cast operator |
| Reference counting | Memory management and garbage collection |
| GetProcAddress | Static methods |
The unmanaged way of doing things doesn't affect ASP or ASP.NET, but does affect those of you who also write COM and use components.
Data Type Marshalling
When you cross the managed/unmanaged boundary, the wrappers automatically perform data type mapping for you. So, although you don't need to know how this works, it's useful to see what language types map to in .NET. There are two kinds of data types as far as marshalling goes:
-
Blittable types :These are the same on both sides of the boundary, and therefore don't need any conversion.
-
Non-Blittable types :These are different on either side of the boundary, and therefore require conversion.
The following table details the pre-.NET data types, and what they map into in .NET:
| C++ | Visual Basic 6 | .NET | Blittable |
|---|---|---|---|
| signed char | Not supported | SByte | Yes |
| unsigned char | Byte | Byte | Yes |
| short | Integer | Short | Yes |
| unsigned short | Not supported | UInt16 | Yes |
| int | Long | Integer | Yes |
| unsigned int | Not supported | UInt32 | Yes |
| __int64 | Not supported | Long | Yes |
| unsigned __int64 | Not supported | UInt64 | Yes |
| float | Single | Single | Yes |
| double | Double | Double | Yes |
| BSTR | String | String | No |
| BOOL | Boolean | Boolean | No |
| VARIANT | Variant | Object | No |
| IUnknown | object | UnmanagedType . IUknown | No |
| DATE | Date | Date | No |
| CURRENCY | Currency | Decimal | No |
| __wchar_t | Char | Char | Yes |
| void | Not supported | Void | Yes |
| HANDLE | Long | IntPtr | Yes |
Simple arrays (single dimensional arrays of blittable types) are themselves defined as blittable types.
Custom Type Marshalling
For blittable types, the marshaller always knows both the managed and unmanaged type, but this isn't so for non-blittable types (such as strings or multi-dimensional arrays). By default the following conversion takes place:
| Managed Type | Unmanaged Type |
|---|---|
| Boolean | A 2 or 4 byte value ( VARIANT_BOOL or Win32 BOOL ); True being 1 or “1. |
| Char | A Unicode or ANSI char (Win32 CHAR or CHAR ). |
| String | A Unicode or ANSI char array (Win32 LPWSTR / LPSTR ), or a BSTR . |
| Object | A Variant or an interface. |
| Class | A class interface. |
| Value Type | Structure with fixed memory layout. |
| Array | Interface or a SafeArray . |
For non-blittable types, you can specify how they are marshalled across the boundary. This is really beyond the scope of this book, but is well detailed in the .NET SDK help file, under Programming with the .NET Framework, Interoperating with Unmanaged Code, and Data Marshalling.
HRESULTS
In Windows, the standard method of handling errors is via the use of HRESULTS . When crossing the boundary to .NET these are automatically converted to exception s, with the HRESULT details being stored as part of the exception object . This means you can use COM objects without sacrificing the structured exception handling in .NET. For this to work the COM object must support the ISupportErrorInfo and IErrorInfo interfaces.
Using COM Objects from .NET
Using COM components from .NET is extremely simple, as there is a tool that takes a COM component or type library and creates a managed assembly (a callable wrapper) to manage the boundary transition for you. Figure 23-2 shows how this wrapper is used:
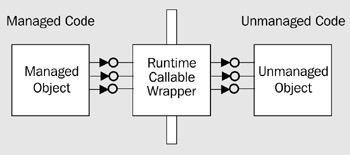
Figure 23-2:
From the programming perspective all you have to do is call methods and access properties as you would with the COM component. The difference is that you'll be calling the wrapper class, which will take the .NET types, convert them to COM types, and call the COM interface methods. The CLR maintains the reference to the COM object, so COM reference counting works as expected, while also providing the simplicity of garbage collected references for the .NET usage of the object.
There are several ways in which you can generate the wrapper class:
-
Adding a reference in Visual Studio .NET
-
Using the type library import tool
-
Using the type library convert class
-
Creating a custom wrapper
Of these, the first two are by far the easiest .
Using Visual Studio .NET
In Visual Studio .NET all you have to do is create a reference to the COM object, and the wrapper class is created for you. First, select References from the Solution Explorer, and then pick Add Reference , as shown in Figure 23-3:
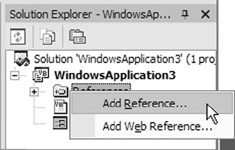
Figure 23-3:
Then, from the dialog that appears, select the COM tab, and pick your COM object, as shown in Figure 23-4:
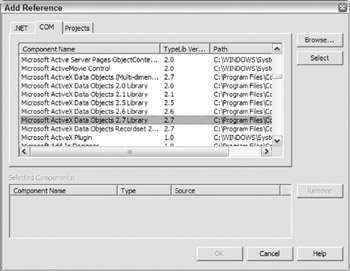
Figure 23-4:
Once you've clicked Select and then OK, the reference is added. The wrapper class (in this case it would be ADODB.dll ) is placed in the bin directory of the application.
The Type Library Import Tool
If you don't have Visual Studio .NET (or are a die-hard Notepad user ) then you can use the type library import tool to create the wrapper class for you. The syntax is:
tlbimp TypeLibrary [ Options ] where Options can be:
| Option | Description |
|---|---|
| /out: FileName | The filename of the wrapper assembly to create. |
| /namespace: Namespace | Namespace of the assembly to be produced. |
| /asmversion: version | Version number of the assembly to be produced. |
| /reference: FileName | Assembly filename used to resolve references. This can be specified multiple times for multiple references. |
| / publickey : FileName | Filename containing the strong name public key. |
| / keyfile : FileName | Filename containing the strong name key pair. |
| /keycontainer: FileName | Key container holding the strong name key pair. |
| /delaysign | Force strong name delay signing. |
| /unsafe | Produce an interface without runtime security checks. |
| /nologo | Don't display the logo. |
| /silent | Don't display output, except for errors. |
| /sysarray | Map COM SafeArray to the .NET System.Array class. |
| /verbose | Display full information. |
| /primary | Produce a primary interop assembly. |
| /strictref | Only use assemblies specified with /reference . |
By default the output name will be the same as the COM type library, not the filename. For example:
tlbimp msado15.dll will produce a wrapper assembly called ADODB.dll , not msado15. dll. The resulting assembly can then be copied into the application bin directory (or installed in the Global Assembly Cache), and referenced as with other .NET assemblies:
<%@ Import Namespace="ADODB" %> The Type Library Convert Class
The System.Runtime.InteropServices namespace contains a class called TypeLibConverter , which provides methods to convert COM classes and interfaces into assembly meta data. This is really only useful if you are building tools that examine COM type libraries at runtime, and is outside the scope of this book.
Custom Wrappers
If your COM component doesn't have a type library then it's possible to create a custom wrapper that directly calls the COM component. This is outside the scope of the book, but for more information, see the topics "Programming with the .NET Framework", "Interoperating with Unmanaged Code", and "Customizing Standard Wrappers" in the SDK help file.
Using the Wrapper Assembly
Using the wrapper assembly is simply a case of treating it like any other managed assembly. For example, if you import the ADO namespace, you can use it in your ASP.NET pages like so:
<%@ Import Namespace="ADODB" %> <html> <script language="VB" runat="server"> Sub Page_Load(Sender As Object, e as EventArgs) Dim rs As New ADODB.Recordset rs.Open("publishers", "Provider=SQLOLEDB; Data Source=.; " & _ "Initial Catalog=pubs; User Id=sa") While Not rs.EOF Response.Write(rs.Fields("pub_name").Value & "<br/>") rs.MoveNext() End While rs.Close End Sub </script> </html>
Deploying Applications That Use COM
However great the COM interoperability story is, it doesn't get around the fact that COM components need to be registered. This is not a fault of .NET, more an issue of the way COM works, and you don't need to do anything other than the standard COM registration. However, the big problem this causes is with the xcopy deployment model, for which it isn't suitable. You can still xcopy the deployment, but you'd need to provide some form of script to register the COM components before the application is activated.
Using .NET Components from COM
The interoperability story doesn't end with using COM code in .NET, as the reverse is also possible. This allows the new language and class features to be used, but without getting rid of old applications. The workings of the wrapper class are shown in Figure 23-5 “ it marshals the COM calls through to the managed object:
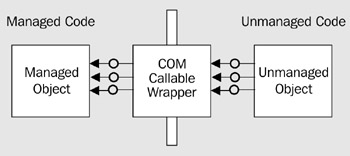
Figure 23-5:
The story is very similar to its opposite that was just examined, as COM type libraries are created for the .NET assemblies. The difference is that there's slightly more work, as you have to explicitly decide which interfaces and methods you want exposed to COM. This is a crucial point, because for .NET components to be available in COM they have to have an Interface (see Chapter 3 for more details on Interfaces), and there are two ways to have this exposed “ manually or automatically. Manually Created Interfaces
Manually creating interfaces means you use the language features to explicitly declare the interface. For example, consider a Person class with two properties ( FirstName and LastName ) and one method ( FullName ). The interface and class in Visual Basic .NET could be defined as follows:
Public Interface IPersonVB Property FirstName() As String Property LastName() As String Function FullName() As String End Interface Public Class PersonVB Implements IPersonVB Private _firstName As String Private _lastName As String Public Sub New() ' default constructor required for interop End Sub Public Property FirstName() As String Implements IPersonVB.FirstName Get FirstName = _firstName End Get Set _firstName = value End Set End Property Public Property LastName() As String Implements IPersonVB.LastName Get LastName = _lastName End Get Set _lastName = value End Set End Property Public Function FullName() As String Implements IPersonVB.FullName Return _firstName & " " & _lastName End Function End Class
One thing to notice is that the class must have a public default constructor. In C#, the interface and class could be defined as follows:
public interface IPersonCS { string FirstName{get; set;} string LastName{get; set;} string FullName(); } public class PersonCS : IPersonCS { private string _firstName; private string _lastName; // default constructor required for interop public PersonCS() {} public string FirstName { get { return _firstName; } set { _firstName = value; } } public string LastName { get { return _lastName; } set { _lastName = value; } } public string FullName() { return _firstName + " " + _lastName; } }
Automatic Interfaces
The alternative approach is to use the Interop Services attributes to have an interface automatically created from the class. To do this you must use the InteropServices namespace, and then add an attribute in front of the class. This attribute will be one of the ClassInterfaceType attributes, which can be one of:
| Attribute | Description |
|---|---|
| None | No class interface is generated for the class. Using COM QueryInterface for IDispatch will fail. An interface needs to be manually created. |
| AutoDispatch | An interface that supports IDispatch is created for the class. However, no type information is produced, so DispIds cannot be cached. |
| AutoDual | A dual interface is created for the class. Typeinfo is produced and made available in the type library. |
The use of this attribute form in Visual Basic .NET is as follows:
Imports System.Runtime.InteropServices <ClassInterfaceAttribute(ClassInterfaceType.AutoDual)> _ Public Class PersonVB
And in C#, it is:
using System.Runtime.InteropServices; [ClassInterfaceAttribute(ClassInterfaceType.AutoDual)] public class PersonCS
| Note | The attribute can also be applied to the assembly, whereby it affects all classes within it. |
In addition to the ClassInterfaceAttribute , there are others that control how various parts of the assembly are exposed to COM. For example, the attribute GuidAttribute allows you to specify the GUID of the exposed item (class, interface, or assembly), and ComVisibleAttribute can be used to hide .NET types from COM.
| Note | Attributes that relate to the marshalling of data are covered in the API Calls section, a little later in the chapter, while the others are fully covered in the SDK help, under "Programming with the .NET Framework", "Interoperating with Unmanaged Code", "Exposing .NET Framework Components to COM", and "Applying Interop Attributes". |
Which Interface Method to Use
You've seen that there are three forms of interface creation, and each has its own advantages and disadvantages. The real problem that arises is that of versioning “ as COM interfaces are immutable, and .NET has the ability to bind to version interfaces. So, the type of interface you expose to COM depends on how your .NET components are going to change over time. For example, consider the following code blocks.
In Visual Basic .NET:
Public Class A Public Sub Foo() End Sub End Class Public Class B Inherits A Public Sub Foo() End Sub End Class
In C#:
public class A { public void Foo(){} } public class B : A { public void Foo(){} }
Since class interfaces do not support versioning, consider what happens if class A is updated to version 2 by adding a new method. Managed users of the class are unaffected, but for unmanaged users of either class A or class B the code will break. This affects both early-bound clients (who rely on the layout of the class interface being immutable) as well as late-bound clients (who use DispIds , which change between versions). So, there are great dangers in exposing class interfaces.
By and large the safest option is for the manual creation of interfaces “ although it involves more work, you get complete control over the interface. The pros and cons of each method are explained in the following sections.
ClassInterfaceType.None and Manual Interface
Its advantages are as follows:
-
There are no versioning problems because users can only call through explicitly created interfaces.
-
The class author has full control over versioning of the class.
Its disadvantages are as follows:
-
More work, as the interface has to be created manually for each class.
-
No scripting support.
-
Less design time support from some RAD tools.
ClassInterfaceType.AutoDispatch
Its advantages are as follows:
-
No versioning problems because classes only support late binding, but without caching DispIds .
-
Does not require user to create separate interface for each class.
-
Supports scripting.
Its disadvantages are as follows:
-
More work for class user.
-
Less support in Visual Basic, as everything must be of type Object .
-
Slower.
ClassInterfaceType.AutoDual
Advantages:
-
No extra work for class author or user.
-
Easy to use from all COM clients.
Disadvantage :
-
Does not support versioning at all. Any class changes will break COM clients.
Exporting the Type Library
Once the .NET assembly has been created, you need to create a COM type library so that COM clients can set references to the classes. This is done using the Type Library Export tool, the syntax of which is:
tlbexp AssemblyName [ Options ] where Options can be:
| Option | Description |
|---|---|
| /out: FileName | The filename of the type library to create. |
| /names: FileName | Use the specified file to specify capitalization of names in the type library. |
| /nologo | Don't display the logo. |
| /silent | Don't display output, except for errors. |
| /verbose | Display full information. |
For example, if the Person class were compiled into a Person.dll assembly, you would use:
tlbexp Person.dll By default this creates Person.tlb .
Registering the DLL for Local Use
Once the type library is created, the class needs to be registered in the Registry. Even though it's a .NET class, which ordinarily doesn't require registration, its use with COM means the wrapper must be registered. The registration is done using the regasm tool:
regasm AssemblyName [ Options ] where Options can be:
| Option | Description |
|---|---|
| /unregister | Unregister the type. |
| /tlb[: FileName ] | Export the assembly to the specified type library, and then register it. |
| /regfile[: FileName ] | Generate a registry merge file with which the type library can be registered. |
| / codebase | Set the code base in the registry. |
| /registered | Only refer to type libraries that are already registered. |
| /nologo | Don't display the logo. |
| /silent | Don't display output, except for errors. |
| /verbose | Display full information. |
For example, the Person class could be registered with:
ragasm Person.dll You could also save on the explicit tlbexp step by doing:
regasm /tlb:Person.tlb Person.dll This creates the type library and then registers it.
Once registered, the classes can be used as if they were COM-created classes. The DLL created must be in the same directory as the application executable.
Registering the DLL for Global Use
If you wish the .NET assembly to be used in multiple applications, then it must be registered in the Global Assembly Cache (GAC). This applies not only to .NET components used from .NET, but also to .NET components used from COM.
Generating a Strong Name
Before adding assemblies to the GAC they need to be strongly named. A Strong Name consists of the assembly identity (name, version, and culture), plus a public key and digital signature. A strong name is useful for several reasons:
-
Guarantees uniqueness :Key pairs are globally unique, and no two will ever be the same.
-
Guarantees version protection :Because the key pairs include a digital signature, they ensure protection against spoofed versions of code.
-
Guarantees code integrity :The digital signature is part of the procedure that ensures code hasn't been changed since it was built.
You can create strong names with the sn utility, which has the following syntax:
sn [ -q(quiet)] Options [ parameters ] There are plenty of options (detailed in the help), but the one we are interested in is the generation of key pairs:
sn k Person.snk This generates a key pair and stores it in the file named Person.snk . The suffix can be anything, although by convention it is .snk .
At this stage the assembly doesn't know anything about the strong name. To guarantee the link between the assembly and the strong name file you need to add an attribute to the assembly. In Visual Basic .NET:
<assembly:AssemblyKeyFile("Person.snk")> _ Namespace People
And in C#:
[assembly:AssemblyKeyFile("PersonCS.snk")] namespace People
Installing in the Global Assembly Cache
Once the key pair has been constructed the assembly can be installed into the GACeither by using the:
-
Windows Installer or
-
Global Assembly Cache tool ( gacutil ).
Use the latter of these, with either the /i switch to install the assembly, or /u to uninstall the assembly. For example:
gacutil /i Person.dll or:
gacutil /u Person You can also use the /l option to list all assemblies in the cache. Alternatively, you can use the Assembly Cache Viewer (search the SDK for more information on this).
Using the .NET Component from COM
Once the .NET component is created and made available to COM (either in the application directory or the GAC), it's available for use. All you have to do is reference it in the usual way from the Project References dialog in Visual Studio. The component can then be used like so:
Dim p As New PersonVB.PersonVB p.FirstName = "Dave" p.LastName = "Sussman" MsgBox p.FullName
API Calls
The compatibility story doesn't stop with COM, as .NET provides a way to access DLLs that aren't COM based, using the Platform Invoke Services (P/Invoke) . This gives you the ability to call APIs in a manner similar to the way Visual Basic 6 does it “ by specifying the DLL and API call before it's used.
The Visual Basic .NET syntax is the same as Visual Basic 6:
Declare StringConversionType (Function Sub) _ MethodName Lib " DllName " ([ Args ]) As Type
Where:
-
StringConversionType identifies the type of conversion that takes place for strings. This can be Ansi (the default) to convert all strings to ANSI values, Unicode to convert all strings to Unicode values, or Auto to convert strings according to the .NET runtime rules.
-
MethodName is the name of the API to call.
-
DllName is the name of the DLL.
-
Args are any arguments to the API call.
-
Type is the return type of the API call.
For example:
Declare Auto Function GetSystemMetrics _ Lib "User32.dll" (nIndex As Integer) As Integer
You can place this within a class if you wish to encapsulate several API calls:
Namespace Wrox Public Class Metrics Declare Auto Function GetSystemMetrics _ Lib "User32.dll" (nIndex As Integer) As Integer End Class End Namespace
You can then call this API like so:
Dim mt As New Metrics Dim val As Integer val = mt.GetSystemMetrics(SM_CXSCREEN)
Alternatively, you can wrap the API call in a class method, giving you the option of pre- or postprocessing the data:
Namespace Wrox Public Class Metrics Declare Auto Function GetSystemMetrics _ Lib "User32.dll" (nIndex As Integer) As Integer Public Function GetMetrics(Index As Integer) As Integer Return GetSystemMetrics(Index) End Function End Class End Namespace
This approach allows you to wrap many API calls into a single class.
For C# use the DllImport attribute, using the following syntax:
[DllImport("LibraryName", CallingConvention := " CallingConvention ", _ CharSet := " CharSet ", _ EntryPoint := " EntryPoint ", _ ExactSpelling := " ExactSpelling ", _ PreserveSig := " PreserveSig ", _ SetLastError := " SetLastError ")> _ static extern FunctionName( Arguments )
The fields of DllImport are detailed in the following table:
| Field | Description |
|---|---|
| CallingConvention | Indicates the value to use when passing method arguments. This can be one of the CallingConvention enumerations: Cdecl , to use the __cdecl format, allowing the calling of functions with varargs . FastCall , to use the __fastcall format. This format is not supported by the initial release of the .NET Framework, but is included here for completeness. StdCall , to use the __stdcall format. This is the default for calling functions in unmanaged code. ThisCall , to use the this call format, for the calling of methods on classes exported from unmanaged code. Winapi , to use the default platform calling convention ( StdCall on Windows or Cdecl on Windows CE). For Win32 API calls you should use StdCall , which is the default. |
| CharSet | Indicates the character set to use for names and string passing. This can be one of the CharSet enumerations: Ansi , to marshal strings as ANSI 1 -byte characters . Auto , to automatically marshal strings appropriate to the target system. None , to indicate no specific marshalling. Unicode , to marshal string as Unicode 2 -byte characters. This also appends the letter 'A' to the EntryPoint , in convention with many Windows API calls. The default is Ansi. |
| EntryPoint | The name, or ordinal, of the entry point in the DLL to be called. |
| ExactSpelling | Indicates whether or not the name of the EntryPoint should be modified to correspond with the CharSet . The default value is False . |
| PreserveSig | Indicates whether or not the HRESULT from the API call should be converted to a managed failure. The default is True . |
| SetLastError | Indicates whether or not the GetLastError API call can be called to determine if an error occurred. The default is False . |
For many Win32 API calls you can accept the default values, for example:
[DllImport("User32.dll")] static extern int GetSystemMetrics(int nIndex);
This can be wrapped in a class to allow external use:
namespace Wrox { public class Metrics { [DllImport("User32.dll")] static extern int GetSystemMetrics(int nIndex); } }
Alternatively you can wrap the API call in a class method, giving you the option of pre- or postprocessing the data:
namespace Wrox { public class Metrics { [DllImport("User32.dll")] static extern int GetSystemMetrics(int nIndex); public int GetMetrics(int Index) { return GetSystemMetrics(Index); } } }
Using the API Class
Using this API class wrapper is just like using any other class. For example, consider the following ASP.NET page:
<%@ Import Namespace="Wrox" %> <html> <script Language="VB" runat="server"> Sub Page_Load(Sender As Object, E As EventArgs) Dim mt As New Metrics() Dim Width As Integer = mt.GetMetrics(MetricsValues.SM_CXSCREEN) Dim Height As Integer = mt.GetMetrics(MetricsValues.SM_CYSCREEN) VBScreen.Text = "VB Screen = " & Width.ToString() & " * " & _ Height.ToString() End Sub </script> <asp:Label id="Screen" runat="server"/> </html>
This displays the current screen resolution of the server. The values passed into the GetMetrics() method are defined in the class as an enum (see the Platform SDK under GetSystemMetrics for more details on these).
Type Marshalling
When dealing with API calls you often have to pass structures into the call, and the structure gets filled with the appropriate information. When doing this you need to tell the CLR how the structure is going to be arranged in memory, so that it matches the equivalent Win32 structure. Use the StructLayout attribute to do this.
For example, consider the GetSystemTime API call in Visual Basic .NET:
<StructLayout(LayoutKind.Sequential)> Public Structure SystemTime Public wYear As Short Public wMonth As Short Public wDayOfWeek As Short Public wDay As Short Public wHour As Short Public wMinute As Short Public wSecond As Short Public wMilliseconds As Short End Structure Public Class API Declare Auto Sub GetSystemTime _ Lib "Kernel32.dll" (ByRef sysTime As SystemTime) End Class
The API call could then be used like this:
Dim st As New SystemTime() Dim t As New API() t.GetSystemTime(st) Response.Write("Month = " & st.Month)
In C#, you also specify attributes on the API arguments:
[StructLayout(LayoutKind.Sequential)] public class SystemTime { public short wYear; public short wMonth; public short wDayOfWeek; public short wDay; public short wHour; public short wMinute; public short wSecond; public short wMilliseconds; } public class API { [DllImport("Kernel32.dll")] public static extern void GetSystemTime( [Out, MarshalAs(UnmanagedType.LPStruct)]SystemTime sysTime) }
The API call could then be used like this:
SystemTime st = new SystemTime(); API.GetSystemTime(st) Response.Write("Month = " + st.Month);
Marshalling Attributes
The StructLayout attribute determines how the CLR aligns the members of a class, allowing them to line up with their unmanaged equivalent. The possible values are:
| Type | Description |
|---|---|
| Automatic | Allows the runtime to choose the most appropriate layout. |
| Explicit | Used in conjunction with the FieldOffsetAttribute to allow exact positioning of each member. |
| Sequential | To layout members sequentially, in the order they are declared. |
The MarshalAs attribute gives the CLR explicit instructions on how the type is to be marshalled. The possible values for the UnmanagedType enum are:
| Type | Description |
|---|---|
| AnsiBStr | Length prefixed ANSI (single byte) character string. |
| AsAny | The type is determined at runtime. |
| Bool | 4 -byte Boolean, where False is 0, and True is not 0. |
| BStr | Length prefixed Unicode (double byte) character string. |
| ByValArray | An array of items whose type (an UnmanagedType value) is defined by the ArraySubType field. |
| ByValTStr | Fixed length character array within a structure. |
| Currency | Used to marshal a System.Decimal type to an unmanaged Currency type. |
| CustomMarshaller | A custom marshaller type. |
| Error | A signed or unsigned integer, equivalent to an HRESULT . |
| FunctionPtr | A function pointer. |
| I1 | A 1 -byte signed integer. |
| I2 | A 2 -byte signed integer. |
| I4 | A 4 -byte signed integer. |
| I8 | An 8 -byte signed integer. |
| IDispatch | A COM IDispatch pointer. |
| Interface | A COM interface pointer. |
| IUnknown | A COM IUnknown pointer. |
| LPArray | An array whose size is determined at runtime. |
| LPStr | An ANSI (single byte) character string. |
| LPStruct | A pointer to a C -style structure. |
| LPTStr | A platform -dependent character string (ANSI on Win9 x , Unicode on NT/Windows 2000/XP). |
| LPWStr | A Unicode (double byte) character string. |
| R4 | A 4 -byte floating point number. |
| R8 | An 8 -byte floating point number. |
| RPrecise | Size agnostic floating point number. |
| SafeArray | A self -describing array. |
| Struct | A C -style structure. |
| SysInt | Platform -dependent signed integer (4 -bytes on 32 -bit Windows, 8 -bytes on 64 -bit Windows). |
| SysUInt | Hardware natural sized unsigned integer. |
| TBStr | Length prefixed platform -dependent character string (ANSI on Windows 9 x , Unicode on Windows NT/2000/XP). |
| U1 | A 1 -byte unsigned integer. |
| U2 | A 2 -byte unsigned integer. |
| U4 | A 4 -byte unsigned integer. |
| U8 | An 8 -byte unsigned integer. |
| VariantBool | An 8 -byte unsigned integer. |
| VBByRefStr | Visual Basic specific array passed by reference. |
Dangers of P/Invoke
When calling DLLs through the P/Invoke method, you should be aware that the CLR cannot apply any security checks to unmanaged code. With managed code you have great security control (safe types, no unmanaged memory, code security, versioning, and so on), but none of these are available in unmanaged code.
This issue shouldn't be confused with the integration of Windows Component Services security, which is covered in the Serviced Components section in Chapter 17.
EAN: 2147483647
Pages: 243