Preventing Anonymous Access to Web Sites
| By default in an ASP.NET Web site, visitors can browse the site anonymously, load pages, and download the content you provide. They do not have to provide any credentialsfor example, by logging in to the site. For most Web sites, of course, this is just what you want. However, there are occasions, depending on the type of content you provide, when you want to force users to identify themselves before they access the content. This might be as soon as they arrive at the site, or it might be at some point such as a checkout, when they are buying goods, or just so that you can allocate forum posts this visitor makes to them. The ASP.NET Configuration FilesMost of the default configuration settings for ASP.NET and the Web sites you create are in the web.config and machine.config files stored in the folder [%WINDIR%]\Microsoft.NET\Framework\[version]\CONFIG\ of your machine. For example, if you installed Windows XP or Windows Server 2003 in the default location, the path for version 2.0 of ASP.NET is: C:\WINDOWS\Microsoft.NET\Framework\v2.0.50727\CONFIG\ You can override most of these settings simply by placing a web.config file in the folders of your site or application. Visual Studio 2005 and Visual Web Developer can automatically create these files to enable debugging of pages as you build your site. The <system.web> section of the web.config file can contain a section named <authorization> that controls access to the site and to individual subfolders with the site's virtual root. If there is no <authorization> in the local or default web.config file, the equivalent section in the configuration file for the machine, machine.config, provides the settings. Listing 11.1 shows the settings for the <authorization> section in the default web.config file. This allows all users to access your sites anonymously. Listing 11.1. The Default Security Settings for Web Sites
However, you do not generally have to edit this file directly. The Web Site Administration Tool in ASP.NET (see Figure 11.1) provides a graphical interface that you can use to specify a wide range of settings for your Web sites. Of course, there is nothing to stop you from editing the file manually, as you will need to do if you want to store user details within it, but using the administration tool helps prevent errors, increases security, and simplifies the process considerably. Figure 11.1. The ASP.NET Web Site Administration Tool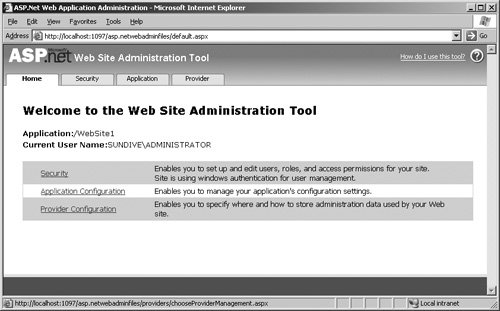 You will see the Web Site Administration Tool in detail shortly, but this section of the chapter explains the fundamental features of the ASP.NET security model. Understanding this will help you to make the right decisions about how you configure your site and will make using the tools and Wizards easier for you, because you will be aware of what they are actually doing. Security and Access Control Settings in IIS and ASP.NETBy default, any visitor to your Web site can access it and view the content. This is because the default settings in Internet Information Server (IIS) are to execute anonymous visitors' requests under the context of a machine-level account named "IUSR_[machine-name]." This is a limited privilege account that only allows READ access to the folders and files within the WWWRoot folder of your machine. You can, of course, grant this account other permissions if you want to allow users to access other folders (for example, if you locate a Web site on a different drive), or if they require WRITE permission to upload or generate files. Figure 11.2 shows the default settings in Windows 2003 Server for the Default Web Site. Figure 11.2. The Access control settings in Internet Information Server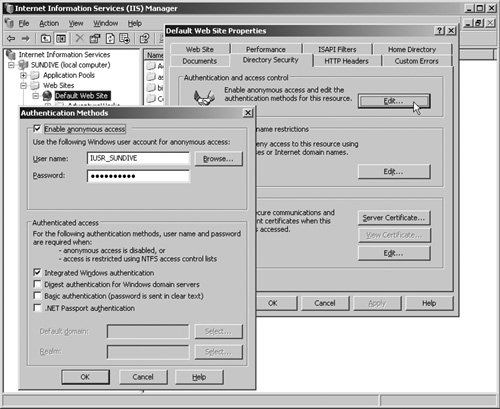 However, once IIS has authenticated visitors, it passes requests for ASP.NET pages and resources to ASP.NET for processing. ASP.NET then executes the request under a separate account. Depending on the operating system and the installed services and configuration, this account is either "ASPNET" or "NETWORK SERVICE." Note ASP.NET does not process resources that are not mapped to it, such as images, PDFs, ZIP files, and other types of documents. For these, you must set up security in the Authentication Methods dialog shown in Figure 11.2. An alternative is to map them to ASP.NET, which will simply pass them on to the client; however, this incurs a processing overload that is usually not acceptable. You can view or change the mappings between file types and ASP.NET for any Web site or virtual application directory in the Mappings page of the Application Configuration dialog that opens when you click Configure in the Properties dialog for that site or directory. Specifying the Account Used by ASP.NETYou can specify which account ASP.NET uses in your machine.config or web.config file, in the <identity> element in the <system.web> section. You can also enable or disable impersonation here. Listing 11.2 shows the settings available for the <identity> element. Listing 11.2. The <identity> Element in an ASP.NET Configuration File
When you specify a different account from the default, using the <identity> element, you can store the user name and password in the file directly, as shown in Listing 11.2. Alternatively, you can encrypt them and store them in your machine registry using the aspnet_setreg.exe utility (available to download from http://www.asp.net). Then you change the <identity> element as shown in Listing 11.3. Listing 11.3. Accessing Account Details Stored in Windows Registry
ASP.NET ImpersonationASP.NET runs all the resources mapped to it under the context of the account you specify in the <identity> element. If, as is the default, there is no <identity> element in your configuration files, ASP.NET executes under the context of the "ASPNET" or "NETWORK SERVICE" account. However, this is only the case if impersonation is not enabled (again, this is the default). If you enable impersonation in the <identity> element by setting impersonate="true", ASP.NET will execute under the context of the account that IIS uses to authenticate each visitor. By default, IIS uses the "IUSR_[machine-name]" account when anonymous access is enabled. However, if you look back at Figure 11.2, you can see that it is possible to configure IIS to block anonymous requests and force users to authenticate using one of the available techniques (Integrated, Basic, Digest, or Passport). ASP.NET will then execute and process its content under the context of the account that the user was authenticated with by IIS. In this case, you can also omit the username and password from the <identity> element. However, in most cases, you will find that the default settings for ASP.NET, running under the "ASPNET" or "NETWORK SERVICE" account with impersonation disabled, will be the best approach for your Web sites and Web applications.
For more details of impersonation and the <identity> element, http://msdn2.microsoft.com/en-us/library/72wdk8cc.aspx. ASP.NET Authentication and AuthorizationThe previous sections of this chapter explained some of the basic concepts of the way that ASP.NET and IIS relate in terms of securing your Web sites, and how they interact to authenticate the users and execute ASP.NET resources under specific accounts. However, once ASP.NET starts to process the request received from IIS, it does so using its own configuration and security settings. These are wholly contained in the machine.config file andmore specificallythe various web.config files in the root and subfolders of your Web site and application directories. These are the settings the ASP.NET Web Administration Tool is specifically designed to manage. In this section of the chapter, you will see a brief overview of these settings and the effect they have on your site. You will see:
You will then be in a better position to get the most from the security features available in ASP.NET, and from features such as the Web Administration Tool. ASP.NET Authentication SettingsThe <authentication> element can appear in a web.config file in the root of your Web site or a virtual application root folder. It specifies the type of authentication ASP.NET uses, the specific settings for this authentication process and, optionally, the accounts that have access to ASP.NET resources. Listing 11.4 shows the format and content available for the <authentication> element. Listing 11.4. The <authentication> Section in web.config
The mode attribute specifies the type of authentication process. The three types are:
Using Forms AuthenticationThe most common authentication approach for public Web sites and Web applications is Forms authentication. This does not rely on any specific network protocols and works through firewalls and proxy servers as well as over the Internet. It is, in fact, similar to the custom techniques that Web site developers have used for many years. However, ASP.NET makes it easy to program and, in most cases, a lot more secure than customer techniques. The <forms> element contains the following series of attributes that define the behavior of the authentication process:
The <credentials> ElementBoth Windows and Passport authentication techniques maintain a list of valid users, outside of your ASP.NET application. Windows stores its accounts details in an internal secure database on the server or the domain controller. The Microsoft Passport site stores user details centrally, and it does not expose them to your ASP.NET applications. However, when you use Forms authentication, you must provide the list of valid users so that ASP.NET can validate logon requests. One way is to include the list of users in your web.config file in the <credentials> element. For each user, you include a <user> element that specifies the user name and password. To avoid storing plain text passwords, you can encrypt them using the delightfully named HashPasswordForStoringInConfigFile method of the System.Web.Security.FormsAuthentication class. You then specify the encryption type you used in the passwordFormat attribute of the <credentials> element.
For details of the FormsAuthentication class, see http://msdn2.microsoft.com/library/k3fc21xw(en-US,VS.80).aspx. Cookie-less Sessions and Cookie-less Forms AuthenticationOne issue that you might come across when using Forms authentication is that it depends on the client's browser accepting and then returning the special cookie that indicates they were authenticated. For clients that do not support cookies, or who have disabled them in their browser options, Forms authentication (together with session support and other features of ASP.NET) will fail to work correctly, because ASP.NET cannot then recognize users when they make a subsequent request. To get around this, you can use cookie-less sessions and cookie-less Forms authentication methods. When you enable cookie-less sessions, ASP.NET inserts the session ID into the URL so that it recognizes the user on the next request. The <sessionState> element in the <system.web> section of web.config can specify that ASP.NET should use cookie-less sessions: <sessionState cookieless="true" /> You specify cookie-less Forms authentication using the cookieless attribute of the <forms> element, as shown at the beginning of this current section. The FormsAuthentication class exposes the static CookiesSupported and CookieMode properties that provide information about the current configuration or the current user's cookie support. ASP.NET Authorization SettingsHaving specified the type of authentication you will use, you now have a technique that allows ASP.NET to identify visitors to the site, or to a specific subsection of the site. However, you also have to provide ASP.NET with information on what permissions and privileges each user should have. In other words, having identified a user, should ASP.NET allow that user to access a specific folder or resource? Listing 11.5 shows the format of the <authorization> element. It allows you to specify a list of users, roles, and verbs that you wish to either permit or deny access to the folder or resource. Note, however, that the roles defined here apply to Windows account groups, and are used only with Windows authentication. The techniques for managing roles in Forms authentication under the control of ASP.NET do not use the roles attribute. Listing 11.5. The <authorization> Section in web.config
There are two specific characters you can use in the users attribute of the <allow> and <deny> elements:
The verbs attribute refers to specific types of HTTP request; the types recognized by ASP.NET are GET, HEAD, POST, and DEBUG. This means that you can allow or deny access based on the type of request. For example, you can allow specific users (or all users) to access pages only by using values in the query string (GET) and not when posting values from a <form>. The most stringent rules take precedence, so that (when using Windows authentication) you can deny access to a Windows account group in the <deny> element but then allow access to a specific account within that group using the <allow> element. You use the <authorization> element in a web.config file placed in the secured target folder of your sitein other words, in the folder(s) where you want to limit access to specific authenticated users. These folders must be within the virtual application to which the <authentication> element applies. Alternatively, you can use the <location> element to target parts of a web.config file at a specific folder or resource, as shown in Listing 11.6. Listing 11.6. Using a <location> Element in web.config
The complete ASP.NET settings schema guide is available at http://msdn2.microsoft.com/en-us/library/b5ysx397. You will find a useful Microsoft patterns & practices guide to Windows Authentication in ASP.NET 2.0 at http://msdn.microsoft.com/library/default.asp?url=/library/en-us/dnpag2/html/paght000025.asp. |
EAN: 2147483647
Pages: 147