Navigation with LinkButton Controls
| So far, you have seen the controls that generate standard clickable hyperlinks to navigate directly to another page or resource. However, the LinkButton and several other control types implement navigation using the postback architecture instead. They create a text link or clickable image that causes the server-side form on which they reside to post back to the server. ASP.NET automatically injects a client-side JavaScript function named __doPostBack into the page. This function takes two parameters: the control that called the function, and an argument to pass to the server-side code. It places these two values into hidden controls within the form, and then calls the client-side submit method of the form to cause the postback to occur. To call the __doPostBack function, ASP.NET uses the capability of a hyperlink to execute JavaScript code by preceding the function name with the string "javascript:". For example, this hyperlink causes a postback to the server, with the form contents including the values MyLink and 42: <a href="javascript:__doPostBack('MyLink','42')">Click here</a>This is how the LinkButton control works, and many other features of the ASP.NET architecture depend on this technique as well. For example, setting the AutoPostBack property of a ListBox or TextBox control to true invokes this mechanism by adding a client-side event handler attribute to the control. For a ListBox, the client-side onchange event executes the __doPostBack function. For a TextBox, the client-side onblur event (which occurs when you move the input focus to a different control) executes the __doPostBack function. Other controls can also cause a postback directly. These include the standard Button control, and the ImageButton control that generates a clickable image in the browser. Using the LinkButton ControlThe LinkButton looks like a hyperlink, but actually behaves like other button-style controls such as Button. When clicked, it causes a postback to the server, which raises an event you can handle in your server-side code. This means, of course, that the LinkButton is not limited to causing navigation. It can execute any server-side code you wish. An example is in the various grid-style controls such as GridView and FormView (described in Chapters 4 and 5). The Select, Edit, Update, and Cancel links automatically generated when you include a CommandField in the grid are LinkButton controls. Many other complex controls such as the BulletedList, Wizard, and Calendar also generate LinkButton controls as part of their user interface, allowing you to handle the events generated as the user interacts with the control. Listing 10.4 shows a BulletedList control configured to create LinkButton controls, with the DisplayMode property set to "LinkButton". The OnClick attribute defines the server-side event handler invoked when the user clicks a link and, in this example, it just displays the index within the list of the clicked item. Listing 10.4. Creating LinkButton Controls in a BulletedList Control
Of course, you can create your own LinkButton controls directly from the Toolbox in Visual Studio or by typing the element declaration: <asp:LinkButton runat="server" OnClick="DoSomething" /> The LinkButton is useful when you require a list of links on a page where some cause navigation and some cause a postback. Rather than mixing HyperLink and Button controls, which produces a rather untidy display, you can use LinkButton controls instead of Button controls. The LinkButton control is similar in underlying operation to the Button control (they both implement the IButtonControl interface), and so provides most of the features of Button as wellas you will see in the next sections.
Details of the LinkButton class are at http://msdn2.microsoft.com/enus/library/73523y55(en-US,VS.80).aspx. Details of the Button class are at http://msdn2.microsoft.com/enus/library/b72c2ah5(enUS,VS.80).aspx. The CommandName and CommandArgument PropertiesIf you use several LinkButton controls on a page, you can arrange for the same event handler to execute for any of the buttons. You can wire up as many controls as you want to the same event handler. The LinkButton (and other button controls) expose the CommandName and CommandArgument properties, which you can set to any String value you wish. The event handler can figure out which of the buttons the user clicked by examining the CommandName property value. If you want to pass in additional data to the event handler, you can set the CommandArgument property and read this for the button that caused the event. For example, you can access the CommandName and CommandArgument property values in the Click event handler for a LinkButton as shown in Listing 10.5. Listing 10.5. Accessing the CommandName and CommandArgument Properties
This capability is useful in controls such as the GridView, where multiple rows cause invocation of the same event handler. You set the CommandName to one of the values that initiates a specific action in the GridView, such as "Delete", "Update", or "Page", to cause the related actions. However, in the RowCommand event of the GridView, you can read the CommandName of the control that initiated the event, allowing you to add other controls to every row and react to the events they raise. As an example, Listing 10.6 shows a GridView control that displays some rows from a database tablethe columns are auto-generated because there is no AutoGenerateColumns="False" attribute. However, the <Columns> section also adds three columns declaratively. There are two ButtonField columns and a TemplateField column. The first ButtonField column generates a normal Button control in every row, because it has the ButtonType="Button" attribute. The second ButtonField column, which does not contain this attribute, generates the default of a LinkButton in every row. Notice that the ButtonField column exposes a CommandName property, declared as "SendButtonField" for the first column and "CopyButtonField" for the second column. The TemplateField column contains both a Button and a LinkButton control, with the CommandName properties set to DetailsButton and DetailsLinkButton, respectively. However, when declaring individual button-type controls, you can also set the CommandArgument property (you cannot set this for a ButtonField for reasons you will see shortly). In this example, the CommandArgument for both buttons is the value of the CategoryName and CategoryID columns of the current row, generated using Eval data-binding statements. Listing 10.6. Using a ButtonColumn, LinkButton, and Button in a GridView control
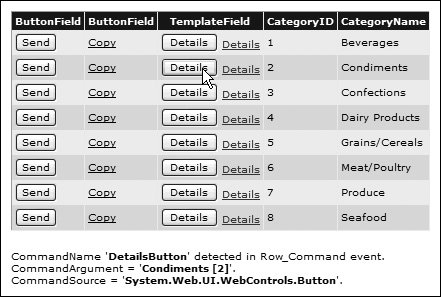
Figure 10.1 shows this example running in the browser. You can see the effect of the ButtonType property in the first two columns, and the Button and LinkButton controls in the third column. Clicking the Details button in the second row of the TemplateField column displays the CommandName and CommandArgument properties of the Button control, plus the string value of the CommandSource property (which is a reference to the control that raised the event) so that you can see what type of control ASP.NET generates. The CommandArgument property contains the name of the category for this row, followed by the value of the ID. Figure 10.1. Displaying the CommandName and CommandArgument in the RowCommand event of the GridView Listing 10.7 shows the first part of the routine that handles the RowCommand event of the GridView control. The GridViewCommandEventArgs instance passed to the event handler exposes the CommandName, CommandArgument, and CommandSource of the control that raised the event. Listing 10.7. Using a ButtonColumn, LinkButton, and Button in a GridView Control
What is interesting is the result of clicking one of the buttons or links in the ButtonField column. In this case, ASP.NET automatically wires up the CommandArgument of the buttons to the RowIndex of each row in the GridView control. This means that you can extract the row index and use it to access the rows or the other properties of the GridView. For example, the code in Listing 10.8 sets the DataKeyNames property of the GridView to the CategoryName column through the attribute DataKeyNames="CategoryName". This means that you can access the value of the DataKey for the current row using the index returned in the CommandArgument propertyas shown in Listing 10.8. Listing 10.8. Using the CommandArgument to Access the DataKeys of a GridView
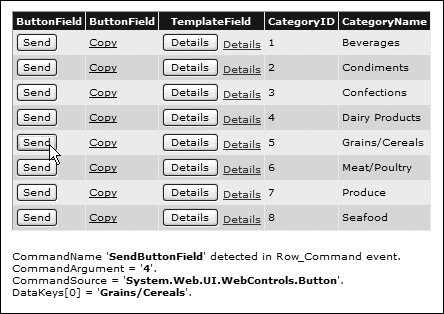
Figure 10.2 shows the result. You can see the CommandArgument value, and the value of the DataKey for that row. Figure 10.2. Using the CommandArgument property of a ButtonField in the RowCommand event of the GridView Other places that the LinkButton occurs are in the Wizard control, which reads the CommandName property of any LinkButton or Button elements in the steps (pages) of the Wizard and automatically moves to the next step if the user clicks a button that has the CommandName value "MoveNext". Likewise, the MultiView control moves to the next view when the user clicks a button with the CommandName value "NextView". Initiating Client-Side EventsThe button-type controls Button, LinkButton, and ImageButton expose a property named OnClientClick as well as OnClick. As the name suggests, the OnClientClick property initiates a client-side event rather than the server-side event initiated by the OnClick event. You write a client-side function and then assign the name to the OnClientClick property of your chosen button-type control. You can also write the usual server-side OnClick event routine as well. Listing 10.9 shows the declaration of a LinkButton control with both the OnClick and OnClientClick attributes. By default, as you will expect, clicking the button causes the specified client-side code routine to execute first, followed by a postback that executes the server-side event handler. Listing 10.9. Using the OnClick and OnClientClick Events with a LinkButton Control
For this example, the server-side code is a one-line routine that displays a message in a Label control elsewhere on the page, indicating that a postback occurred and that the server-side event handler executed. You can see this code at the start of Listing 10.10, which also contains the client-side JavaScript function referenced in the OnClientClick attribute of the LinkButton. This routine first clears any text from the Label control on the page by getting a reference to it through the CSS2 getElementById function and setting the innerText property to an empty string. Then it displays a client-side JavaScript confirm dialog, and returns the result. Listing 10.10. Handling the OnClick and OnClientClick Events
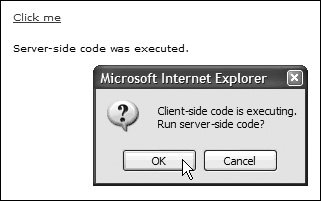
The important point here is that, unless you cancel the client-side click event in your client-side code, a postback will occur. To cancel a client-side event, you must return false from the function that the control executes. If you look back at Listing 10.9, you will see that the declaration of the LinkButton includes OnClientClick="return DoClientSideCode()". This means that whatever value the function named DoClientSideCode returns will be returned to the LinkButton control itself. If this value is false, the LinkButton will not cause a postbackwhich is exactly what will occur if the user clicks Cancel in the confirm dialog. Therefore, as you can see in Figure 10.3, the client-side code runs first and displays the confirm dialog. If you select OK, the client-side function returns TRue and server-side code executes. If you click Cancel, the clientside function returns false and server-side code does not execute. This approach is useful for many features in a Web page; for example, getting users to confirm that they want to delete a row from the database or perform some other nonreversible action. Figure 10.3. Using the OnClientClick property of a LinkButton control All of this discussion on the LinkButton and Button controls that cause a postback does not appear to relate to navigation issuesthe topic of this chapter. In fact, you will see how they relate in the next section when you look at navigation through browser redirection.
Details of the OnClientClick property are at http://msdn2.microsoft.com/en-us/library/1c9t9zkk. |
EAN: 2147483647
Pages: 147