Handling Data Editing Conflicts
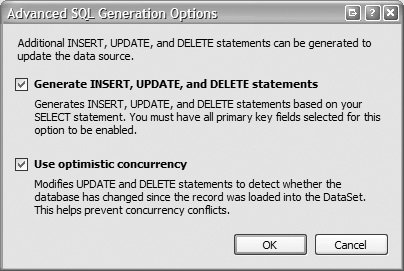
| One problem with data editing is the possibility of two people editing the same record at the same time. By default, the data source controls work on the last update principle, meaning that the last person to save changes winstheir values overwrite any previous changes. Essentially, the rows being edited or deleted are only matched by the row ID. The chances of a conflict happening depend upon your application type, but you may not want this default behavior. To change to an optimistic model, you can set the ConflictDetection property of the data source to CompareAllValues, which adds all columns to the WHERE clause to uniquely identify the row. The values in the WHERE clause are the old values, before they were updated on the client, so the WHERE would only match if the row has not had any values changed. When configuring a data source, you can have these options set for you on the Advanced properties of the configuration, as shown in Figure 5.2. Figure 5.2. Configuring optimistic concurrency Selecting optimistic concurrency for a SQL data source generates the code seen in Listing 5.14. Listing 5.14. A SqlDataSource with Optimistic Concurrency
The important points to note are the ConflictDetection property, and the WHERE clauses. Notice that each column is matched with a value called original_Columnthis is the parameter that holds the original value. The OldValuesParameterFormatString method identifies the format these parameters are in, with {0} being a marker that is replaced by the column name. When the display control passes the values to the data source control, it passes both the newly updated values and the old values, and it's these old values that are placed into the original_ parameters. When the update button is pressed, the update happens as normal and the Updated event of the data source is raised, at which point you can see whether there was a problem, as seen in Listing 5.15. Listing 5.15. Detecting Errors in the SqlDataSource Control's Updated Event
The trouble you have with this event procedure is that you have no access to the data. You can see if any rows were affected, and whether an Exception was raised, and can make an assumption if no rows were updated. But since there is no access to the fields, that's about all you can do. A better solution is to use the RowUpdated event on the display control. For example, the GridView control not only sets the AffectedRows property, but gives you access to the OldValues and NewValues collections. This means that you could compare the values to see which are different, or just provide a way for the users to see all the values. Listing 5.16 shows a sample event procedure to handle this type of conflict. Much is the same as in the event shown in Listing 5.15, but instead of just saying that a conflict may have occurred, it can offer much more information. Listing 5.16. Detecting Errors in the GridView Control's Updated Event
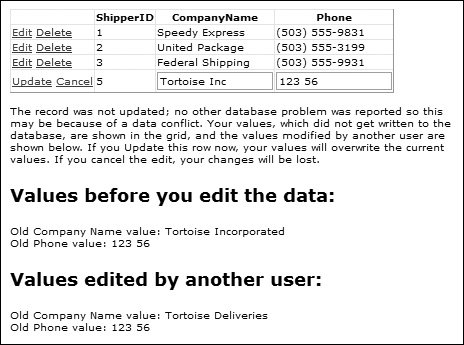
The actions performed here are to first make sure that editing isn't finished by setting the KeepInEditMode property to true. Next, the GridView is rebound to the data, which ensures that the data shown now contains the values modified by the other user. This is important because the WHERE clauses are dependent upon this. Then the new valuesthose that the user on this page enteredare displayed in list boxes and an appropriate message is displayed. The results of this can be seen in Figure 5.3. Figure 5.3. An Edit page with conflict detection Another solution is to populate the row in edit mode with the new values and display the ones that the other user changed. This allows the user to simply click the Update button to save their changes rather than having to paste them back into the text box fields. This code looks much more complex but is just as simple. After the grid hs been rebound to the fresh data, the values are extracted from the row being edited. Each cell in the row contains a TextBox control for data entry, so this is referenced and the Text property that contains the new value is extracted. If you were using template columns and using controls other than a TextBox, you would have to cast to the correct data type. These new values are displayed in labels on the page. Next, the fresh values in the grid are overwritten with the new valuesthe values this user has just entered. Finally, the old values are displayedthese are the values that were in the grid when this user started editing. So now the user can see all three values and simply has to click the Update button to have his or her values overwrite the fresh ones, as seen in Figure 5.4. Figure 5.4. An Edit page with improved conflict detection Listing 5.17. Displaying All of the Conflicting Data
Both of the techniques presented for conflict handling work just as well with the DetailsView and FormView controls, and the advantage of using the display controls is that you can use either the SqlDataSource or the ObjectDataSource controls for your data interface. |

EAN: 2147483647
Pages: 147