Storing and Retrieving User Personalization Data
Storing and Retrieving User Personalization DataMy first experience with a Personalization system was with the Site Server 3.0's Personalization and Membership feature. One of the frustrating aspects with Site Server's Personalization model, as well as all other commercially available Personalization systems, is that they are dictionary based. For example, were you to store or retrieve a value such as "John" as the first name of the user using ASP.NET's Session APIs: ' Store the user's first name value Session("FirstName") = "John" ... ' Retrieve the user's first name string firstName = Session("FirstName") Using key/value pairs is a very common pattern. In fact, we see this type of data storage/retrieval used for Application state, Session state, ViewState , Cache , and so on. While this technique is both common and a very acceptable approach for storing data work, there are two problems.
Following is an example of nonstrongly typed code that could be used to access a ShoppingCart class instance's CartID property from an instance of the ShoppingCart stored in Session state: Dim cartID As Integer Dim cart As ShoppingCart ' First get the Shopping Cart cart = CType(Session("MyCart"), ShoppingCart) ' Next, get the cart id cartID = cart.CartID The key value MyCart is used to retrieve the object from Session state. We then cast the returned object to the appropriate type ShoppingCart . Using the new ASP.NET 2.0 Personalization feature, this same code is written as: Dim cartID As Integer ' Get the cart id cartID = Profile.Cart.CartID Rather than accessing the value with a key, Cart is a property of type ShoppingCart and the cartID property can be used directly. No casts and no keys to rememberand a nice side effect is that you get statement completion within your development environment too! The ASP.NET 2.0 Personalization system can store any data type, from simple scalar values such as integers and strings to complex user data types such as shopping carts. The option of storing any data type gives you a great degree of flexibility in your applications. You may be wondering how the Cart property became available on the Profile class. The Profile class is a special class dynamically compiled with your ASP.NET application. The addition of the Profile class is done automaticallywithout you needing to do anything. Properties on the Profile class are added through the ASP.NET configuration system within a new <personalization/> section of the configuration file. Configuring PersonalizationPersonalization properties are defined within the ASP.NET configuration system in the new <personalization/> section. Listing 7.1 is a sample web.config containing <personalization/> settings. Listing 7.1 Configuring Personalization<configuration> <system.web> <personalization> <profile> <property name="FirstName" /> <property name="TotalPosts" type="System.Int32" defaultValue="0" /> <property name="LastPostDate" type="System.DateTime" /> <property name="Cart" allowAnonymous="true" type="Market.ShoppingCart, market" serializeAs="Binary" /> </profile> </personalization> <system.web> </configuration> The <configuration/> section follows the same provider design pattern used by Membership, Role Manager, and other ASP.NET 2.0 features that require data storage services. We'll cover the provider model in detail later in this chapter. Within the <personalization> element of the machine configuration file the defaultProvider is set to AspNetAccessProvider the Access Personalization provider is therefore configured as the default. You can easily change the default by specifying a different provider from those available in the <providers/> element. We'll come back to the <providers/> section shortly. The <profile/> section is where individual properties are specified. These properties are then made available automatically through the Profile class in the Page . In the configuration sample above we created four properties:
Programmatically these properties are accessed as shown in Listing 7.2. Listing 7.2 Setting the Properties of a ProfileDim totalPosts As Integer ' Set the user's first name Profile.FirstName = "Rob" ' Access the user's total posts totalPosts = Profile.TotalPosts ' DataBind to the user's cart and ' display items in his/her basket DataGrid1.DataSource = Profile.Cart.Basket DataGrid1.DataBind If you want to take more control over how the data within the Profile object is organized, you can control the object model structure that is created in the Profile . For example, if we wished to store personalization data from the ASP.NET Forums (http://www.asp.net/forums), we may wish for it to be organized logically together. This can be accomplished using a special < group /> element within <profile/> (see Listing 7.3). Listing 7.3 Configuring a Personalization Group<profile> <property name="FirstName" /> <property name="LastPostDate" type="System.DateTime" /> <group name="Forums"> <property name="TotalPosts" type="System.Int32"/> <property name="Location" /> <property name="AllowAvatar" type="System.Boolean" /> <property name="AvatarURL" /> </group> </profile> Values within a group are accessed as follows: Dim location As String ' Get the user's location location = Profile.Forums.Location As you can probably tell, the <property/> element is key to setting up Personalization properties. The <group/> element simply provides an easy way to logically organize these properties. In the examples we've shown, we've seen several of the different attributes the <property/> element supports. Let's take a look at what all the different attributes are. Configuring Personalization PropertiesThe <property/> element is what you use to add properties to the programmatic Profile APIwhen ASP.NET compiles your page, the default Profile class is replaced with a class instance that contains the properties you define. This all happens under the covers; all you need to know is how to specify the property. The simplest use of <property/> is to declare a new Personalization property with only the name attribute defined: <profile> <property name="FirstName" /> </profile> This instructs the Personalization system to add a property named FirstName of type String with no default value, to not allow anonymous personalization, and to store/retrieve the value from the default Personalization provider. When defining properties, the only required element is name ; this is used to access the property from the programmatic Profile in the page. All other attributes, while important, are optional. Table 7.1 on the next page lists all the <property/> elements. Accessing Other Users' Personalization DataThe Profile API within your ASP.NET application will automatically be set to retrieve the personalization data for the authenticated user. However, if you wish to retrieve data for a different user, you can retrieve the user's profile using the Profile.GetProfile( username ) API. You simply specify the username and you can access that user's personalization data. Table 7.1. Personalization Property Attributes
Now that we've looked at how to set up the required configuration properties and how to access other users' personalization data, let's look at how to configure the databases required to store the personalization data. Setting Up the Databases for PersonalizationTwo Personalization providers ship with ASP.NET 2.0:
By default Personalization is set to use the Microsoft Access Personalization provider, defined in the class AccessPersonalizationProvider . This provider is found in the namespace System.Web.Personalization in the System.Web.dll assembly. Personalization is instructed to use the Access provider through the configuration settings. The defaultProvider attribute on the <personalization/> element controls what the default provider is: <personalization defaultProvider="AspNetAccessProvider"> The provider itself is then defined within the <providers/> section of <personalization/> (see Listing 7.4). Listing 7.4 Configuring the Access Personalization Provider<add name="AspNetAccessProvider" type="System.Web.Personalization. AccessPersonalizationProvider, System.Web, Version=1.2.3400.0, Culture=neutral, PublicKeyToken=b03f5f7f11d50a3a" connectionStringName="AccessFileName" applicationName="/" description="Stores and retrieves personalization data from the local Microsoft Access database file" /> As mentioned, there is also a Personalization provider for Microsoft SQL Server (see Listing 7.5). Listing 7.5 Configuring the SQL Server Personalization Provider<add name="AspNetSqlProvider" type="System.Web.Personalization. SqlPersonalizationProvider, System.Web, Version=1.2.3400.0, Culture=neutral, PublicKeyToken=b03f5f7f11d50a3a" connectionStringName="LocalSqlServer" applicationName="/" description="Stores and retrieves personalization data from the local Microsoft SQL Server database" /> Table 7.2. Personalization Providers' Supported Security Models
Table 7.2 gives you an idea of which provider to use depending on your application. The ASP.NET team specifically recommends using SQL Server for enterprise-level Internet applications. Let's take a look at both providers in more detail and see how we set them up. Using the Access Personalization Provider and the \data\ DirectoryThe Microsoft Access database used by ASP.NET Personalization is the same Microsoft Access database used by other Access providers, such as Membership. To use Microsoft Access as your database, ASP.NET must have read/write permission on the actual Microsoft Access file. If you create your project using the Visual Studio .NET "Whidbey" tool, the tool will attempt to grant the necessary permission for ASP.NET to have read/write access. In fact, what will happen is that a new directory, \data\ , will be created within your application, and a copy of an existing template Access file containing all the necessary tables and procedures will be copied from: [View full width]
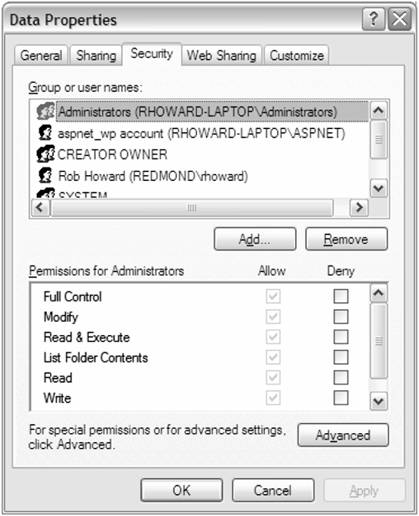
This file is created in your project as \data\AspNetDB.mdb . If you receive a security error when attempting to use any of the features that utilize the Access provider, you will need to manually add the necessary permissions. Granting Permissions to the Access DatabaseTo grant ASP.NET permissions to the Microsoft Access database:
This grants permission to either the ASP.NET worker process or the IIS 6.0 worker process to have read/write permissions on the \data\ directoryallowing ASP.NET to modify the Access database. Specifying Which Access Database to UseYou'll notice that the actual filename of the Access database to use for the Personalization provider is not named. Instead only the following reference exists: connectionStringName="AccessFileName" All connection string information is now stored in the new connection string manager section of web.config . Data stored in the connection string manager section will eventually be encrypted (not implemented in the Technology Preview). If your web.config file were compromised, your connection strings would be safe. Listing 7.6 shows the entry from machine.config for the new connection string manager feature. Listing 7.6 Configuring Connection Strings<system.web> <connectionStrings> <add name="LocalSqlServer" connectionString="data source=127.0.0.1; Integrated Security=SSPI" /> <add name="AccessFileName" connectionString="~\DATA\ASPNetDB.mdb" /> </connectionStrings> </system.web> All connection strings used by providers are stored within <connection Strings/> . By default all Access providers will attempt to use the \Data\Asp NetDb.mdb file relative to the current applicationspecified by the tilde ( ~ ). You can easily change this to use an Access file from a different location. For example, you may want all your applications to share one Asp NetDB.mdb file. To do this, specify an absolute path , or each application's web.config could set its own value. Using the SQL Server Personalization ProviderMicrosoft Access is a great storage solution for small Web sites or intranet applications. However, as we stated earlier, Microsoft SQL Server is the recommended data storage location for enterprise-level Internet applications. While providers that use Microsoft Access "just work," there is a bit of setup that needs to take place in order to use Microsoft SQL Server. There are several different options for configuring Microsoft SQL Server for ASP.NET services:
Let's look at how we can set up a SQL Server database for the ASP.NET Personalization feature using the ASP.NET SQL Server Setup Wizard. ASP.NET SQL Server Setup WizardThe ASP.NET SQL Server Setup Wizard is both a command-line and GUI-based utility. It is used to configure SQL Server to support the various application services (such as Membership, Personalization, and so on) used by ASP.NET. The tool, aspnet_regsql.exe , can be found in \Windows\Microsoft .NET\Framework\v1.2.30609\ . Note that the directory number corresponds to the version of .NET Framework installed. You will likely have a directory different than \v1.2.30609\ . The tool supports two modes: command line and GUI. The command-line mode gives you the most control over what is going to be set up, while the GUI tool simply installs or removes all features. To run in command-line mode, first open a command shell, navigate to the directory where aspnet_regsql.exe tool is located, and type: aspnet_regsql.exe /? This will give you a listing of the command-line capabilities of this tool. In Figure 7.2 you can see some of the output in command-line mode. Instructions for using the tool as well as the various switches are also listed. In future books we'll go into more detail on how all these command-line options work. For now we're going to focus on the GUI mode. Figure 7.2. ASP.NET SQL Server configuration tool command line To run the aspnet_regsql.exe tool in GUI mode, type: aspnet_regsql.exe with no parameters or double-click on the file from Explorer. This will open the wizard and display the welcome screen (see Figure 7.3). Figure 7.3. ASP.NET SQL Server configuration tool wizard Click Next to select the setup options (see Figure 7.4). From this screen you have only two options.
Figure 7.4. Using the ASP.NET SQL Server configuration tool, step 1 (In the beta release you will be able to configure database cache invalidation see Chapter 11from the tool as well.) If you select to configure SQL Server, the tool will run all .sql scripts required for SQL Server support for all ASP.NET services. The next screen (see Figure 7.5) will ask which SQL Server and database to execute these scripts on. You will need to select both the server and the database to install to. If a database does not exist, you can specify a new database by simply typing in the database name. Figure 7.5. Using the ASP.NET SQL Server configuration tool, step 2 After clicking Next you will see a screen to confirm your selections, and installation will begin. Once complete, you will see a screen indicating success or failure, and you can then exit the wizard. Finally, you will need to modify the <connectionStrings/> section of the configuration file to specify the username and password to access SQL Server. By default the connection string is set to use Windows Integrated Authentication. Windows Integrated Authentication will attempt to log into SQL Server using the credentials of the process running ASP.NET ( assuming impersonation is not enabled). This identity is either the aspnet_wp user for Windows Server 2000 or Windows XP or a user within the IIS_wpg group for Windows Server 2003. Alternatively you can specify a SQL username and password in the connection string. Data Access OptimizationsWhen designing the Personalization system the ASP.NET team took great care to ensure the system is flexible for storing and accessing data but at the same time smart and performance-focused about how data is accessed. Personalization vs. Session StateMany people may initially confuse Personalization and Session state. While similar in that both features store data for users, they are very distinct in how they operate on that data and how data is maintained . Session state is for temporary user session data. When the user's session expires , the data stored in Session state is removed. Session state also is auto- populated on each request to the application. Whether you use it or not, you are likely paying the cost for Session statethis is even more costly when the Session state data is stored out-of-process. Personalization is for long-lived data. Whereas with Session state the data is created and then, if the session is not active for a period of time, automatically removed, data created through Personalizationin theory exists forever. For example, if you stored a ShoppingCart in Session state, the contents of the cart would be lost when the Session ended. However, with Personalization the contents of the cart could be persisted indefinitely. The last and major difference between Personalization and Session state is the manner in which data is both retrieved and saved. Session state makes use of the two application events: Application_OnAcquireRequestState and Application_OnReleaseRequestState . When the request is starting, the OnAcquireRequestState event is raised, and the Session state module contacts the session store and retrieves all session data for the current user. It also then places a lock on this data in the Session store to prevent other threads from modifying the data. Lastly, once the request is complete the OnReleaseRequestState event is raised, the Session state data is updatedor left unchangedand the lock is released. If two requests , as in a frame-based Web application, both attempt to change a value in Session state, the lock would prevent one of the threads from accessing the data until the other request first fully completes. This locking and reading of Session state occurs on each request, no matter if Session state data is even used. This can be controlled through page- and application-level directives such as EnableSession , but nevertheless this approach can be inefficient. Personalization, on the other hand, is designed to be very smart about how it accesses and saves data. Data stored in Personalization is not retrieved until it is requested. Unlike Session, which populates the Session dictionary each time, Personalization waits until the user requests a property. Then, when Personalization does need to retrieve data, it will retrieve the data for the requested property and all related properties within the same provider. For example, the configuration for Personalization shown in Listing 7.7 adds a new AspNetForums providerwhich we'll create later in the chapterand specifies that all properties in the Forums group use this provider. Listing 7.7 Configuring a New Personalization Provider<configuration> <system.web> <personalization enabled="true" defaultProvider="AspNetSqlProvider" > <providers> <add name="AspNetForums" type="AspNetForums.SqlDataProvider" /> </providers> <profile> <property name="FirstName" /> <property name="LastName" /> <property name="ZipCode" /> <group name="Forums"> <property name="TotalPosts" type="System.Int32" provider="AspNetForums"/> <property name="Location" provider="AspNetForums"/> <property name="AllowAvatar" type="System.Boolean" /> provider="AspNetForums"/> <property name="AvatarURL" provider="AspNetForums"/> </group> </profile> </personalization> </system.web> </configuration> When using Personalization and requesting the FirstName property, the values for LastName and ZipCode are also retrieved since they all come from the default provider: Dim firstName As String ' Get the user's first name firstName = Profile.FirstName However, values for TotalPosts , Location , AllowAvatar , and Avatar URL are not retrieved. These properties belong to a different provider, and their values will not be retrieved until the value of one of those properties is requested. This means that you can easily partition your data into multiple providers and make intelligent decisions about when to retrieve what data, unlike Session, which would simply retrieve everything. As you'll see later in the chapter, creating providers was designed to be easy. In fact, the ASP.NET team fully expect you to create providers for your data. Finally, when values are set using the Profile API, the data store is updated when the page completes execution. Membership and PersonalizationPersonalization stores data by associating the data with the authenticated username as the key. While Membership provides services to authenticate the user and set the authentication username, Membership is not required to use Personalization. In fact, any authentication mechanism will work. As long as a value is set for User.Identity.Name , personalization data can be stored. For anonymous users, that is, users accessing the application who might not necessarily be authenticated, the User.Identity.Name value will not be set. To store anonymous personalization data, you need to enable the new anonymous identification feature. |