form Creating XHTML Forms

<form> Creating XHTML Forms

You use the <form> element to create an XHTML form, which you use to contain XHTML controls such as buttons and text fields. This element is supported in XHTML 1.0 Strict, XHTML 1.0 Transitional, XHTML 1.0 Frameset, and XHTML 1.1. Here are its attributes:

  • accept Holds a comma-separated list of content types that a server processing this form must handle correctly. (XHTML 1.0 Strict, XHTML 1.0 Transitional, XHTML 1.0 Frameset, XHTML 1.1, 4.)

  • accept-charset Holds a list of possible language character sets for the form data. (XHTML 1.0 Strict, XHTML 1.0 Transitional, XHTML 1.0 Frameset, XHTML 1.1, 4.)

  • action Required. Gives the URI that will handle the form data. (XHTML 1.0 Strict, XHTML 1.0 Transitional, XHTML 1.0 Frameset, XHTML 1.1.)

  • class Gives the style class of the element. (XHTML 1.0 Strict, XHTML 1.0 Transitional, XHTML 1.0 Frameset, XHTML 1.1.)

  • dir Sets the direction of text that doesn't have an inherent direction in which you should read it, called directionally neutral text. You can set this attribute to ltr , for left-to-right text, or rtl , for right-to-left text. (XHTML 1.0 Strict, XHTML 1.0 Transitional, XHTML 1.0 Frameset, XHTML 1.1.)

  • enctype Sets the MIME type used to encode the name /value pairs when sent to the action URI. The default is "application/x-www-form-urlencoded" . (XHTML 1.0 Strict, XHTML 1.0 Transitional, XHTML 1.0 Frameset, XHTML 1.1.)

  • id Refers to the element; set this attribute to a unique identifier. (XHTML 1.0 Strict, XHTML 1.0 Transitional, XHTML 1.0 Frameset, XHTML 1.1.)

  • lang Specifies the base language used in the element. Applies only when the document is interpreted as HTML. (XHTML 1.0 Strict, XHTML 1.0 Transitional, XHTML 1.0 Frameset, XHTML 1.1.)

  • method Indicates a method or protocol for sending data to the target action URI. The GET method is the default; the other alternative is POST . (XHTML 1.0 Strict, XHTML 1.0 Transitional, XHTML 1.0 Frameset, XHTML 1.1.)

  • name Deprecated. Gives a name to the form so you can reference it in code. Use the id attribute instead in browsers that understand it. (XHTML 1.0 Transitional, XHTML 1.0 Frameset.)

  • style Inline style indicating how to render the element. (XHTML 1.0 Strict, XHTML 1.0 Transitional, XHTML 1.0 Frameset, XHTML 1.1.)

  • target Indicates a named frame for the browser to display the form results in. (XHTML 1.0 Transitional, XHTML 1.0 Frameset.)

  • title Contains the title of the element. (XHTML 1.0 Strict, XHTML 1.0 Transitional, XHTML 1.0 Frameset, XHTML 1.1.)

  • xml:lang Specifies the base language for the element when the document is interpreted as an XML document. (XHTML 1.0 Strict, XHTML 1.0 Transitional, XHTML 1.0 Frameset, XHTML 1.1.)

Here are the XHTML events this element supports: onclick , ondblclick , onmousedown , onmouseup , onmouseover , onmousemove , onmouseout , onkeypress , onkeydown , onkeyup , onsubmit , and onreset .

When you want to use controls, such as buttons and text fields, in a Web page, you should enclose the control elements in a <form> element. (Controls won't even appear in Netscape Navigator unless you enclose them in a <form> element.)

Forms were originally intended to be used to send data (such as the contents of text fields) back to the server. The target URI to send that data to is placed in the action attribute, and the W3C has made that attribute required for forms. We'll see how to send data to a server in Chapter 20, "WML, ASP, JSP, Servlets, and Perl," and we'll use the action attribute there; until then, I'll just set the action attribute to "action" . In addition, note that in XHTML, you're supposed to give XHTML forms an ID with the ID attribute. However, some browsers, such as Netscape Navigator, don't understand that attribute and use name instead. The only alternative in this case is to use both the ID and the name attributes here.

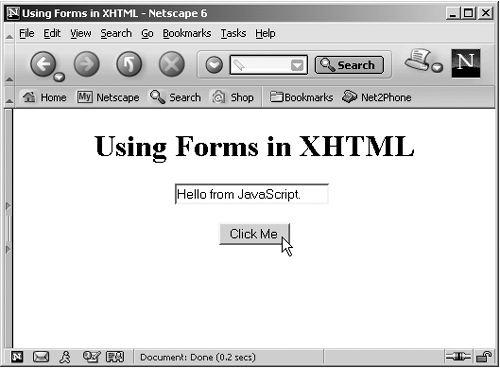
Let's see an example. Here, the document will display a message that, when clicked, displays Hello from JavaScript . in a text field. Here's the code (note that the <br> element will be deprecated in XHTML 2.0):

Listing ch17_15.html
 <?xml version="1.0"?> <!DOCTYPE html PUBLIC "-//W3C//DTD XHTML 1.0 Transitional//EN" "http://www.w3.org/tr/xhtml1/DTD/xhtml1-transitional.dtd"> <html xmlns="http://www.w3.org/1999/xhtml" xml:lang="en" lang="en">     <head>         <title>             Using Forms in XHTML         </title>         <script language = "javascript">             function displayMessage()             {                 document.form1.textfield.value = "Hello from JavaScript."             }         </script>     </head>     <body>          <center>              <h1>                  Using Forms in XHTML              </h1>  <form name = "form1" id = "form1" action = "action">   <input type = "text" name = "textfield" size = "25" />   <br />   <br />   <input type = "button" value = "Click Me"   onclick = "displayMessage()" />   </form>  </center>     </body> </html> 

You can see the results of this XHTML in Figure 17-7.

Figure 17-7. Using an XHTML form in the Netscape Navigator.

graphics/17fig07.gif

This document used both a button and a text field. I'll take a look at how to create those two controls in XHTML next .


Real World XML
Real World XML (2nd Edition)
ISBN: 0735712867
EAN: 2147483647
Year: 2005
Pages: 440
Authors: Steve Holzner

flylib.com © 2008-2017.
If you may any questions please contact us: flylib@qtcs.net