Chapter 19. Vector Markup Language
| CONTENTS |
- Creating VML Documents
- The VML Elements
- The <shape> Element
- Using Predefined Shapes
- Coloring Shapes
- Scaling Shapes
- Positioning Shapes
- The <shadow> Element
- The <fill> Element
- Using the <shapetype> Element
- More Advanced VML
The way you present XML in browsers should not be limited to simple text in fact, there are various initiatives to create graphics-based XML applications. We created graphical browsers in Chapter 11, "Java and the XML DOM," and Chapter 12, "Java and SAX," to use XML to display circles. I also discussed the W3C language, Scalable Vector Graphics (SVG), in Chapter 1, "Essential XML." SVG has been around for a long time but has not been very widely implemented. Today, the most widespread graphics-based XML application is the Vector Markup Language (VML) from Microsoft.
Here's how Microsoft describes VML: "VML is an application of Extensible Markup Language (XML) 1.0 which defines a format for the encoding of vector information together with additional markup to describe how that information may be displayed and edited."
VML supports the markup of vector graphic information in the same way that HTML supports the markup of textual information. Besides its own XML elements, VML also supports CSS, so you can style and position shapes as you like. It's supported in Microsoft Office 2000 Microsoft Word, PowerPoint, and Excel. When you create graphics in those programs, the graphics are stored in VML. Internet Explorer also supports VML. You can use the tools that come with Microsoft Office to draw VML figures, or you can create VML yourself. We'll do it ourselves in this chapter.
There are two primary online resources for VML: the VML reference at Microsoft, and the note that Microsoft wrote and sent to the W3C, which the W3C has posted (not much has come of that note; no one besides Microsoft seems very inclined to implement VML). Here are these resources (bear in mind that URIs on Microsoft's sites change very frequently):
-
http://msdn.microsoft.com/standards/vml/ref/. The Microsoft VML reference, with examples.
-
http://www.w3.org/TR/NOTE-VML. The VML note at W3C, dated May 13, 1998.
VML was added to Internet Explorer before that browser added its built-in XML support, so the way you implement VML does not involve Internet Explorer XML islands or any such mechanism. Instead, you use a namespace for VML and then use the VML engine in Internet Explorer, which is actually implemented as an Internet Explorer behavior (an external code module). We saw this example in Chapter 1, and I'll take a closer look at it in this chapter:
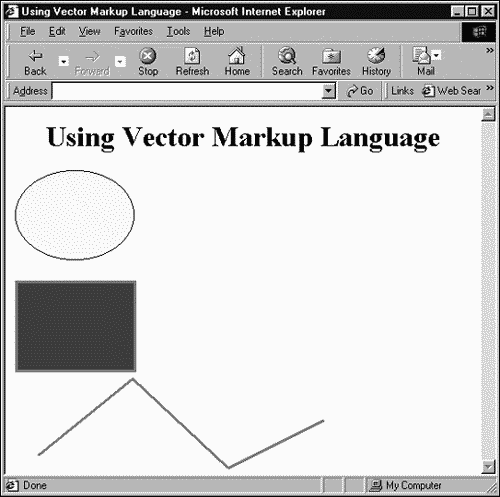
<HTML xmlns:v="urn:schemas-microsoft-com:vml"> <HEAD> <TITLE> Using Vector Markup Language </TITLE> <STYLE> v\:* {behavior: url(#default#VML);} </STYLE> </HEAD> <BODY> <CENTER> <H1> Using Vector Markup Language </H1> </CENTER> <P> <v:oval STYLE='width:100pt; height:75pt' fillcolor="yellow" /> <P> <v:rect STYLE='width:100pt; height:75pt' fillcolor="blue" strokecolor="red" STROKEWEIGHT="2pt"/> <P> <v:polyline POINTS="20pt,55pt,100pt,-10pt,180pt,65pt,260pt,25pt" strokecolor="red" STROKEWEIGHT="2pt"/> </BODY> </HTML>
Internet Explorer BehaviorsYou can find out more about Internet Explorer behaviors, which represent one of Microsoft's techniques for separating markup from document content, at http://msdn.microsoft.com/workshop/c-frame.htm#/workshop/author/default.asp |
This example just drew a few VML shapes, and you can see the results of this page in Figure 19.1.
Figure 19.1. A VML page sample page.
Now that we're discussing VML in depth, the syntax of this document bears a little examination.
Creating VML Documents
In Internet Explorer, VML is embedded in HTML documents. You start by declaring this namespace, v:
<HTML xmlns:v="urn:schemas-microsoft-com:vml"> . . .
You must also instantiate the VML engine, which is implemented as an Internet Explorer behavior. To implement this behavior, you use a <STYLE> element, connecting the v namespace to the VML default behavior:
<HTML xmlns:v="urn:schemas-microsoft-com:vml"> <HEAD> <TITLE> Using Vector Markup Language </TITLE> <STYLE> v\:* {behavior: url(#default#VML);} </STYLE> </HEAD> . . . This indicates to Internet Explorer that the VML in the page should be handled by the VML engine. Now you can add VML elements such as <oval> if you use the proper namespace, v:
<HTML xmlns:v="urn:schemas-microsoft-com:vml"> <HEAD> <TITLE> Using Vector Markup Language </TITLE> <STYLE> v\:* {behavior: url(#default#VML);} </STYLE> </HEAD> <BODY> <CENTER> <H1> Using Vector Markup Language </H1> </CENTER> <P> <v:oval STYLE='width:100pt; height:75pt' fillcolor="yellow" /> <P> <v:rect STYLE='width:100pt; height:75pt' fillcolor="blue" strokecolor="red" STROKEWEIGHT="2pt"/> <P> <v:polyline POINTS="20pt,55pt,100pt,-10pt,180pt,65pt,260pt,25pt" strokecolor="red" STROKEWEIGHT="2pt"/> </BODY> </HTML> I'll take a look at what VML elements are available now.
The VML Elements
Twenty elements are defined in VML, as shown in Table 19.1.
| Element | Description |
|---|---|
| <arc> | Draws an arc |
| <background> | Adds a background |
| <curve> | Draws a curve |
| <fill> | Fills a shape |
| <formulas> | Specifies a formula that lets you scale shapes |
| <group> | Groups shapes |
| <handles> | Draws handles on shapes |
| <image> | Supports images |
| <imagedata> | Specifies an image to be rendered on top of a shape |
| <line> | Draws a line |
| <oval> | Draws an oval |
| <path> | Specifies a path for rendering |
| <polyline> | Draws a shape from line segments |
| <roundrect> | Draws a rounded rectangle |
| <shadow> | Adds a shadow to a shape |
| <shape> | Creates a basic shape |
| <shapetype> | Defines a reusable shape |
| <stroke> | Specifies how to draw a path |
| <textbox> | Creates a text box |
| <textpath> | Specifies a path for text to be drawn along. |
The overall structure of VML is based on the two primary elements: <shape> and <group>. The <shape> element is the most basic VML element, and you use it to define general graphic shapes in VML. You can use the <group> element to group shapes together so that they can be handled as a single unit.
Besides the <shape> and <group> elements, VML also defines additional top-level elements to help make the editing and representation of complex graphical information more compact and convenient. For example, you can use the <shapetype> element to define a definition of a shape. A <shape> element may then reference a <shapetype> element to instantiate several copies of the same shape.
You also can use a number of predefined shapes, based on the <shape> element. Using the predefined shapes means that you don't have to explicitly declare the shape you want to use. These predefined shapes are <line>, <polyline>, <curve>, <rect>, <roundrect>, <oval>, <arc>, and <image>.
Common Attributes
You can find parts (but only parts) of the VML DTD in the VML note at http://www.w3.org/TR/NOTE-VML. Two important parts are the entity parameters coreattrs and shapeattrs, which define attribute lists, because many of the elements we'll see in this chapter use those attributes. Here's how coreattrs is defined:
<!entity %coreattrs id id #implied -- document-wide unique id -- class cdata #implied -- space separated list of classes -- style cdata #implied -- associated style info -- title cdata #implied -- advisory title/amplification -- href cdata #implied -- URL link if the element is clicked on -- target cdata #implied -- target frame for href --- alt cdata #implied -- alternate text if element cannot be displayed -- coordsize cdata #implied -- size of coordinate space inside the element -- coordorigin cdata #implied -- coordinate at top-left corner of element -- wrapcoords cdata #implied -- outline to use for tight text wrapping -- >
Here is the shapeattrs parameter entity:
<!entity %shapeattrs opacity cdata #implied -- opacity of the shape -- chromakey cdata #implied -- color to be made transparent -- stroke cdata #implied -- Boolean whether to stroke the outline or not -- strokecolor cdata #implied -- RGB color to use for the stroke -- strokeweight cdata #implied -- weight of the line to use for stroking -- fill cdata #implied -- Boolean whether to fill the shape or not -- fillcolor cdata #implied -- RGB color to use for the fill -- print cdata #implied -- Boolean whether the element is to be printed -- >
VML Uses CSS
VML uses CSS to position and orient shapes. In addition to standard CSS layout, the VML elements may also be rotated or flipped. Each element also establishes a coordinate space for its content, which allows scaling of the content with respect to the containing elements.
VML used a number of VML styles to augment CSS2, and I'll take a look at them here.
The rotation Property
You can use the rotation property to specify a rotation for a shape or group. The rotation is measured in clockwise degrees about its center.
The flip Property
You use the flip property to specify that a shape or group should be flipped about its center on either the x or the y axis. Here are the two values that you can assign to the flip property:
| Value | Description |
|---|---|
| x | Flip the rotated shape about the y axis |
| y | Flip the rotated shape about the x axis |
The center-x and center-y Properties
You use the center-x and center-y properties to specify the center of the block that contains the shape. These properties can be used as an alternative to the customary CSS positioning properties, left and top.
Local Coordinate Space
The <shape> and <group> elements are CSS block-level elements. Inside their blocks, a local coordinate system is defined for any subelements using the coordsize and coordorigin attributes, and all CSS2 positioning information is expressed in terms of this local coordinate space. We'll run into these attributes in this chapter when we group shapes.
The VML coordsize attribute defines how many units there are along the width of the containing block. The coordorigin attribute defines the coordinate at the top left corner of the containing block. For example, take a look at a group defined as follows:
<v:shape style='width: 500px; height: 200px' coordsize="100,100" coordorigin="-50,-50" />
Here, the containing block would be 500 pixels wide by 200 pixels high. The coordinate system inside the block ranges from -50.0 to 50.0 along the x axis and -50.0 to 50.0 along the y-axis. The point (0, 0) is right in the center of the block. Shapes inside the group are positioned and sized according to this local coordinate system. That's useful because, no matter how the width and height of the group is changed, the local coordinate system inside will remain the same.
The <shape> Element
The <shape> element is the primary one in VML, although I rarely find myself using it in practice (I mostly use the predefined shapes based on <shape>). This element may appear by itself or within a <group> element. The <shape> element includes all the attributes in coreattrs and shapeattrs, and adds three more:
<!attlist shape %coreattrs; %shapeattrs; type cdata #implied -- reference to shapetype -- adj cdata #implied -- list of adjust values for parameterized paths -- path cdata #implied -- string with command set describing a path -- >
For the sake of reference, all the attributes of this element and their descriptions appear in Table 19.2; note that VML attributes can be part of either the VML or the CSS namespaces.
| Namespace | Attribute | Type | Default Value | Description |
|---|---|---|---|---|
| CSS | flip | String | null | Specifies that the shape image inside the reference rectangle should be flipped along the given axes in the order specified. Takes the values "x", "y", or both. |
| CSS | height | Number | 100 | Specifies the height of the containing block of the shape. |
| CSS | left, margin-left, center-x, etc | Number | 0 | Sets the position of the left of the containing block of the shape. |
| CSS | position | string | "static" | Sets the CSS type of positioning. When inside a group, this value must always be "absolute". |
| CSS | rotation | number | 0 | Specifies the angle by which to rotate. |
| CSS | top, margin-top, center-y, etc | number | 0 | Sets the position of the top of the containing block of the shape. |
| CSS | visibility | string | visible | Sets the visibility of shapes. |
| CSS | width | number | 100 | Specifies the width of the container rectangle of the shape. |
| CSS | z-index | number | 0 | Specifies the z-index of the shape. Positive numbers come out of the screen, and negative ones go into it. |
| VML | adj | string | null | Is a comma-separated list of numbers that are "adjusting" parameters for the formulas that define the path of the shape. |
| VML | alt | string | null | Text associated with the shape that may appear instead of the shape. |
| VML | chromakey | color | null | Sets a color value that will be transparent so that anything behind the shape will show through. |
| VML | class | string | null | Gives the CSS class of this shape. |
| VML | coordorigin | Vector2D | "0 0" | Gives the coordinates at the top-left corner of the containing block. |
| VML | coordsize | Vector2D | "1000 1000" | Gives the width and height of the coordinate space inside the containing block of this shape. |
| VML | fill | boolean | true | If "true", the path defining the shape will be filled. |
| VML | fillcolor | color | "white" | Specifies the color of the brush to use to fill the path of this shape. |
| VML | href | string | null | Specifies the URI to jump to when this shape is clicked. |
| VML | id | string | null | A unique identifier for the shape. |
| VML | opacity | number | 1.0 | Sets the opacity of the entire shape. Set this to values between 0 (transparent) and 1 (opaque.) |
| VML | path | string | null | Specifies the path that defines the shape a string containing the commands that define the path. |
| VML | boolean | true | If true, this shape should be printed. | |
| VML | stroke | boolean | true | If true, the path defining the shape will be stroked (rendered) using a solid line, unless there is a stroke subelement. |
| VML | strokecolor | color | "black" | Sets the color of the brush to use to draw the path of this shape. |
| VML | stroke weight | number | "0.75pt" | Sets the width of the brush to use to stroke the path. |
| VML | target | string | null | The target frame URI. |
| VML | title | string | null | Gives the title of the shape. |
| VML | type | string | null | Holds a shapetype ID that describes the shape. |
| VML | v | string | null | A string containing the commands that define the path. |
| VML | Wrapcoords | string | null | Used for the wrapping text around an object. |
Microsoft gives all VML elements an "XML template" that specifies default values for each of its attributes; here's the XML template for the <shape> element:
<shape type=null adj=null path=null opacity="100%" chromakey="none" stroke="true" strokecolor="black" strokeweight="0.75pt" fill="true" fillcolor="white" print="true" id=null class=null style='visibility: visible' title=null href=null target=null alt=null coordsize="1000, 1000" coordorigin="0, 0" wrapcoords=null />
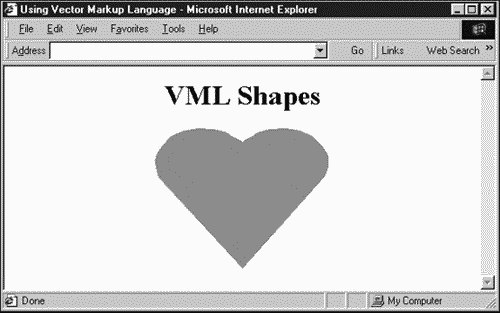
Using the <shape> element to draw shapes can be a little complex because you need to define the whole shape yourself, which you do by specifying a VML path. Doing that means giving the actual locations to use to draw the shape. To show how that works, I'll use a shape that Microsoft supports in its reference material; it draws a heart:
<HTML xmlns:v="urn:schemas-microsoft-com:vml"> <HEAD> <TITLE> Using Vector Markup Language </TITLE> <STYLE> v\:* {behavior: url(#default#VML);} </STYLE> </HEAD> <BODY> <CENTER> <H1> VML Shapes </H1> <v:shape fillcolor="red" strokecolor="red" coordsize="21600,21600" path="m10860,2187c10451,1746,9529,1018,9015,730, 7865,152,6685,,5415,,4175, 152,2995,575,1967, 1305,1150,2187,575,3222,242,4220,,5410,242,6560, 575,7597l10860, 21600,20995,7597c21480,6560, 21600,5410,21480,4220,21115,3222,20420,2187,19632, 1305,18575,575,17425,152,16275,,15005,,13735,152, 12705,730,12176,1018,11254,1746, 10860,2187xe" style='width:200;height:160;'/> </CENTER> </BODY> </HTML> You can see the results in Figure 19.2.
Figure 19.2. Using the <shape> element.
Another way of drawing this shape is to specify the shape's path in a <shapetype> element and then reference the <shapetype> element's ID with the <shape> element's type attribute:
<HTML xmlns:v="urn:schemas-microsoft-com:vml"> <HEAD> <TITLE> Using Vector Markup Language </TITLE> <STYLE> v\:* {behavior: url(#default#VML);} </STYLE> </HEAD> <BODY> <CENTER> <H1> VML Shapes </H1> <v:shapetype id="Valentine" fillcolor="red" strokecolor="red" coordsize="21600,21600" path="m10860,2187c10451,1746,9529,1018,9015,730, 7865,152,6685,,5415,,4175, 152,2995,575,1967, 1305,1150,2187,575,3222,242,4220,,5410,242,6560, 575,7597l10860, 21600,20995,7597c21480,6560, 21600,5410,21480,4220,21115,3222,20420,2187,19632, 1305,18575,575,17425,152,16275,,15005,,13735,152, 12705,730,12176,1018,11254,1746, 10860,2187xe"> </v:shapetype> <v:shape type="#Valentine" style='width:200;height:160;'/> </CENTER> </BODY> </HTML> However, unless you have a drawing tool of some kind, it's pretty tedious to calculate all the points in a path; it's usually far easier to use the predefined shapes.
Using Predefined Shapes
There are quite a few predefined shapes in VML, and using them can save you a lot of effort. In this section, I'll take a look at how to draw graphics using these elements.
The <rect> Element
The <rect> element just draws rectangles. This element supports both the coreattrs and shapeattrs attributes; here is its XML template, showing the default values for those attributes:
<rect id=null href=null target=null class=null title=null alt=null style='visibility: visible' opacity="1.0" chromakey="null" stroke="true" strokecolor="black" strokeweight="1" fill="true" fillcolor="white" print="true" coordsize="1000,1000" coordorigin="0 0" />
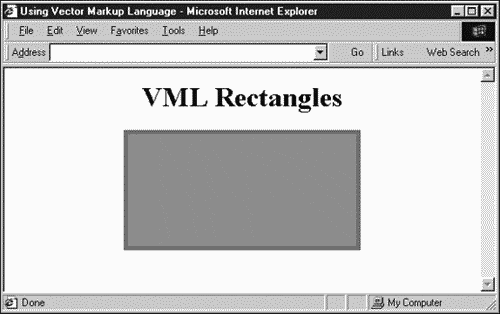
Here's an example; in this case, I'll draw a rectangle that's red with a green border of 4 points wide:
<HTML xmlns:v="urn:schemas-microsoft-com:vml"> <HEAD> <TITLE> Using Vector Markup Language </TITLE> <STYLE> v\:* {behavior: url(#default#VML);} </STYLE> </HEAD> <BODY> <CENTER> <H1> VML Rectangles </H1> <v:rect style='width:200pt;height:100pt' fillcolor="red" strokecolor="green" strokeweight="4pt"/> </CENTER> </BODY> </HTML> You can see the results in Figure 19.3.
Figure 19.3. Using the <rect> element.
The <roundrect> Element
You can use the <roundrect> element to draw a rectangle with rounded corners. This element supports the coreattrs and shapeattrs attributes, along with one additional attribute, arcsize:
<!attlist roundrect %coreattrs; %shapeattrs; arcsize cdata #implied -- size of arc on corners of rectangle -- >
The arcsize attribute defines the rounded corners as a percentage of half the smaller dimension of the rectangle. Here's the XML template for this element:
<roundrect arcsize="0.2" id=null href=null target=null class=null title=null alt=null style='visibility: visible' opacity="1.0" chromakey="null" stroke="true" strokecolor="black" strokeweight="0.75pt" fill="true" fillcolor="white" print="true" coordsize="1000,1000" coordorigin="0 0" />
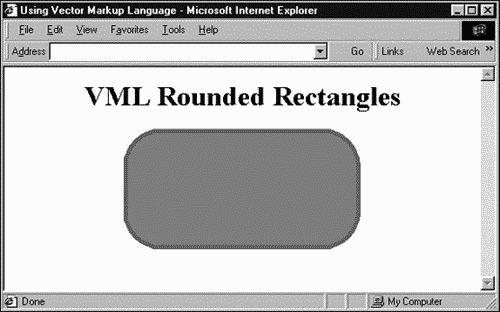
As an example, I'll convert the rectangle in the previous example to a rounded rectangle with rounded corners 20% of half the smaller dimension of the rectangle. To do that, you specify an arcsize of "0.2":
<HTML xmlns:v="urn:schemas-microsoft-com:vml"> <HEAD> <TITLE> Using Vector Markup Language </TITLE> <STYLE> v\:* {behavior: url(#default#VML);} </STYLE> </HEAD> <BODY> <CENTER> <H1> VML Rounded Rectangles </H1> <v:roundrect style="width:200pt;height:100pt" arcsize="0.2" fillcolor="red" strokecolor="green" strokeweight="4pt"/> </CENTER> </BODY> </HTML> You can see the results of this VML in Figure 19.4.
Figure 19.4. Using the <roundrect> element.
The <line> Element
You use the <line> element to create a straight line. Here are the attributes of this element:
<!attlist line %coreattrs; %shapeattrs; from cdata #implied to cdata #implied >
These are the two attributes specific to the <line> element:
| Attribute | Description |
|---|---|
| from | The starting point of the line. Specified using Vector2D format, like this: "100 100". |
| to | The ending point of the line. Specified using Vector2D format, like this: "100 100". |
And here's the XML template for this element:
<line from="0 0" to="10 10" id=null href=null target=null class=null title=null alt=null style='visibility: visible' opacity="1.0" chromakey="null" stroke="true" strokecolor="black" strokeweight="1" fill="true" fillcolor="white" print="true" coordsize="1000,1000" coordorigin="0 0" />
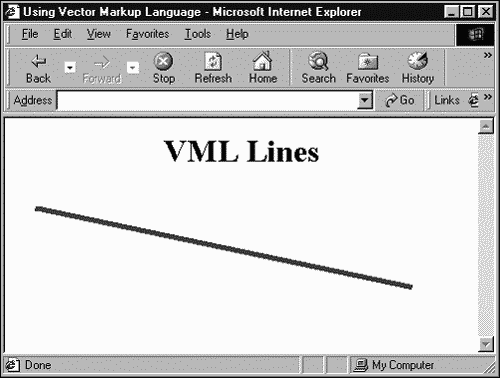
Here's an example; in this case, I'm drawing a thick blue line from the pixel coordinates (20, 20) to (400, 100):
<HTML xmlns:v="urn:schemas-microsoft-com:vml"> <HEAD> <TITLE> Using Vector Markup Language </TITLE> <STYLE> v\:* {behavior: url(#default#VML);} </STYLE> </HEAD> <BODY> <CENTER> <H1> VML Lines </H1> <v:line from="20px,20px" to="400px,100px" strokecolor="blue" strokeweight="4pt"> </CENTER> </BODY> </HTML> You can see the results of this VML in Figure 19.5.
Figure 19.5. Using the <line> element.
The <oval> Element
You use the <oval> element to draw ovals and circles. This element supports the coreattrs and shapeattrs attributes. Here is the <oval> element's XML template:
<oval position="0 0" size="100 100" id=null href=null target=null class=null title=null alt=null style='visibility: visible' opacity="1.0" chromakey="null" stroke="true" strokecolor="black" strokeweight="0.75pt" fill="true" fillcolor="white" print="true" coordsize="1000,1000" coordorigin="0 0" />
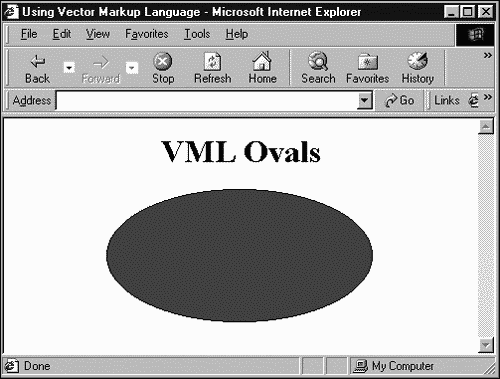
Here's an example where I'm drawing a blue oval; as with other elements, you can specify the size of the oval using the CSS style attribute:
<HTML xmlns:v="urn:schemas-microsoft-com:vml"> <HEAD> <TITLE> Using Vector Markup Language </TITLE> <STYLE> v\:* {behavior: url(#default#VML);} </STYLE> </HEAD> <BODY> <CENTER> <H1> VML Ovals </H1> <v:oval style='width:200pt;height:100pt' fillcolor="blue" /> </CENTER> </BODY> </HTML> You can see the results of this VML in Figure 19.6.
Figure 19.6. Using the <oval> element.
The <polyline> Element
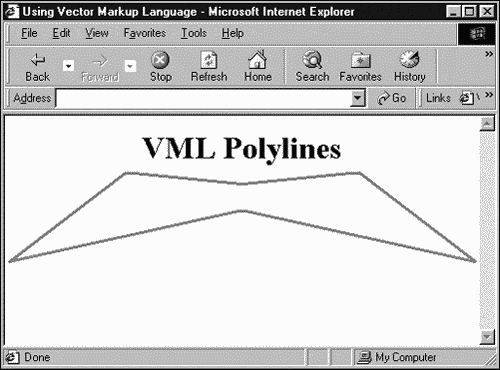
You can use the <polyline> element to define shapes that are created from connected line segments. You use this element to draw your own shapes. Here's the attribute list for this element:
<!attlist polyline %coreattrs; %shapeattrs; points cdata #implied >
The points attribute is a string that defines the polyline shape to draw using pairs of values that specify points, such as "0 0 10 10 40 40". Here is the XML template for this element:
<polyline points="0 0 10 10 20 0" id=null href=null target=null class=null title=null alt=null style='visibility: visible' opacity="1.0" chromakey="null" stroke="true" strokecolor="black" strokeweight="1" fill="true" fillcolor="white" print="true" coordsize="1000,1000" coordorigin="0 0" />
For example, to draw a polyline shape, here's some VML:
<HTML xmlns:v="urn:schemas-microsoft-com:vml"> <HEAD> <TITLE> Using Vector Markup Language </TITLE> <STYLE> v\:* {behavior: url(#default#VML);} </STYLE> </HEAD> <BODY> <CENTER> <H1> VML Polylines </H1> <v:polyline points="0pt,0pt,90pt,-9pt,180pt,60pt,0pt,20pt -180pt,60pt,-90pt,-9pt,0pt,0pt" strokecolor="red" strokeweight="2pt"/> </CENTER> </BODY> </HTML> You can see the results of this VML in Figure 19.7.
Figure 19.7. Using the <polyline> element.
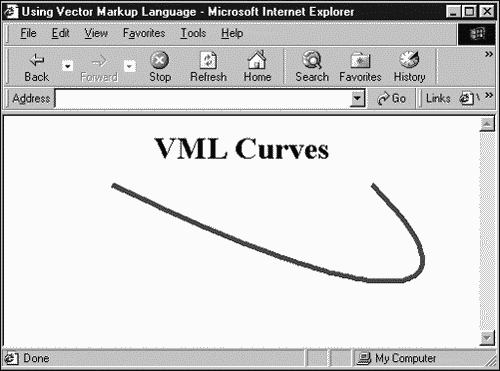
The <curve> Element
You can use the <curve> element to draw a cubic be`zier curve. Here is the attribute list of this element:
<!attlist curve %coreattrs; %shapeattrs; from cdata #implied control1 cdata #implied control2 cdata #implied to cdata #implied >
These are the custom attributes for this element:
| Attribute | Description |
|---|---|
| from | The starting point of the line in the coordinate space of the parent element. Specified using Vector2D format, like this: "100 100". |
| control1 | The first control point for the curve. Specified using Vector2D format, like this: "100 100". |
| control2 | The second control point for the curve. Specified using Vector2D format, like this: "100 100". |
| to | The ending point of the line in the coordinate space of the parent element. Specified using Vector2D format, like this: "100 100". |
The control points let you specify the bounding rectangle for the curve and so specify its shape. Here is this element's XML template:
<curve from="0 0" control1="10 10" control2="20 0" to="10 10" id=null href=null target=null class=null title=null alt=null style='visibility: visible' opacity="1.0" chromakey="null" stroke="true" strokecolor="black" strokeweight="1" fill="true" fillcolor="white" print="true" coordsize="1000,1000" coordorigin="0 0" />
For example, I'll draw a curve using this VML:
<HTML xmlns:v="urn:schemas-microsoft-com:vml"> <HEAD> <TITLE> Using Vector Markup Language </TITLE> <STYLE> v\:* {behavior: url(#default#VML);} </STYLE> </HEAD> <BODY> <CENTER> <H1> VML Curves </H1> <v:curve style='position:absolute' from="-100pt,0" control1="100pt,100pt" control2="200pt,100pt" to="100pt,0" strokecolor="blue" strokeweight="4pt"/> </CENTER> </BODY> </HTML> You can see the results of this VML in Figure 19.8.
Figure 19.8. Using the <curve> element.
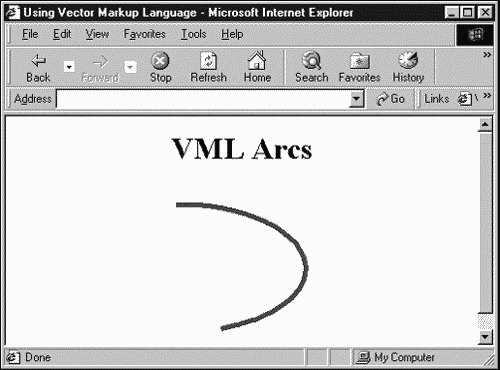
The <arc> Element
You can use the <arc> element to draw an arc. The arc is defined by the intersection of the oval with the start and end radius vectors given by angles. Here is the attribute list of this element:
<!attlist arc %coreattrs; %shapeattrs; startangle cdata #implied endangle cdata #implied >
These are the custom attributes for this element:
| Attribute | Description |
|---|---|
| startangle | Specifies the angle where the arc starts |
| endangle | Specifies the angle where the arc ends |
Here is the XML template for this element:
<arc startangle="0" endangle="90" id=null href=null target=null class=null title=null alt=null style='visibility: visible' opacity="1.0" chromakey="null" stroke="true" strokecolor="black" strokeweight="0.75pt" fill="true" fillcolor="white" print="true" coordsize="1000,1000" coordorigin="0 0" />
For example, here's how to take an arc from an oval, extending from 0 to 160 :
<HTML xmlns:v="urn:schemas-microsoft-com:vml"> <HEAD> <TITLE> Using Vector Markup Language </TITLE> <STYLE> v\:* {behavior: url(#default#VML);} </STYLE> </HEAD> <BODY> <CENTER> <H1> VML Arcs </H1> <v:arc style='width:200pt;height:100pt' startangle="0" endangle="160" strokecolor="blue" strokeweight="4pt"/> </CENTER> </BODY> </HTML> You can see the results of this VML in Figure 19.9.
Figure 19.9. Using the <arc> element.
Coloring Shapes
You may have noticed that I've specified colors so far using words such as "red", "blue", "green", and so on. In fact, there are three ways to specify colors in VML:
-
Using a predefined color name: fillcolor="red"
-
Using the rgb function: fillcolor="rgb(255,0,0)"
-
Specifying a direct value: fillcolor="#FF0000"
You can use the HTML 4.0 predefined color names in VML:
-
aqua
-
black
-
blue
-
fuchsia
-
gray
-
green
-
lime
-
maroon
-
navy
-
olive
-
purple
-
red
-
silver
-
teal
-
white
-
yellow
You can also specify colors by giving the red, green, and blue color values in the rgb function, like this: rgb(rrr, ggg, bbb). Here, rrr is the red color value, ggg is the green color value, and bbb is the blue color value, all of which range from 0 to 255. Or, you can give those color values directly using hexadecimal digits, as you would in HTML, like this: "#rrrgggbbb". For example, "000000" is black, "#0000FF" is bright blue, "#FFFFFF" is white, and so on.
Scaling Shapes
You may also have noticed that you can set the size for shapes with the style attribute, as in this case, where I'm setting the size of the bounding rectangle of an oval:
<HTML xmlns:v="urn:schemas-microsoft-com:vml"> <HEAD> <TITLE> Using Vector Markup Language </TITLE> <STYLE> v\:* {behavior: url(#default#VML);} </STYLE> </HEAD> <BODY> <CENTER> <H1> VML Ovals </H1> <v:oval style='width:200pt;height:100pt' fillcolor="blue" /> </CENTER> </BODY> </HTML> To scale a shape, all you have to do is change the width and height, as specified with the style attribute. For example, to double the oval's size in both dimensions, I could assign style a value of "width:400pt;height:200pt".
Positioning Shapes
VML uses the same syntax defined in CSS2 to position shapes on a Web page. You can use static, relative, or absolute positioning to determine where the base point is located on a Web page. You can also use the top and left or center-x and center-y, style attributes to specify the offset from the base point at which the containing box for the shape will be positioned.
You can also use z-index to specify the z-order of shapes on a Web page. In addition, VML provides rotation and flip to rotate or flip shapes. I'll take a look at a few of the position styles here.
The static Position Style
The default position style is static, which makes the browser insert a shape at the current point in the browser's text flow. Here's an example putting static positioning to work, where I'm drawing a rectangle following some text:
<HTML xmlns:v="urn:schemas-microsoft-com:vml"> <HEAD> <TITLE> Using Vector Markup Language </TITLE> <STYLE> v\:* {behavior: url(#default#VML);} </STYLE> </HEAD> <BODY> <CENTER> <H1> VML Positioning </H1> Here is the rectangle: <v:rect style='width:200pt;height:100pt' fillcolor="red" strokecolor="green" strokeweight="4pt"/> </CENTER> </BODY> </HTML> The results appear in Figure 19.10. As you see there, the shape's base line is aligned with the baseline of the text.
Figure 19.10. Using static positioning.

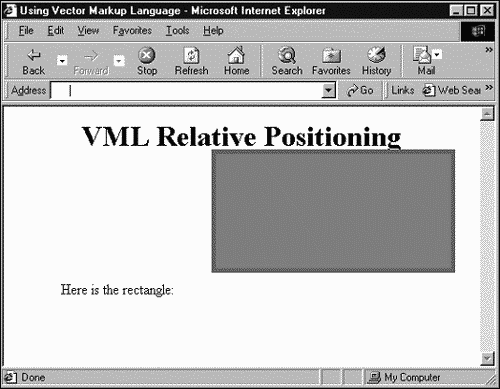
The relative Position Style
When you use static positioning, a shape is positioned with respect to the current location in the text flow. You can also position shapes relative to the current location in the text flow. To do so, you use the position:relative style and use the top and left style properties.
Here's an example where I position a shape 30 points to the left of the current text location and 15 points higher:
<HTML xmlns:v="urn:schemas-microsoft-com:vml"> <HEAD> <TITLE> Using Vector Markup Language </TITLE> <STYLE> v\:* {behavior: url(#default#VML);} </STYLE> </HEAD> <BODY> <CENTER> <H1> VML Relative Positioning </H1> Here is the rectangle: <v:rect style='position:relative;left:30pt; top:-15pt;width:200pt;height:100pt' fillcolor="red" strokecolor="green" strokeweight="4pt"/> </CENTER> </BODY> </HTML> You can see the results in Figure 19.11. As you see in the figure, the shape is positioned relative to the current text flow location.
Figure 19.11. Using relative positioning.
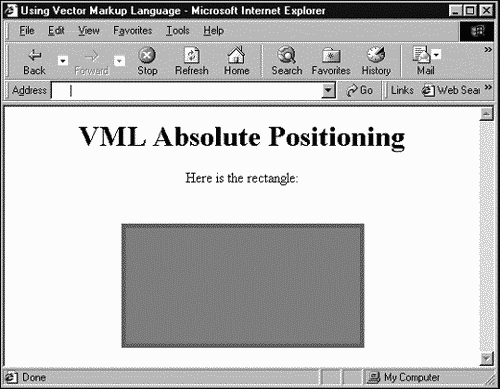
The absolute Position Style
You can also position shapes in absolute terms. When you set the position style property to absolute, the shape is positioned with respect to the upper-left corner of its container. You can use the top and left style properties to position the top left of the shape with regard to the container's origin.
Here's an example. In this case, I'll position a VML shape 100 points from the top and left of the shape's container, which is the browser's display area in this case:
<HTML xmlns:v="urn:schemas-microsoft-com:vml"> <HEAD> <TITLE> Using Vector Markup Language </TITLE> <STYLE> v\:* {behavior: url(#default#VML);} </STYLE> </HEAD> <BODY> <CENTER> <H1> VML Absolute Positioning </H1> Here is the rectangle: <v:rect style='position:absolute;left:100pt; top:100pt;width:200pt;height:100pt' fillcolor="red" strokecolor="green" strokeweight="4pt"/> </CENTER> </BODY> </HTML> You can see the results in Figure 19.12. The rectangle is positioned in absolute terms in the browser's display area; note that when you position shapes absolutely, they are not considered part of the text flow.
Figure 19.12. Using absolute positioning.
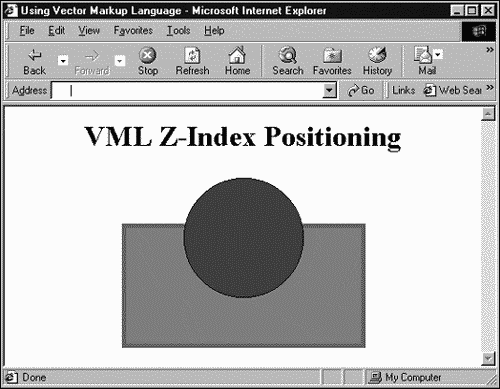
The z-index Position Style
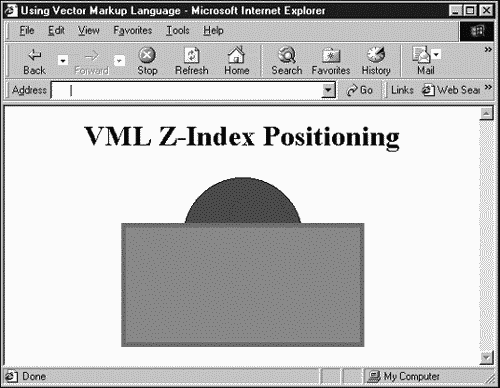
It is possible to position a shape that overlaps another shape. In VML, you can control the z-order by using the z-index style attribute. You can set this attribute to zero, a positive integer, or a negative integer. The shape that has a larger z-index value appears on top of the shape that has a smaller z-index value. When both shapes have the same z-index value, the shape that was displayed last appears on top.
For example, in the following VML, the blue oval is displayed on top of the red rectangle. This is because the z-index value of the blue oval is greater than the z-index value of the red rectangle:
<HTML xmlns:v="urn:schemas-microsoft-com:vml"> <HEAD> <TITLE> Using Vector Markup Language </TITLE> <STYLE> v\:* {behavior: url(#default#VML);} </STYLE> </HEAD> <BODY> <CENTER> <H1> VML Z-Index Positioning </H1> <v:rect style='position:absolute;left:100pt;top:100pt; width:200pt;height:100pt;z-index:0' fillcolor="red" strokecolor="green" strokeweight="4pt"/> <v:oval style='position:absolute;left:150pt;top:60pt; width:100pt;height:100pt;z-index:1' fillcolor="blue" /> </CENTER> </BODY> </HTML> You can see the results in Figure 19.13.
Figure 19.13. Using z-index positioning.
If you reverse the z-index of the shapes, the blue oval would move behind the red rectangle:
<v:rect style='position:absolute;left:100pt;top:100pt; width:200pt;height:100pt;z-index:1' fillcolor="red" strokecolor="green" strokeweight="4pt"/> <v:oval style='position:absolute;left:150pt;top:60pt; width:100pt;height:100pt;z-index:0' fillcolor="blue" />
You can see the new result in Figure 19.14.
Figure 19.14. Reversing z-index positioning.
Positive z-index values are considered out of the screen, and negative values are considered into the screen. Note that if you provide a negative integer, you can use z-index to position graphics behind the normal flow of text.
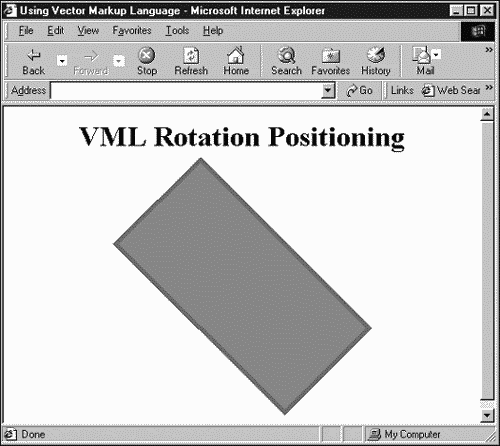
The rotation Position Style
You can use the rotation style property to specify how many degrees you want a shape to be rotated. A positive value specifies a clockwise rotation, and a negative value specifies a counterclockwise rotation.
For example, if you specify style='rotation:45', you can rotate this rectangle 45 clockwise:
<HTML xmlns:v="urn:schemas-microsoft-com:vml"> <HEAD> <TITLE> Using Vector Markup Language </TITLE> <STYLE> v\:* {behavior: url(#default#VML);} </STYLE> </HEAD> <BODY> <CENTER> <H1> VML Rotation Positioning </H1> <v:rect style='position:absolute;left:100pt;top:100pt; width:200pt;height:100pt;rotation:45' fillcolor="red" strokecolor="green" strokeweight="4pt"/> </CENTER> </BODY> </HTML> You can see the results of this VML in Figure 19.15.
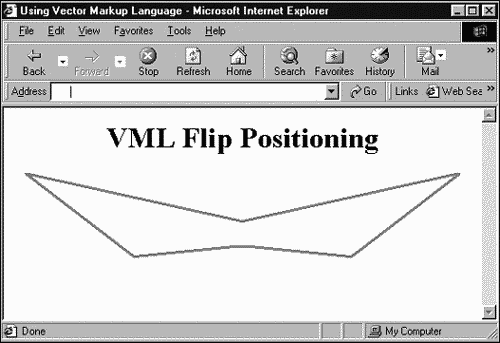
The flip Position Style
You can use the flip style attribute to flip a shape on its x or y axis. Here are the possible values of this property:
| Value | Description |
|---|---|
| x | Flip the rotated shape about the y axis |
| y | Flip the rotated shape about the x axis |
Figure 19.15. Rotation positioning.
You can use either x or y or both. If you use style='flip:x y', the shape will flip on both its x and y axis. As an example, here's how to flip the shape in Figure 19.7, with respect to the y axis:
<HTML xmlns:v="urn:schemas-microsoft-com:vml"> <HEAD> <TITLE> Using Vector Markup Language </TITLE> <STYLE> v\:* {behavior: url(#default#VML);} </STYLE> </HEAD> <BODY> <CENTER> <H1> VML Flip Positioning </H1> <v:polyline points="0pt,0pt,90pt,-9pt,180pt,60pt,0pt, 20pt -180pt,60pt,-90pt,-9pt,0pt,0pt" style="flip: y" strokecolor="red" strokeweight="2pt"/> </CENTER> </BODY> </HTML> The flipped shape appears in Figure 19.16.
Figure 19.16. Flip positioning.
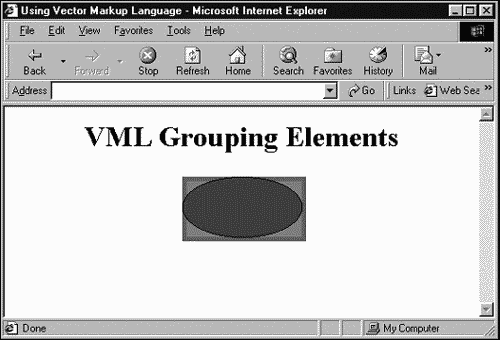
The <group> Element
You can group shapes with the <group> element, which enables you to treat a number of shapes as one unit. To create a group, you use the <group> element, which supports the coreattrs attributes. Here is this element's XML template:
<group id=null class=null style='visibility: visible' title=null href=null target=null alt=null coordsize="1000, 1000" coordorigin="0, 0" wrapcoords=null />
Here's an example. In this case, I'll group a rectangle and an oval together. I do that by creating a <group> element this way:
<HTML xmlns:v="urn:schemas-microsoft-com:vml"> <HEAD> <TITLE> Using Vector Markup Language </TITLE> <STYLE> v\:* {behavior: url(#default#VML);} </STYLE> </HEAD> <BODY> <CENTER> <H1> VML Grouping Elements </H1> <v:group id="Group1" style='position:absolute; left:150pt;top:60pt;width:200pt;height:100pt' coordsize="100,100"> . . . </v:group> </CENTER> </BODY> </HTML> You position grouped shapes together, so I'm specifying the absolute position and dimensions of the group with the <group> element's style property.
Here's an important point the shapes in a group use the group's coordinate system because the group is their container. To specify the group's coordinates, you can use the coordsize and coordorigin attributes. By default, the coordinate size is set to 1000 x 1000, and the origin is set to (0, 0) in a group (there are no units for these values they're relative measurements expressed simply as numbers).
In this example, I've set the coordinate size to 100 x 100, so I draw the contained shapes using that coordinate system:
<HTML xmlns:v="urn:schemas-microsoft-com:vml"> <HEAD> <TITLE> Using Vector Markup Language </TITLE> <STYLE> v\:* {behavior: url(#default#VML);} </STYLE> </HEAD> <BODY> <CENTER> <H1> VML Grouping Elements </H1> <v:group id="Group1" style='position:absolute; left:150pt;top:60pt;width:200pt;height:100pt' coordsize="100,100"> <v:rect fillcolor="red" strokecolor="green" style='width:50;height:50' strokeweight="4pt" /> <v:oval fillcolor="blue" style='width:50;height:50' /> </v:group> </CENTER> </BODY> </HTML> You can see the results of this VML in Figure 19.17. The group of shapes is treated as one unit, which is useful because it enables you to position and scale all the shapes in the group at once.
Figure 19.17. Grouping elements.
The <shadow> Element
You can use the <shadow> element to add shadows to VML shapes, as well as create embossing effects and even double shadows. Here's the attribute list for this element:
<!attlist shadow id id #implied -- document-wide unique id -- on cdata #implied type cdata #implied obscured cdata #implied color cdata #implied opacity cdata #implied offset cdata #implied color2 cdata #implied offset2 cdata #implied origin cdata #implied matrix cdata #implied >
You can find the attributes of this element in Table 19.3.
| Namespace | Attribute | Type | Default Value | Description |
|---|---|---|---|---|
| VML | color | Boolean | gray RGB (128,128,128) | Sets the color of the primary shadow. |
| VML | color2 | Boolean | gray RGB(203,203,203) | Sets the color of the second shadow, or the highlight in an embossed shadow. |
| VML | id | string | null | Gives a unique identifier for the shadow. |
| VML | matrix | string | null | Is a perspective transform matrix using the form "scalexx,scalexy,scaleyx,scaleyy,perspectivex,perspectivey". The perspective units are measured in inverse fractions of the shape size. |
| VML | obscured | Boolean | false | Determines whether you can see the shadow if the shape is not filled. |
| VML | offset | vector2D | 2pt,2pt | Amount of x,y offset for the shadow from the shape's location. |
| VML | offset2 | vector2D | 0pt,0pt | Amount of x,y offset for the second shadow from the shape's location. |
| VML | on | Boolean | true | Turns the display of the shadow on and off. |
| VML | opacity | number | 1.0 | Sets the opacity of the shadow. |
| VML | origin | vector2D | 0,0 | Sets the origin. Set this to fractional values. |
| VML | type | string | single | Sets the shadow type. This can be single, double, emboss, or perspective. |
This is the XML template for this element:
<shadow id=null on="false" type="single" obscured="false" color="rgb(128,128,128)" opacity="1.0" offset="2pt,2pt" color2="rgb(203,203,203)" opacity2="1.0" offset2="0pt,0pt" origin="0,0" matrix=null </shadow>
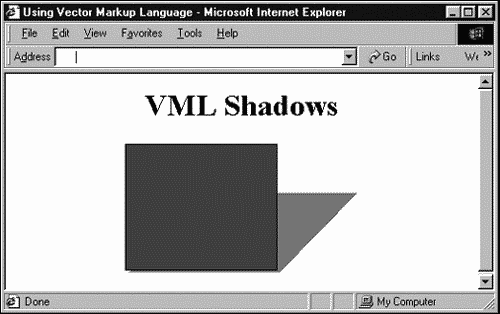
You place the <shadow> element inside the <shape>, <shapetype>, or any predefined shape element to draw a shape with a shadow. When creating a shadow, the tricky part is getting the perspective transform matrix to indicate how to create the shadow as you want it. In this example, I've created a matrix that will add a shadow to any VML shape that shape is a rectangle here, but you can use an oval or whatever you like pointing to the right and up at 45 :
<HTML xmlns:v="urn:schemas-microsoft-com:vml"> <HEAD> <TITLE> Using Vector Markup Language </TITLE> <STYLE> v\:* {behavior: url(#default#VML);} </STYLE> </HEAD> <BODY> <CENTER> <H1> VML Shadows </H1> <v:rect style='width:120pt;height:100pt;' fillcolor="blue"> <v:shadow on="true" type="perspective" origin=".5,.5" matrix="1,-1,0,1,0,-5e-7"/> </v:rect> </CENTER> </BODY> </HTML> The result appears in Figure 19.18, where you can see the shadow apparently coming from a light source at the lower left.
Figure 19.18. Creating VML shadows.
The <fill> Element
As we've seen, you can use the fill attribute to set fill colors. The <fill> element works like the fill attribute, except that it's an element you enclose in VML shape elements. I'll take a look at this element here, including some of its more advanced capabilities. Here is the attribute list for the <fill> element:
<!attlist fill id id #implied -- document-wide unique id -- type cdata #implied on cdata #implied color cdata #implied color2 cdata #implied opacity cdata #implied src cdata #implied size cdata #implied origin cdata #implied position cdata #implied alignshape cdata #implied colors cdata #implied angle cdata #implied focus cdata #implied focussize cdata #implied focusposition cdata #implied method cdata #implied >
You can find these attributes explained in Table 19.4.
| Namespace | Attribute | Type | Default Value | Description |
|---|---|---|---|---|
| VML | alignshape | Boolean | true | Aligns the image with the shape if true; otherwise, aligns the image with the window. |
| VML | angle | number | "0" | Specifies the angle along which the gradient is directed. |
| VML | aspect | string | "ignore" | Set this to "ignore" to ignore aspect issues, to "atleast" to specify that the image is at least as big as imageSize, or to "atmost"to specify that the image is no bigger than imageSize. |
| VML | color | color | "white" | Sets the fill color. |
| VML | color2 | color | "white" | Sets the secondary fill color for patterns. |
| VML | colors | string | null | Sets intermediate colors in the gradient and their relative positions along the gradient for example: "20% red, 60% blue, 80% green". |
| VML | focus | number | "0" | Sets the focus point for linear gradient fill; possible values range from 100 to 100. |
| VML | focusposition | Vector2D | 0,0 | For radial gradients, sets the position of the innermost rectangle. |
| VML | focussize | Vector2D | 0,0 | For radial gradients, sets the size of the innermost rectangle. |
| VML | id | string | null | Gives a unique identifier for the shape. |
| VML | method | string | "sigma" | Sets the fill method; set this to "none", "linear", "sigma" or "any". |
| VML | on | Boolean | true | Turns fill display on or off. |
| VML | opacity | number | 1.0 | Sets the opacity of the fill. |
| VML | origin | Vector2D | "auto" | Sets the origin, relative to the upper left of the image. By default, sets to the center of the image. |
| VML | position | Vector2D | "auto" | Is a point in the reference rectangle of the shape used to position the origin of the image. Specified as a fraction of the image size. |
| VML | size | Vector2D | "auto" | Gives the size of the image. |
| VML | src | string | null | Gives the URI of an image to load for image and pattern fills. |
| VML | type | string | "solid" | Sets the fill type. May be "solid", "gradient", "gradientradial", "tile", "pattern", or "frame". |
This is the XML template for this element, showing the default values for its attributes:
<fill id=null type="solid" on="true" color="white" opacity="1.0" color2="white" opacity2="1.0" src=null size="auto" origin="center" position="center" aspect="ignore" alignshape="true" colors=null angle="0" focus="0" focussize="0,0" focusposition="0,0" method="sigma" />
You can create all kinds of fills, such as gradient fills, pattern fills, and picture fills.
Creating Gradient Fills
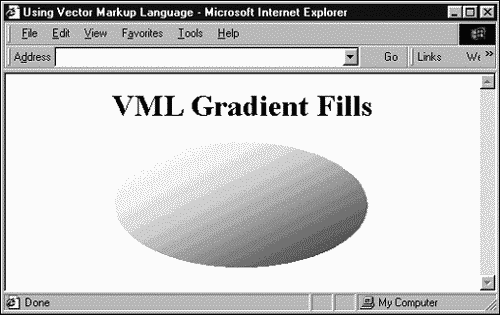
To draw a gradient-filled shape, you can set the type property attribute of the <fill> subelement to "gradient" or "gradientradial", and then specify other property attributes of the <fill> subelement, such as method, color2, focus, and angle. Here's an example; in this case, I'm creating a shaded egg shape with a standard gradient fill:
<HTML xmlns:v="urn:schemas-microsoft-com:vml"> <HEAD> <TITLE> Using Vector Markup Language </TITLE> <STYLE> v\:* {behavior: url(#default#VML);} </STYLE> </HEAD> <BODY> <CENTER> <H1> VML Gradient Fills </H1> <v:oval style='width:200pt;height:100pt' fillcolor="blue" strokecolor="white"> <v:fill method="linear sigma" angle="45" type="gradient" /> </v:oval> </CENTER> </BODY> </HTML> You can see the results of this VML in Figure 19.19.
Figure 19.19. A gradient fill.
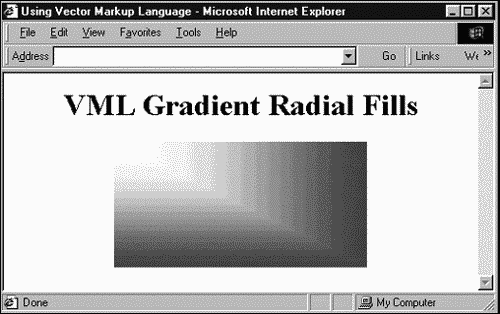
Another option is the gradientradial fill type, where the fill gradient is directed radially. Here's an example, this time with a rectangle:
<HTML xmlns:v="urn:schemas-microsoft-com:vml"> <HEAD> <TITLE> Using Vector Markup Language </TITLE> <STYLE> v\:* {behavior: url(#default#VML);} </STYLE> </HEAD> <BODY> <CENTER> <H1> VML Gradient Radial Fills </H1> <v:rect style='width:200pt;height:100pt' fillcolor="blue" strokecolor="white"> <v:fill method="linear sigma" angle="45" type="gradientradial" /> </v:rect> </CENTER> </BODY> </HTML> You can see the results of this VML in Figure 19.20.
Figure 19.20. A gradient radial fill.
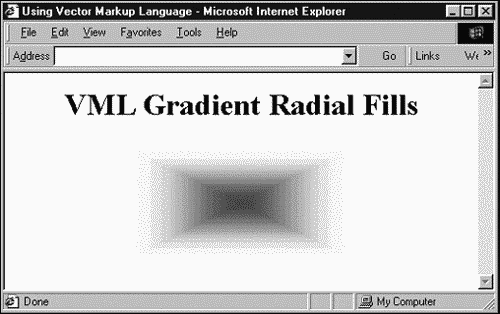
You can also set the origin of gradient radial fills, as in this case, where I'm setting the gradient origin to the center of the rectangle for an intriguing effect:
<HTML xmlns:v="urn:schemas-microsoft-com:vml"> <HEAD> <TITLE> Using Vector Markup Language </TITLE> <STYLE> v\:* {behavior: url(#default#VML);} </STYLE> </HEAD> <BODY> <CENTER> <H1> VML Gradient Radial Fills </H1> <v:rect style='width:200pt;height:100pt' fillcolor="blue" strokecolor="white"> <v:fill method="linear sigma" angle="45" focus="100%" focusposition=".5,.5" focussize="0,0" type="gradientradial" /> </v:rect> </CENTER> </BODY> </HTML> You can see the results of this VML in Figure 19.21.
Figure 19.21. A gradient radial fill with origin at the center.
Creating Pattern Fills
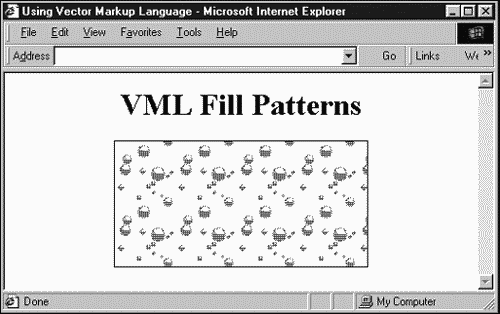
To draw a pattern-filled shape, you can set the type property attribute of the <fill> element to "pattern", and then set the src property to the URI of an image file. For example, here's how I use the image bubbles.bmp, which comes with Windows, as a fill pattern (after converting bubbles.bmp to a GIF file so that Internet Explorer can handle it):
<HTML xmlns:v="urn:schemas-microsoft-com:vml"> <HEAD> <TITLE> Using Vector Markup Language </TITLE> <STYLE> v\:* {behavior: url(#default#VML);} </STYLE> </HEAD> <BODY> <CENTER> <H1> VML Fill Patterns </H1> <v:rect style='width:200pt;height:100pt' fillcolor="blue"> <v:fill type="pattern" src="bubbles.gif"/> </v:rect> </CENTER> </BODY> </HTML> Note that you can also specify the color of the fill you want, as in this case, where I'm making it blue (the original image is black and white). You can see the results of this VML in Figure 19.22, where the bubbles pattern is repeatedly tiled inside a rectangle.
Figure 19.22. A pattern fill.
Creating Picture Fills
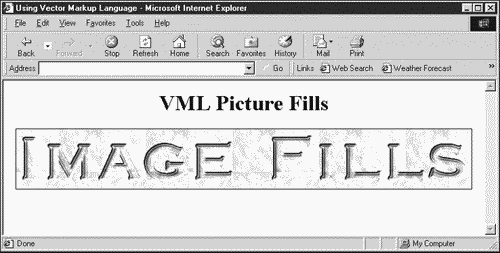
To draw a picture-filled shape, you can set the type property attribute of the <fill> element to "frame", and then set the src property to the URI of the image you want to use. Here's an example; in this case, I'll display the image fill.jpg:
<HTML xmlns:v="urn:schemas-microsoft-com:vml"> <HEAD> <TITLE> Using Vector Markup Language </TITLE> <STYLE> v\:* {behavior: url(#default#VML);} </STYLE> </HEAD> <BODY> <CENTER> <H1> VML Picture Fills </H1> <v:rect style='width:673px;height:89px'> <v:fill type="frame" src="fill.jpg"/> </v:rect> </CENTER> </BODY> </HTML> You can see the results of this VML in Figure 19.23.
Figure 19.23. A picture fill.
Using the <shapetype> Element
You can parameterize the creation of shapes with the <shapetype> element. The <shapetype> element defines a shape type, and you can instantiate shapes of that type. You create a shape type and give it a name with the ID attribute of <shapetype>, and you use that shape type with the <shape> element's type attribute.
Here's the attribute list of the <shapetype> element:
<!attlist shapetype %coreattrs; %shapeattrs; adj cdata #implied -- list of adjust values for parameterized paths -- path cdata #implied -- string with command set describing a path -- >
These are the custom attributes of this element:
| Attribute | Description |
|---|---|
| adj | A comma-separated list of numbers that are "adjusting" parameters for the formulas that define the path of the shape |
| path | The path that defines the shape; a string containing the commands that define the path |
Here is the <shapetype> element's XML template:
<shapetype adj=null path=null opacity="100%" chromakey="none" stroke="true" strokecolor="black" strokeweight="0.75pt" fill="true" fillcolor="white" print="true" id=null class=null style='visibility: visible' title=null href=null target=null alt=null coordsize="1000, 1000" coordorigin="0, 0" wrapcoords=null />
We saw an example using the <shapetype> element earlier in this chapter. In that example, the shape was defined with the path attribute, like this:
<v:shapetype id="Valentine" fillcolor="red" strokecolor="red" coordsize="21600,21600" path="m10860,2187c10451,1746,9529,1018,9015,730, 7865,152,6685,,5415,,4175, 152,2995,575,1967, 1305,1150,2187,575,3222,242,4220,,5410,242,6560, 575,7597l10860, 21600,20995,7597c21480,6560, 21600,5410,21480,4220,21115,3222,20420,2187,19632, 1305,18575,575,17425,152,16275,,15005,,13735,152, 12705,730,12176,1018,11254,1746, 10860,2187xe"> </v:shapetype>
The path defined here defines the shape. Specifying a path in the <shapetype> element is a little involved; you specify pairs of points along the path and use commands such as m (start a path), x (close the path), e (end the path), and so on. You can find the available commands in Table 19.5. This table also indicates how many parameters each command takes, using DTD notation; for example, 2* indicates that the command takes pairs of parameters. You can also skip any values that are zero when specifying points, so the point specification 16275,,15005,,13735,152 is the same as 16275,0,15005,0,13735,152.
| Command | Name | Parameters | Description |
|---|---|---|---|
| ae | angleellipseto | 6* | center (x,y), size (w,h), start-angle, end-angle. Draws a segment of an ellipse. |
| al | angleellipse | 6* | Same as angleellipseto, except that there is an implied move to the starting point of the segment. |
| ar | arc | 8* | left, top, right, bottom, start (x,y), end (x,y). Same as arcto, except that a new subpath is started by an implied move to the start point. |
| at | arcto | 8* | left, top, right, bottom, start (x,y), end (x,y). The first four values define the bounding box of an ellipse, and the second four define two radial vectors. This command draws a segment of the ellipse, starting at the angle defined by the start radius vector and ending at the angle defined by the end vector. |
| c | curveto | 6* | Draws a cubic be`zier curve from the current point to the coordinate given by the final two parameters. The control points are given by the first four parameters. |
| e | end | 0 | End of the current set of subpaths. |
| l | lineto | 2* | Draws a line from the current point to the given point. |
| m | moveto | 2 | Begins a new subpath at the given coordinate. |
| nf | nofill | 0 | Ensures that the current set of subpaths will not be filled. |
| ns | nostroke | 0 | Ensures that the current set of subpaths will not be drawn (stroked). |
| qb | quadraticbezier | 2+2* | (controlpoint (x,y))*, end (x,y) Defines one or more quadratic be`zier curves with a set of control points and an endpoint. |
| qx | ellipticalqaudrantx | 2* | end (x,y). Draws a quarter ellipse from the current point to the endpoint. |
| qy | ellipticalquadranty | 2* | end (x,y). Same as ellipticalquadrantx, except that the segment starts out vertical. |
| r | rlineto | 2* | Draws a line from the current point to the given point. |
| t | rmoveto | 2* | Starts a new subpath at the indicated coordinate. |
| v | rcurveto | 6* | Creates a cubic be`zier curve using the given coordinate relative to the current point. |
| wa | clockwisearcto | 8* | left, top, right, bottom start (x,y), end (x,y). Same as arcto, except that here the arc is drawn in a clockwise direction. |
| wr | clockwisearc | 8* | left, top, right, bottom start (x,y), end (x,y). Same as arc, except here the arc is drawn in a clockwise direction. |
| x | close | 0 | Closes the current subpath. Draws a straight line from the current point to the original moveto point. |
Here's how you can use this <shapetype> element to create a shape as we've done earlier in the chapter:
<HTML xmlns:v="urn:schemas-microsoft-com:vml"> <HEAD> <TITLE> Using Vector Markup Language </TITLE> <STYLE> v\:* {behavior: url(#default#VML);} </STYLE> </HEAD> <BODY> <CENTER> <H1> VML Shapes </H1> <v:shapetype id="Valentine" fillcolor="red" strokecolor="red" coordsize="21600,21600" path="m10860,2187c10451,1746,9529,1018,9015,730, 7865,152,6685,,5415,,4175, 152,2995,575,1967, 1305,1150,2187,575,3222,242,4220,,5410,242,6560, 575,7597l10860, 21600,20995,7597c21480,6560, 21600,5410,21480,4220,21115,3222,20420,2187,19632, 1305,18575,575,17425,152,16275,,15005,,13735,152, 12705,730,12176,1018,11254,1746, 10860,2187xe"> </v:shapetype> <v:shape type="#Valentine" style='width:200;height:160;'/> </CENTER> </BODY> </HTML> The results of this VML appear earlier in Figure 19.2.
You can list properties for the shape in the <shapetype> element, as in this example, which assigns a value to the fillcolor property. However, if you want to override those properties, you can do so; just specify new values in the <shape> element when you instantiate the shape. For example, here's how I turn the heart this VML draws blue:
<HTML xmlns:v="urn:schemas-microsoft-com:vml"> <HEAD> <TITLE> Using Vector Markup Language </TITLE> <STYLE> v\:* {behavior: url(#default#VML);} </STYLE> </HEAD> <BODY> <CENTER> <H1> VML Shapes </H1> <v:shapetype id="Valentine" fillcolor="red" strokecolor="red" coordsize="21600,21600" path="m10860,2187c10451,1746,9529,1018,9015,730, 7865,152,6685,,5415,,4175, 152,2995,575,1967, 1305,1150,2187,575,3222,242,4220,,5410,242,6560, 575,7597l10860, 21600,20995,7597c21480,6560, 21600,5410,21480,4220,21115,3222,20420,2187,19632, 1305,18575,575,17425,152,16275,,15005,,13735,152, 12705,730,12176,1018,11254,1746, 10860,2187xe"> </v:shapetype> <v:shape type="#Valentine" fillcolor="blue" style='width:200;height:160;'/> </CENTER> </BODY> </HTML> More Advanced VML
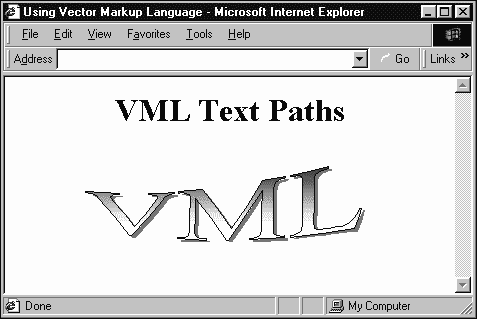
Besides the material we've seen in this chapter, there's plenty more in VML. Like many graphics languages, VML has a lot of depth. Here's a last example, adapted from the examples in the Microsoft VML reference, which displays text along a VML text path, specified using VML formulae:
<HTML xmlns:v="urn:schemas-microsoft-com:vml"> <HEAD> <TITLE> Using Vector Markup Language </TITLE> <STYLE> v\:* {behavior: url(#default#VML);} </STYLE> </HEAD> <BODY> <CENTER> <H1> VML Text Paths </H1> <v:shapetype id="MyShape" coordsize="21600,21600" adj="9931" path="m0@0c7200@2,14400@1,21600, 0m0@5c7200@6,14400@6,21600@5e"> <v:formulas> <v:f eqn="val #0"/> <v:f eqn="prod #0 3 4"/> <v:f eqn="prod #0 5 4"/> <v:f eqn="prod #0 3 8"/> <v:f eqn="prod #0 1 8"/> <v:f eqn="sum 21600 0 @3"/> <v:f eqn="sum @4 21600 0"/> <v:f eqn="prod #0 1 2"/> <v:f eqn="prod @5 1 2"/> <v:f eqn="sum @7 @8 0"/> <v:f eqn="prod #0 7 8"/> <v:f eqn="prod @5 1 3"/> <v:f eqn="sum @1 @2 0"/> <v:f eqn="sum @12 @0 0"/> <v:f eqn="prod @13 1 4"/> <v:f eqn="sum @11 14400 @14"/> </v:formulas> <v:path textpathok="t" /> <v:textpath on="t" fitshape="t" xscale="t"/> </v:shapetype> <v:shape type="#MyShape" style='position:absolute; top:60pt; left:60pt; width:207pt;height:63pt;' adj="8717" fillcolor="blue" strokeweight="1pt"> <v:fill method="linear sigma" focus="100%" type="gradient"/> <v:shadow on="t" offset="3pt"/> <v:textpath style='font-family:"Times New Roman"; v-text-kern:t'trim="t" fitpath="t" xscale="f" string="VML"/> </v:shape> </CENTER> </BODY> </HTML> You can see the results of this VML in Figure 19.24. You may have seen text graphics like this in Microsoft Office products such as Word and PowerPoint, and now you know how it's done.
Figure 19.24. Using a VML text path.
For more information on VML, take a look at the Microsoft VML site. VML is a powerful language, but it's limited to Internet Explorer. One day, browsers will implement a W3C language such as SVG, and I'll be able to rewrite this chapter.
It's time to take a look at using Perl and XML on the server side, and I'm going to do that in the next chapter.
| CONTENTS |
EAN: 2147483647
Pages: 23