Menus
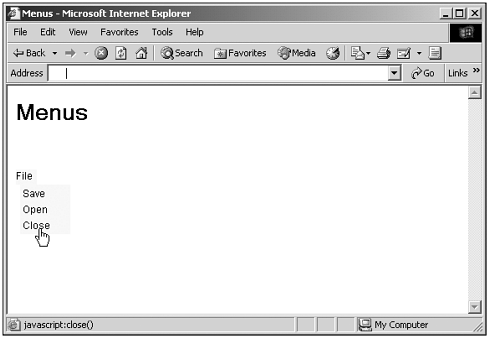
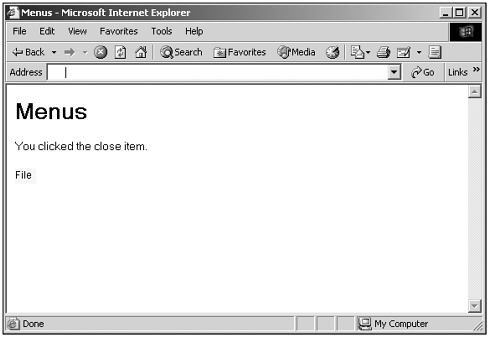
MenusYou can even put together a menu system displayed inside a web page using styles. To do that, you need a browser that supports the visibility style property (although it's possible to make menus "appear" and "disappear" with their left and top properties, moving them on- or off-screen ). Here's a demo menu program, targeted at IE5+. (Earlier versions didn't support the CSS2 visibility property.) Here the menu is actually a <DIV> that encloses a <TABLE> element (which I use to make sure the menu items appear one on top of the other). When the user clicks the menu name (File), the menu opens by making the <DIV> containing the menu visible. (And if the user clicks outside the menu without making a selection, the menu will close.) Each item in the menu is actually a hyperlink (with its TEXT- DECORATION style attribute set to none to remove underlining) to a JavaScript URL, enabling you to place code to execute when the user clicks that menu item in a JavaScript function. In this example, the code just displays a message indicating which menu item you selected. Here's what the code looks like: (Listing 21-14.html on the web site) <HTML> <HEAD> <TITLE>Menus</TITLE> <SCRIPT LANGUAGE="JavaScript"> <!-- function showMenu(e) { document.getElementById("div2").style.visibility = "visible" } function hideMenu(e) { var id = e.srcElement.id if(id != "div1"){ document.getElementById("div2").style.visibility = "hidden" } } function open() { document.getElementById("div3").innerText = "You clicked the open item." } function save() { document.getElementById("div3").innerText = "You clicked the save item." } function close() { document.getElementById("div3").innerText = "You clicked the close item." } //--> </SCRIPT> </HEAD> <BODY ONCLICK="hideMenu(event)"> <H1>Menus</H1> <FORM NAME="form1"> <DIV ID="div1" ONMOUSEDOWN="showMenu(event)" ONMOUSEOVER="this.style.cursor = You can see the results in Figure 21.9, where clicking the File item has opened the menu, and Figure 21.10, where I've selected the Close item, and the code is reporting that fact. Pretty cool, and all made possible with dynamic styles and JavaScript. Figure 21.9. Creating JavaScript-based menus. Figure 21.10. Creating JavaScript-based menus. That's it for our work with CSS in this chapter. As you can see, there's a terrific amount of power here for the JavaScript programmer's arsenal. In the next chapter, we'll take a look at working with JavaScript together with XML and XSLT. |
- Distributed Data Warehouse for Geo-spatial Services
- Data Mining for Business Process Reengineering
- Intrinsic and Contextual Data Quality: The Effect of Media and Personal Involvement
- Relevance and Micro-Relevance for the Professional as Determinants of IT-Diffusion and IT-Use in Healthcare
- Development of Interactive Web Sites to Enhance Police/Community Relations