Moving Images
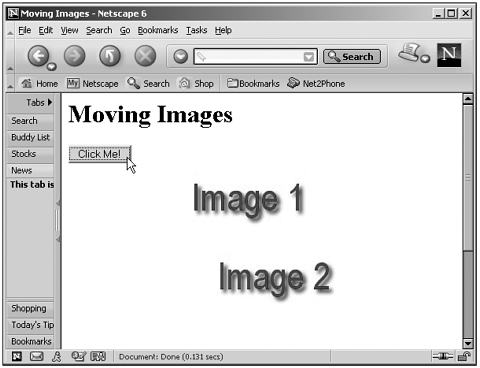
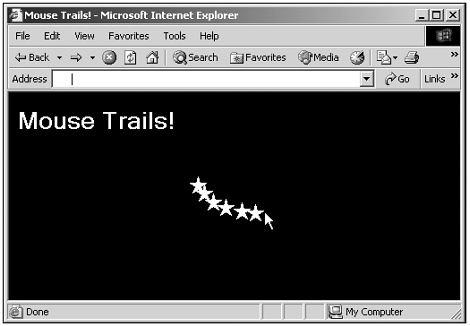
| Here's another way to work with imagesyou can move them around in a web page, repositioning them where you want them. Normally, the browser handles the flow and placement of images in the page, but you can specify the exact location of images using cascading styles (which we'll see more of in Chapter 21). Here's an example that changes the left and top styles of an image when you click a button, moving the image (again, you'll need version 6+ if you're using Netscape Navigator to work with styles this way): (Listing 15-09.html on the web site)<HTML> <HEAD> <TITLE>Moving Images</TITLE> <SCRIPT LANGUAGE="JavaScript"> <!-- function mover() { document.getElementById("div1").style.left = "150" document.getElementById("div1").style.top = "200" } // --> </SCRIPT> </HEAD> <BODY> <H1>Moving Images</H1> <DIV ID="div1" STYLE="POSITION:ABSOLUTE; LEFT:10; TOP:180; WIDTH:240; HEIGHT: You can see the results of this code in Figure 15.9, where I've clicked the button to move the second image. This is another technique good for JavaScript-supported animation. Figure 15.9. Moving an image. You can extend this example to create "mouse trails," where a set of images follows the mouse around; just use the onmousemove event and the setInterval method and move an image to follow the mouse cursor. Here's some code that does just that (this is just intended as a simple demo, and it's targeted at Internet Explorer 4+ and Netscape Navigator 6; if you want to use this example in earlier browser versions, you'll have to replace methods like getElementById with their earlier counterparts): (Listing 15-10.html on the web site) <HTML> <HEAD> <TITLE>Mouse Trails!</TITLE> <SCRIPT LANGUAGE="JavaScript"> <!-- var xData, yData var oldX, oldY, timeout, counter var timer = setInterval("draw()", 20); function init() { xData = new Array(-1, -1, -1, -1, -1, -1) yData = new Array(-1, -1, -1, -1, -1, -1) timeout = 0 counter = 0 oldX = -1 oldY = -1 } document.onmousemove = mouseMove function draw() { var id for (loopIndex = 0; loopIndex < 6; loopIndex++) { id = "img" + parseInt(loopIndex) if((xData[0] == oldX) && (yData[0] == oldY)) { timeout++ } else { timeout = 0 } if(timeout > 20) { document.getElementById(id).style.visibility = "hidden" document.getElementById(id).style.left = 0 document.getElementById(id).style.top = 2000 } else { if((xData[loopIndex] > 0) && (yData[loopIndex] > 0)) { document.getElementById(id).style.visibility = "visible" document.getElementById(id).style.left = xData[loopIndex] document.getElementById(id).style.top = yData[loopIndex] } } oldX = xData[0] oldY = yData[0] } } function mouseMove(e) { counter++ if(counter < 4) { return } counter = 0 var newx, newy if(window.event){ e = window.event } newx = e.clientX - 10 newy = e.clientY - 10 for(var loopIndex = 5; loopIndex >= 0; loopIndex--){ xData[loopIndex + 1] = xData[loopIndex] yData[loopIndex + 1] = yData[loopIndex] } xData[0] = newx yData[0] = newy } //--> </SCRIPT> </HEAD> <BODY BGCOLOR="BLACK" TEXT="ffffff" ONLOAD="init()"> <H1>Mouse Trails!</H1> <DIV ID="img0" STYLE="POSITION:ABSOLUTE; LEFT:0; TOP:2000; VISIBILTY:hidden"> <IMG SRC="star.gif"> </DIV> <DIV ID="img1" STYLE="POSITION:ABSOLUTE; LEFT:0; TOP:2000; VISIBILTY:hidden"> <IMG SRC="star.gif"> </DIV> <DIV ID="img2" STYLE="POSITION:ABSOLUTE; LEFT:0; TOP:2000; VISIBILTY:hidden"> <IMG SRC="star.gif"> </DIV> <DIV ID="img3" STYLE="POSITION:ABSOLUTE; LEFT:0; TOP:2000; VISIBILTY:hidden"> <IMG SRC="star.gif"> </DIV> <DIV ID="img4" STYLE="POSITION:ABSOLUTE; LEFT:0; TOP:2000; VISIBILTY:hidden"> <IMG SRC="star.gif"> </DIV> <DIV ID="img5" STYLE="POSITION:ABSOLUTE; LEFT:0; TOP:2000; VISIBILTY:hidden"> <IMG SRC="star.gif"> </DIV> </BODY> </HTML> You can see the results of this code in Figure 15.10, where you can see a trail of stars following the mouse around. Figure 15.10. Mouse trails. Tip Want to make an image appear to move under other page elements? Just include the style "z-index:-1" for the <IMG> element for a cool effect. |