Flylib.com

Books Software


6.1 Creating AWT Applications


6.1 Creating AWT Applications

The Abstract Windowing Toolkit, or AWT, was Java's early attempt at a GUI toolkit. It's still supported and used, so we'll take a look at an example here that will launch its own window. The original AWT package only took six weeks to write, and the controls, designed for use in applets, were modeled after HTML controls. Since that time, Swing has taken over the standard Java interfacebut even Swing is built on top of AWT.

Our AWT example will just launch its own window and display the same message as our applet. To follow along, create a new project, Ch06_02 , and give it a new class with a main method, Ch06_02 , putting that class into the org.eclipsebook.ch06 package. We need to import java.awt.* for basic AWT support, and java.awt.event.* to handle the window-closing event, so add this code:

import java.awt.*;

import java.awt.event.*;

The actual window this example will display will be based on the AWT Frame class and will be called AppFrame , so add this code to Ch06_02.java :

class AppFrame extends Frame

{

        .

        .

        .

}

As in our applet, we'll override the paint method and use the passed Graphics object to display the text we want in the new window:

class AppFrame extends Frame

{

public void paint(Graphics g)


{


g.drawString("Hello from Eclipse!", 60, 100);


}

}

Now, in the Ch06_02 class's main method, we'll create a new window of the AppFrame class and set its size :

public class Ch06_02 {

public static void main(String [] args)


{


AppFrame f = new AppFrame( );


f.setSize(200, 200);

.

        .

        .

    }

}

All that's left is to add the standard code to handle the window-close event that occurs when the user clicks the X button in the window at the upper right, and to show the window using its show method:

public class Ch06_02 {


    public static void main(String [] args)

    {

       AppFrame f = new AppFrame( );


       f.setSize(200, 200);

f.addWindowListener(new WindowAdapter( ) { public void


windowClosing(WindowEvent e) {System.exit(0);}});


f.show( );

}

}

To run this application, select Run As Java Application. This application will launch the AWT window, complete with the message you see in Figure 6-3.

Figure 6-3. Running a windowed AWT application
figs/ecps_0603.gif

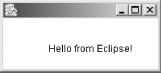
And that's itthe code for this application appears in Example 6-2.

Example 6-2. A basic AWT application
package org.eclipsebook.ch06;


import java.awt.*;

import java.awt.event.*;


public class Ch06_02 {


    public static void main(String [] args)

    {

       AppFrame f = new AppFrame( );


       f.setSize(200, 200);


       f.addWindowListener(new WindowAdapter( ) { public void

           windowClosing(WindowEvent e) {System.exit(0);}});


       f.show( );

    }

}


class AppFrame extends Frame

{

    public void paint(Graphics g)

    {

        g.drawString("Hello from Java!", 60, 100);

    }

}

As you can see, launching windowed applications this way is no problem from Eclipsejust set up your application to launch windows and run it. AWT is fine up to a point, but Swing is where the action is today.


6.2 Creating Swing Applications

Our first Swing application will be simple, and it will only mimic the applet and AWT applications we've seen by displaying the same message as they did. To put together this application, create a project named Ch06_03 and add the class Ch06_03 with a main method to the org.eclipsebook.ch06 package. We'll need these imports in this example:

import java.awt.*;

import javax.swing.*;

import java.awt.event.*;

In this example, we'll derive a new class, Panel , from the Swing JPanel class to display the message in:


class Panel extends JPanel

{

        .

        .

        .

}

The JPanel class has a method named paintComponent and we'll override that method to display the text message like this:

class Panel extends JPanel 

{

Panel( )


{


setBackground(Color.white);


}


public void paintComponent (Graphics g)


{


super.paintComponent(g);


g.drawString("Hello from Eclipse!", 60, 100);


}

}

The main class in this application, Ch06_03 , will extend the Swing JFrame class:

public class Ch06_03 extends JFrame {

        .

        .

        .

In the Ch06_03 class constructor, we'll create an object of the Panel class and add it to the content pane of the current JFrame object:

Panel p;

public Ch06_03( )


{


super("Swing application");


Container contentPane = getContentPane( );


p = new Panel( );


contentPane.add(p);


}

All that's left is to create a new object of the Ch06_03 class in the main method, display that object with the setVisible method, and handle the window closing with the WindowAdapter class as we did in AWT. You can see how this works in the main method in Example 6-3.

Example 6-3. A simple Swing application
package org.eclipsebook.ch06;


import javax.swing.*;

import java.awt.*;

import java.awt.event.*;


public class Ch06_03 extends JFrame {


        Panel p;


        public Ch06_03( ) 

        {

                super("Swing application");


                Container contentPane = getContentPane( );

                p = new Panel( );

                contentPane.add(p);

        }


        public static void main(String args[]) 

        {

                final JFrame f = new Ch06_03( );


                f.setBounds(100, 100, 300, 300);

                f.setVisible(true);

                f.setDefaultCloseOperation(DISPOSE_ON_CLOSE);


                f.addWindowListener(new WindowAdapter( ) {

                        public void windowClosing(WindowEvent e) {

                                System.exit(0);

                        }

                });

        }

}


class Panel extends JPanel 

{

        Panel( )

        {

                setBackground(Color.white);

        }


        public void paintComponent (Graphics g)

        {

                super.paintComponent(g);

                g.drawString("Hello from Eclipse!", 60, 100);

        }

}

You can see the results when you run this application in a Swing window in Figure 6-4.

Figure 6-4. A Swing application
figs/ecps_0604.gif

One of the original motivations behind Swing was to let developers tailor the "look-and-feel" of their applications to various operating systems. That's become a big issue in Eclipse, which comes with IBM's Standard Widget Toolkit (SWT), a replacement toolkit for AWT and Swing, built-in. SWT is the focus of the next two chapters, but before we get there, we'll take a look at what Swing has to offer for pluggable look-and-feels in a new example, Ch06_04 .

To set a Swing program's look-and-feel, you use the UIManager class's setLookAndFeel method. In this example, we'll add three radio buttons to support the Metal (Sun's Java look-and-feel), Motif, and Windows look-and-feels. First, we'll derive the Ch06_04 class from the Swing JFrame class and create the radio buttons:

public class Ch06_04 extends JFrame {

    JRadioButton b1 = new JRadioButton("Metal"),

    b2 = new JRadioButton("Motif"),

    b3 = new JRadioButton("Windows");

As in the previous example, we'll use a JPanel object for display purposes. Here, we'll display an assortment of controls, buttons, text fields, labels, checkboxes, and so on, and we'll add an ActionListener to the Metal/Motif/Windows radio buttons:

class Panel extends JPanel implements ActionListener

{

    public Panel( ) 

    {

        add(new JButton("JButton"));

        add(new JTextField("JTextField"));

        add(new JCheckBox("JCheckBox"));

        add(new JRadioButton("JRadioButton"));

        add(new JLabel("JLabel"));

        add(new JList(new String[] {

            "JList Item 1", "JList Item 2", "JList Item 3"}));

        add(new JScrollBar(SwingConstants.HORIZONTAL));


        ButtonGroup group = new ButtonGroup( );

        group.add(b1);

        group.add(b2);

        group.add(b3);


        b1.addActionListener(this);

        b2.addActionListener(this);

        b3.addActionListener(this);


        add(b1);

        add(b2);

        add(b3);

        .

        .

        .

All that's left is to call the UIManager class's setLookAndFeel method inside the actionPerformed method to switch the look-and-feel as needed. You can see how that works in the full code, which appears in Example 6-4.

Example 6-4. The Ch06_04.java Swing application with pluggable look-and-feel
package org.eclipsebook.ch06;


import java.awt.*;

import javax.swing.*;

import java.awt.event.*;


public class Ch06_04 extends JFrame {

    JRadioButton b1 = new JRadioButton("Metal"),

    b2 = new JRadioButton("Motif"),

    b3 = new JRadioButton("Windows");


    public Ch06_04( ) {

        super("Swing application");


        Container contentPane = getContentPane( );

        contentPane.add(new Panel( ), BorderLayout.CENTER);

    }


    public static void main(String args[]) 

    {

        final JFrame f = new Ch06_04( );


        f.setBounds(100, 100, 300, 300);

        f.setVisible(true);

        f.setDefaultCloseOperation(DISPOSE_ON_CLOSE);


        f.addWindowListener(new WindowAdapter( ) {

            public void windowClosing(WindowEvent e) {

                System.exit(0);

            }

        });

    }


    class Panel extends JPanel implements ActionListener

    {

        public Panel( ) 

        {

            add(new JButton("JButton"));

            add(new JTextField("JTextField"));

            add(new JCheckBox("JCheckBox"));

            add(new JRadioButton("JRadioButton"));

            add(new JLabel("JLabel"));

            add(new JList(new String[] {

                "JList Item 1", "JList Item 2", "JList Item 3"}));

            add(new JScrollBar(SwingConstants.HORIZONTAL));


            ButtonGroup group = new ButtonGroup( );

            group.add(b1);

            group.add(b2);

            group.add(b3);


            b1.addActionListener(this);

            b2.addActionListener(this);

            b3.addActionListener(this);


            add(b1);

            add(b2);

            add(b3);

        }

public void actionPerformed(ActionEvent e) 

        {

            JRadioButton src = (JRadioButton)e.getSource( );


            try {

                if((JRadioButton)e.getSource( ) == b1)

                    UIManager.setLookAndFeel(

                      "javax.swing.plaf.metal.MetalLookAndFeel");

                else if((JRadioButton)e.getSource( ) == b2)

                    UIManager.setLookAndFeel(

                        "com.sun.java.swing.plaf.motif.MotifLookAndFeel");

                else if((JRadioButton)e.getSource( ) == b3)

                    UIManager.setLookAndFeel(

                        "com.sun.java.swing.plaf.windows.WindowsLookAndFeel");

            }

            catch(Exception ex) {}


            SwingUtilities.updateComponentTreeUI(getContentPane( ));

        }

    }

}

When you run this application, you'll see a number of controls in the launched window, as seen in Figure 6-5. This figure shows the default "Metal" look that Sun developed as a cross-platform look.

Figure 6-5. The Metal look
figs/ecps_0605.gif

On the other hand, selecting the Motif radio button changes the look-and-feel to Motif, as you see in Figure 6-6.

Figure 6-6. The Motif look
figs/ecps_0606.gif

And selecting the Windows radio button displays the Windows look-and-feel, as you see in Figure 6-7.

Figure 6-7. The Windows look
figs/ecps_0607.gif

As you can see, Swing makes an effort to stay up-to-date with various looks. Unfortunately, the various operating systems that Swing emulates have changed faster than Swing has, and Swing is substantially behind the times now, especially when it comes to Windows.

We'll talk more on this issue in the next chapter when we start dealing with SWT.


Now that we're designing GUIs, you may be asking yourself, wouldn't it be great if Eclipse came with visual tools that would let you simply drag and drop controls into place? Many developers have asked for that, but it doesn't appear likely that Eclipse will include a drag-and-drop GUI toolbox soon. However, there are a number of Eclipse plug-ins that provide this functionalitysome are commercial, some are free. Next, we'll take a look at a free plug-in that lets you build Swing applications.