Understanding Location Steps and Paths
| How do location paths work? We took a look at location paths in the overview in Chapter 1, where we saw that location paths look much like directory paths. For example, you might store section one of chapter one of part one of a novel in a directory with this path if you're using Windows: \novel\part1\section1\chapter1 or this path if you're using Unix: /novel/part1/section1/chapter1 The idea behind XPath location paths is very much the same except that, as we'll see in this chapter and the next , the XPath syntax can get much more complex and detailed than directory paths. Like directory paths, you build location paths out of individual steps, called location steps , separated by / or // . You use these steps to specify the data you want, just as you use successive directories in a file path to get to the location of a file. For example, in the XPath location path /library/book/title[2]/text() , we begin with a / , which matches the root node of the document, followed by, in order:
In fact, the XPath location path /library/book/title[2]/text() uses abbreviated XPath syntax, which we're going to see in this chapter. Here's the full version of this XPath location path, where the child element nature of each 00successive location step is spelled out: /child::library/child::book/child::title[position()=2]/child::text Okaynow let's get to the details. The Parts of a Location StepEach location step is made up of an axis , a node test , and zero or more predicates, like this (where the * symbol means "zero or more of"): axis :: node-test [ predicate ]* For example, in the location step child:: name [position() = 2] , child is the name of the axis (which you follow with :: ), name is the node test and [position() = 2] is the predicate. In this case, the child axis selects child nodes of the node you start at, which is the context node. We're going to take a look at axes, node tests, and predicates in detail in this chapter. This location step can also be abbreviated, using the abbreviated syntax we'll see in this chapter, as name[2] (this works because the child axis is the default axis, and when you use position predicates like [position() = 2] , XPath lets you abbreviate them as simply [2] ). Location paths can be made up of one or more location steps, such as child::name[position() = 2]/child::firstName , which selects all the <firstName> elements that are children of the second <name> child element of the context node. This location path can also be abbreviated as name[2]/firstName . When you start the location path (not a location step) with / or // , the location path is called an absolute location path because you're specifying the path from the root node of the XML document (just as starting a file path with / in Unix starts the path from the root directory and makes the path an absolute one). Otherwise, the location path is relative , starting with the context node. For example, take a look at this node tree again: root element: <library> element: <book> ------------------- element: <title> element: <title> text: "I Love XPath" text: "XPath is the BEST" Beginning a location path with / (or // , as we'll see) makes that path start with the document's root node, making this an absolute location path and making the root node the context node for the first location step in the path. To move to the child <library> element, you add the location step library like this: /library (using unabbreviated syntax, that would be /child::library ). That makes the context node for the next location step the <library> element. To move to the <book> element starting from the <library> context node, you add book (or child::book ) to the location path like this: /library/book and so on, all the way down to the text in the second <title> element, which you reach with /library/book/title[2]/text() . These are all absolute location paths, starting from the root node. On the other hand, if you've got a context node already setsome XPath software lets you specify context nodesyour location paths can be relative. For example, if you've set the context node to the <library> element, the relative location path book/title[2]/text() will locate the text in the second <title> element in the document. Now it's time to get systematic about our study of location steps, which we're going to do by taking a look at what kind of axes, node tests, and predicates XPath are available. XPath AxesWe're going to take a look at all 13 XPath 1.0 axes in this chapter. For example, in the location step child::planet , which refers to all <planet> elements that are children of the context node, child is the axis (and as you now know, you can also abbreviate this location step as planet , because child is the default axis). Here are all the XPath 1.0 axes:
Each XPath location step must specify an axis (or use the default child axis), as in this location path we've already seen: /child::library/child::book/child::title[2]/child::text . You can also see the various XPath axes listed in Table 3.1, which lists the support for these axes by XML processors in Internet Explorer. The XML processor in Internet Explorer is called MSXML; MSXML 2.0 was the version in Internet Explorer 5.0, early versions of Internet Explorer 6.0 used MSXML3, and the current version is MSXML4. If you're using the .NET platform, your version of MSXML is MSXML.NET. Table 3.1. The XPath Axes
XPath Node TestsWhen you use an axis in a location step, you're telling XPath where to look and identifying a set of nodes. A node test tells XPath which of the nodes in that set you're interested in. There are a number of ways to create node tests. You can use names of nodes as node tests, or the wildcard * to select element or attribute nodes (note especially that * matches only elements and attributes, not just any kind of node). For example, the location step child::*/child::name selects all <name> elements that are grandchildren of the context node. To match attributes, you'd use the attribute axis like this: attribute::* . Besides node names and the wildcard character, you can also use these node tests in XPath 1.0:
You can see the XPath 1.0 node tests in Table 3.2, along with the XML processor version that supports them in the Internet Explorer. Table 3.2. The XPath Node Tests
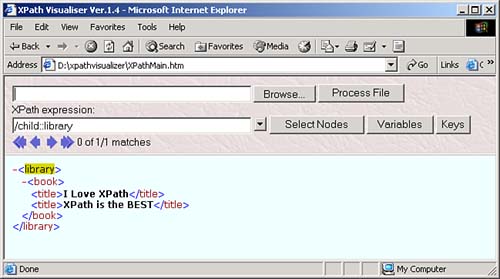
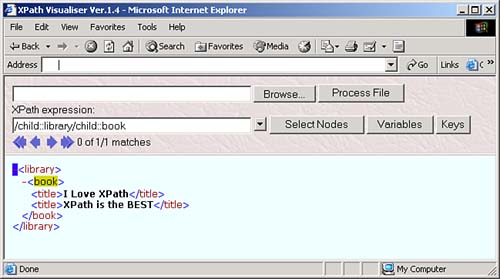
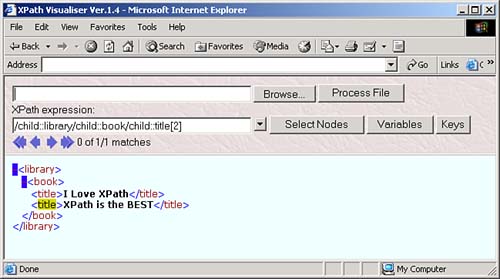
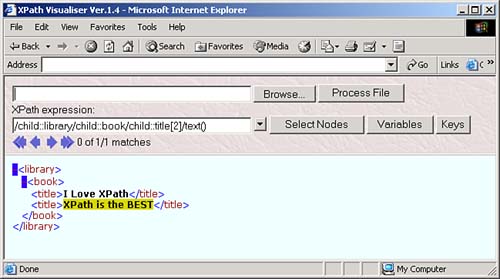
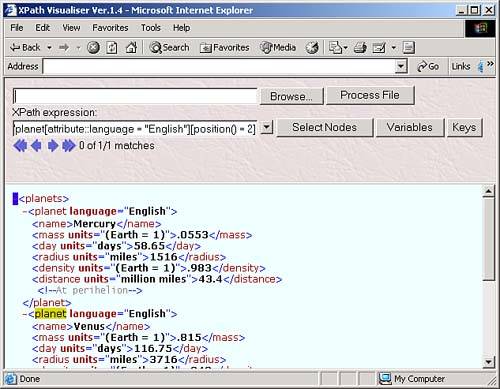
The node test lets you specify what nodes you want to work with in an XPath location step. For example, take a look at our sample node tree: root element: <library> element: <book> ------------------- element: <title> element: <title> text: "I Love XPath" text: "XPath is the BEST" You can start at the root node with / , and then use the child axis and the node test library to move to the <library> elementgiving you the location path /child::library . You can see this at work in the XPath Visualiser in Figure 3.1. Figure 3.1. Using the XPath location step /child::library . And you can move to the <book> element under the <library> element with another location step involving this child axis and a node test like this: /child:library/child:book . You can see what this looks like in the XPath Visualiser in Figure 3.2. Figure 3.2. Using the XPath location step /child::library/child::book . The next level down in the node tree holds two <title> elements, however. What if we only want to work with the second one? If we used the location path /child::library/child::book/child::title , we'd match both <title> elements, so we need more than a node test herewe need to use a predicate. XPath PredicatesThe next part of a location step, which follows the node text, is the predicate. A location step doesn't need a predicate, but if you use a predicate, you can specify even more about the node or nodes you want to match. You often use one of the built-in XPath functions in predicates. For example, take a look at the location step child::planet[position() = 2] . In this case, the predicate, which is always enclosed between [ and ] , is position() = 2 . This means that the value the built-in XPath function position() returns must indicate that this is the second <planet> child in order for the location step to match (this location step can also be abbreviated as planet[2] ). In this way, this predicate narrows down the search from the node-set of all <planet> children of the context node down to the second <planet> child. Now we're in a position to select the second <title> element in our XML document that has this node tree: root element: <library> element: <book> ------------------- element: <title> element: <title> text: "I Love XPath" text: "XPath is the BEST" To move to the second <title> element, we can use the location path /child::library/child::book/child::title[2] , as you see in the XPath Visualiser in Figure 3.3 (this location path can also be abbreviated as /library/book/title[2] ). Figure 3.3. Using the location step /child::library/child::book/child::title[2] . As you can see, expressions in predicates can let you narrow down the search from a whole node-set to just the nodes you're looking for. Here's another node-test exampleto select the <title> element that contains the text "I Love XPath", you can use this XPath location path with the text() node test: /child::library/child::book/child::title[text()="I Love XPath"] , as you see in Figure 3.4. Figure 3.4. Selecting a <title> element. Now we're able to construct XPath location paths like /child::library/child::book/child::title[2] using axes, node tests, and predicates. Each part of a location step, the axis, node test, and predicate, narrows down the set of nodes you're working with. You can also build up XPath expressions much as you can location paths. For example, the text() node test will return the text in a node, so if you want to extract the text of the <title> element, you can use the XPath expression /child::library/child::book/child::title[2]/text() , which evaluates not to a node-set, but to a text string, "XPath is the BEST", as you can see in Figure 3.5. Figure 3.5. Using /child::library/child::book/child::title[2]/text() . You can use multiple predicates in the same location stepfor example, say that we added a language attribute to each <planet> element in our planetary data XML document, as you see in ch03_01.xml (see Listing 3.1). Listing 3.1 Adding a Language Attribute ( ch03_01.xml )<?xml version="1.0" encoding="utf-8"?> <planets> <planet language="English"> <name>Mercury</name> <mass units="(Earth = 1)">.0553</mass> <day units="days">58.65</day> <radius units="miles">1516</radius> <density units="(Earth = 1)">.983</density> <distance units="million miles">43.4</distance><!--At perihelion--> </planet> <planet language="English"> <name>Venus</name> <mass units="(Earth = 1)">.815</mass> <day units="days">116.75</day> <radius units="miles">3716</radius> <density units="(Earth = 1)">.943</density> <distance units="million miles">66.8</distance><!--At perihelion--> </planet> <planet language="English"> <name>Earth</name> <mass units="(Earth = 1)">1</mass> <day units="days">1</day> <radius units="miles">2107</radius> <density units="(Earth = 1)">1</density> <distance units="million miles">128.4</distance><!--At perihelion--> </planet> </planets> What if we wanted to reach the second <planet> element that has a language attribute set to "English"? We could do that with a location path like this: /planets/planet[attribute::language = "English"][position() = 2] , as you see in Figure 3.6. In this way, you can handle multiple conditions with multiple predicates. Figure 3.6. Using /planets/planet[attribute::language = "English"][position() = 2] . Some Examples of XPath Location PathsThere's nothing like seeing all this at work to understand what's going on, so here are a number of location path examples:
As you can see, some of this syntax is pretty involved, and a little lengthy to type. However, there is an abbreviated form of XPath syntax, and we'll look at that next. Using XPath Abbreviated SyntaxThere are a number of abbreviations you can take advantage of in XPath syntax. Here are the rules:
You can also abbreviate predicate expressions like [position() = 3] as [3] . Using the abbreviated syntax makes XPath expressions a lot easier to write. For example, attribute::units can be abbreviated as @units , you can refer to the context node itself as simply . , and you can refer to the current node and any descendants as // . The // syntax in particular is useful and important. Take a look at ch03_01.xml , for example, the XML document where we're storing planetary data. In that XML document, we have three <planet> elements as children of the main <planets> element: <planets> <planet language="English"> <name>Mercury</name> <mass units="(Earth = 1)">.0553</mass> <day units="days">58.65</day> . . . <planet language="English"> <name>Venus</name> <mass units="(Earth = 1)">.815</mass> <day units="days">116.75</day> . . . <planet language="English"> <name>Earth</name> <mass units="(Earth = 1)">1</mass> <day units="days">1</day> . . . To select all three <planet> elements, you can use the absolute XPath expression /planets/planet , which starts at the XML document's root node, finds the <planets> element, and then matches the three <planet> child elements. That's fine if you know exactly where in the XML document the elements you want are and so can specify a direct path to them. But you can also use //planet to select all three <planet> elements, because //planet will find the <planet> elements by checking the root node and all descendants for <planet> elements. That's the power of // when you want to search for nodes that may be anywhere in a document, use // . How about some examples of location paths using abbreviated syntax? Here are a number of examples:
|

EAN: 2147483647
Pages: 131