Configuring iSeries Access
Several features of iSeries Access configure the behavior of the current session. These include defining the current printer, configuring the session name and display size, and a variety of other display features:
-
Printer Setup. Find the option from within the File pull-down menu to con figure the default printer for this session. Figure 12.6 shows the Printer setup wizard.
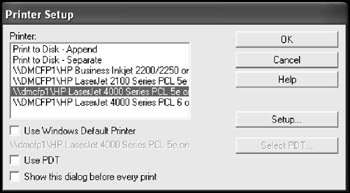
Figure 12.6: Printer Setup wizard.
Select Use Windows Default Printer to set your Windows default printer as the iSeries Access default printer. Click Setup to configure the properties of the selected printer.
-
Configure. Find the option from within the Communications pull-down menu to disconnect from the configured i5 Server.
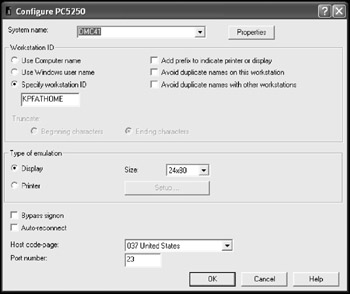
Figure 12.7: Configure iSeries session.
Select Use Computer Name to use the PC's computer name as the device name for this session. Select Use Windows User Name to assign the name of the logged-in Windows user as the device name for this session. The most common choice is Specify Workstation ID. If this option is selected, the device name is taken from the text box (currently loaded with KPFATHOME). If that box is empty, a virtual device name, such as QPADEV0001, is assigned.
To avoid duplicates device names, either with other application windows on this PC, or with other PCs, iSeries Access provides three options, as shown in Figure 12.8.

Figure 12.8: Prefix and suffix options.
If you are using both display and printer sessions, you may wish to select the first option shown in Figure 12.8, attaching a "P" or "D" as a prefix to the device name to indicate which type of session it is.
If this session has an assigned device name, you may wish to select the option to avoid duplicates names on this workstation. This allows you to create copies of this session and establish multiple connections to the same server, each with a unique device name. Therefore, if your assigned device name was "TEST," the first session would be "TESTA" and the second would be "TESTB," and so forth. If you are concerned about conflicts with duplicate device names being used on other PCs, you may wish to select the option to avoid duplicates names with other workstations. This adds a numeric suffix to the end of the device name. Therefore, if your assigned device name was "TEST," the first session would be "TEST1" and the second would be "TEST2," and so on.
If you used both options to avoid duplicates, the first device name is "TESTA1," and the second is "TESTB1." However, if "TESTA1" is already in use on the server, this session will alter its device name to "TESTA2," and so on.
The Size setting can be either 24×80 or 27×132. For many, the smaller font used by the 27×132 screen size is uncomfortably small and creates unwanted eye strain. However, many people find that its ability to display more data on the screen at once outweighs the problem.
If you wish to simplify the login process you can select Bypass Signon. This causes the system to log you into the server using the same user ID and password you provided to connect to the server. Otherwise, a separate sign-on is required after connecting to the server.
-
Preferences. Configure preferences from within the Edit pull-down menu. Some of the more common preferences include:
-
Appearance
-
Hot spots
-
Keyboard Setup
-
Pop-up Keypad
-
Appearance
Appearance has severals subtopics, including Color Mapping, as shown in Figure 12.9. This option allows you to remap the standard display station colors to whatever colors you prefer. The left-hand pane lists every type of display data, so that you can configure the color attributes of each part of the display. Both the foreground and background colors can be set, and a sample is displayed.
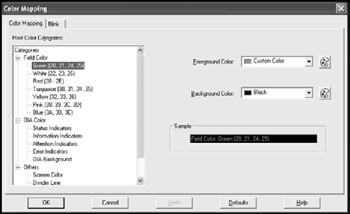
Figure 12.9: Color mapping.
The second option beneath Appearance is Display Setup, shown in Figure 12.10. Within this option, you may configure the cursor shape and behavior, sound effects, and the style of column separator and rule lines.
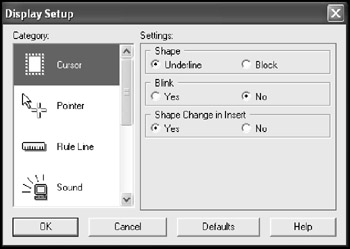
Figure 12.10: Display Setup.
The third option beneath Appearance is Window Setup, shown in Figure 12.11. This option configures the title and scroll bars. However, the single most important option here is the Status Bar. Select 5250 Message line to display i5 error messages on the status bar of your window rather than on line 25 of the display. Many users fail to see error messages placed on line 25. For most users, I suggest deselecting that option.
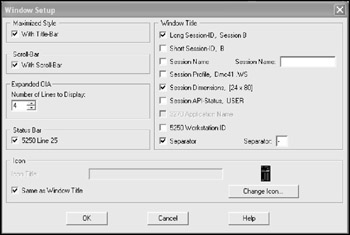
Figure 12.11: Display setup.
Hot Spots
Hot spots are clickable points on the display that mimic pressing a key on the keyboard. Figure 12.12 displays a typical set of function options that you might see on an i5 screen. Normally, you press a function key such as the F12 key to exit. Using Hot Spots, you can double-click the constant F12 instead of pressing the F12 button.
![]()
Figure 12.12: Display setup.
Only the Fxx text itself is a hot spot; the other associated text such as "=Exit" is not part of the hot spot. If you prefer a more dramatic and obvious presentation of the hot spots, use the preference tool shown in Figure 12.13 to configure the hot spots to display as 3D buttons, as shown in Figure 12.14.
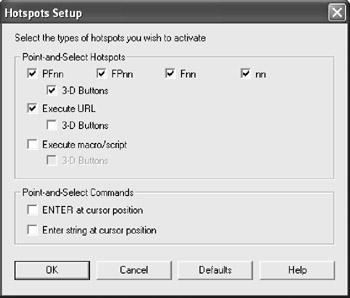
Figure 12.13: Display Setup.
![]()
Figure 12.14: 3D display setup.
Keyboard Setup
Everyuser is different; each may have her own unique preferences for how her keyboard should work. Rather than forcing all users to conform to one standard keyboard configuration, iSeries Access allows each user to customize the behavior of their keyboard. Select the Keyboard… option beneath Preferences on the Edit pull-down menu to display the configuration screen shown in Figure 12.15.
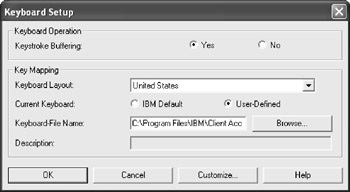
Figure 12.15: Keyboard Setup.
If you have previously created a keyboard mapping file, you can use the Browse button to select that file. To create or modify the configuration of the keyboard mapping file, click Customize to display the panel shown Figure 12.16.
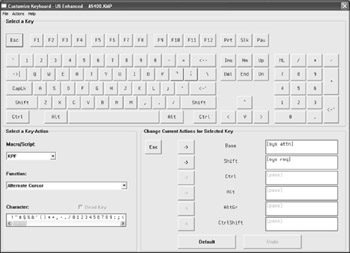
Figure 12.16: Customize keyboard.
To change the behavior of a key, click the key in the image of the keyboard at the top of the screen. Then, choose the new key, macro, or function that you wish to assign to the key, using the options presented in the lower left side of the panel. Once you have selected the new key, macro, or function, click the associated shift state in the lower right section of the panel. (Macros are discussed later in this chapter.)
Functions are keys that cause some sort of action, rather than placing a character on the screen. A few of the more common functions are:
-
Attention
-
Backspace
-
Enter
-
Field Exit
-
Help
Once all the changes are completed, select Exit from the File pull-down menu. The system will prompt you to save the keyboard mapping file if necessary. To share one keyboard mapping file among many users, save it to a network folder.
Pop-up Keypad
Many characters, macros, and functions do not have obvious connections to specific keys. These can be provided to the user through a Pop-up Keypad such as the one shown in Figure 12.17.
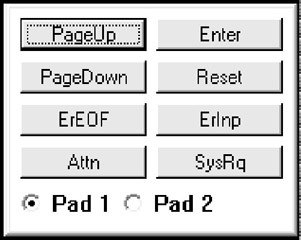
Figure 12.17: Pop-up keypad.
Display the Pop-up Keypad by right-clicking the mouse anywhere in the iSeries Access display. To customize the Pop-up Keypad, select "Pop-up Keypad…" under the Edit-Preference pull-down menu. The Setup panel shown in Figure 12.18 is displayed. Select User defined, then click Customize to display the user panel shown in Figure 12.19. Use this panel to set the number, size, and color of the Pop-up Keypad as well as the function keys and macros assigned to the keypad.
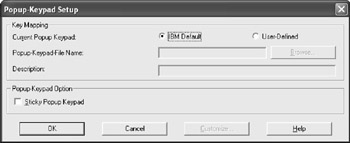
Figure 12.18: Pop-up Keypad Setup.
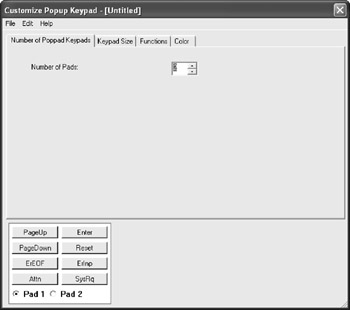
Figure 12.19: Pop-up keypad customization.
EAN: N/A
Pages: 245