Workshop 5: Edit Your Subclips into a Sequence and Add Transitional Effects In this workshop, you'll begin to edit from the subclips already created and manipulate your views of the bins in the Browser. You'll learn to create more tracks in your sequence, edit a few clips into the sequence, and add some simple transitions. Begin Editing Scene 1 Follow the steps in this workshop and do not deviate from them, because the entire book is predicated on the fact that you have followed these steps exactly. If you have trouble making things come out right, chances are you missed a step or didn't trim the video or audio as directed. Go back a step or two and check your work if you run into a problem. Also, "The Midnight Sun Finished Sequence" is included for reference purposes. -
Open sequence 1 by double-clicking its icon. It should be an empty sequence. If it isn't, delete all clips from it by highlighting them and pressing Delete. tip Here's another trick you can do. Select the Scrub Video tool, and set a poster frame directly in the bin. (Click the Zoom tool in the Tools Palette, and select the hand with the arrows inside it or press H twice.) Scrub through the large icons (click and drag left and right on the pictures themselves with this tool) to quickly get a notion of what they contain. Then hold down the Ctrl key and release the mouse on the frame you want to park on. -
Open the Scene 1 bin by double-clicking it, or drag its tab away from the Browser window if you've left it there. -
Enlarge the bin and Ctrl-click the gray area to the left of the clips. From the context menu, select View as Large Icons. -
Enlarge the window to reveal all the video clips in it. Notice that some have slates or other pictures obscuring their view. You'll fix this before you make your first edits. -
Double-click the "Abandoned rags" clip to open it in the Viewer. -
Navigate to a frame that doesn't contain the slate. Select Mark, Set Poster Frame or press Ctrl+P. The representative frame in the bin is updated to be that frame. Do the same to all the subclips that have a slate at their head frame position. -
When you are done experimenting, look at Figure 5.12, which looks more descriptive than when you started. Figure 5.12. The Scene 1 bin in the Large Icons View.  Make the First Edits to the Movie Many editors use their bins' List or Icons views to make it easier to locate clips. Sometimes pictures work better than a list of names , and sometimes they don't. It just depends on the project and its material. You'll make your first edits using the List view and then try some edits with the Large Icons view. -
This movie has many tracks of audio, so start by creating a few more than the two that are currently in Sequence 1. Ctrl-click the A1 audio track label and select Add Track, as shown in Figure 5.13. This adds just one more track of audio. But if you want to add more than one track of audio or video, it's easy to do. Figure 5.13. The tracks shortcut menu.  -
Select Sequence, Insert Tracks. The dialog box shown in Figure 5.14 appears. Figure 5.14. The Insert Tracks dialog box.  -
Type 6 in the Audio Tracks box, and click OK. You should now have a total of nine audio tracks in Sequence 1. Having this many tracks is not uncommon. There are a couple of moments in the movie where nine audio tracks are used at once. -
Open the Sound Clips bin. Double-click the clip titled "Wind, desert Lonely , 66_1-01" to open it in the Viewer. -
Because you are trying to create a sequence of establishing shots, you'll establish sound to prepare for them. A great way to get the feeling of "cold" is to use wind; it's close to the feeling you want to establish, and wind also indicates loneliness. Scroll down through the audio tracks to reveal tracks 6 and 7. Select them as the target tracks by clicking their destination buttons, as shown in Figure 5.15. Play with this targeting a bit. You can click the source button (to the left of the destination button) to select the source footage to remap its track 1 to other tracks in the Timeline. But leave track 1 targeted to track 6 and track 2 targeted to track 7, as shown in Figure 5.15, after you are done experimenting. Note that you can also Ctrl-click the destination buttons to map source buttons to them. Figure 5.15. Targeting audio tracks.  -
Highlight the Viewer by pressing Cmd+1 or clicking it. Mark the whole clip by pressing X or by clicking the Mark Clip button. Make sure that the position indicator in the Timeline window is at the very head of the Timeline. Drag the hand-on-speaker icon in the top right of the Viewer to the Canvas window. The Canvas overlay reveals the Overwrite box. Drag the clip's ghost box to the Overwrite box in the overlay. The clip should now be in the Timeline on tracks 6 and 7. -
Open the Scene 1 bin and double-click the "Cap up mtn side dusk" freeze frame of the mountains you created earlier. It opens in the Viewer. -
Type 1001706 in the timecode display box in the upper right of the Canvas, and then press I to set an In point there for this shot. You needn't type the colons between the pairs of numbers. Final Cut Pro knows that when you type numbers in the timecode display boxes, you must be referring to timecode, so it puts in the colons for you. -
Type 910 in the duration timecode display box (the one on the left in the Canvas window) and press Enter. Again, no colons or semicolons are needed. If you type 910 , Final Cut Pro assumes that you mean 9:10, or 9 seconds and 10 frames. An Out point is created in the sequence, which creates a total duration of 9 seconds and 10 frames for the duration of the next edit. Perform a Four-Point Edit Now you will ask Final Cut Pro to perform a four-point edit. An In and Out point are selected in both the Viewer and the Canvas windows . When this happens, Final Cut Pro assumes that you want the duration of the edit to be that as selected in the Canvas and Timeline windows . It also assumes that you want the In point from the Viewer to be the edit's In point. It ignores the Out point selected in the Viewer, except in the case of a fit-to-fill edit (called a four-point edit in some applications). In this case, it calculates a new playback speed for the source clip to "fit" into the time indicated by the Canvas window's duration from in to out. -
Perform the edit by dragging from the center of the Viewer to the Canvas window overlay. Select Overwrite and let go of the mouse button. You can also perform this edit by pressing the F10 key. The still of the mountains is now in the Timeline. -
Turn on the Clips Overlays button in the Timeline window (it looks like a line graph). Little lines appear in the clips in the tracks. You might toggle this button on and off to watch the lines turn on and off. These lines indicate the level of opacity in video clips and the sound level in audio clips. -
Press Z to activate the Zoom tool. Zoom in on the "Cap up mtn side dusk" still frame clip in the Timeline window, and press P. The Pen tool is now active. -
Position the mouse pointer over the clip's line. The Pen tool appears. Move this tool to the line in the "Cap up mtn side dusk" still frame clip, and click about 2 seconds (judge this by looking at the timecode displayed in the Timeline window). -
Click the clip right on the line to see the Pen tool. A keyframe is added, as shown in Figure 5.16. The small black dot is the keyframe indicator. It denotes that the frame it's over is a keyframe. Figure 5.16. The keyframe indicator dot.  -
With the Pen tool still active, click the line at the very head of the same clip, and drag this new keyframe to the bottom of the clip, as shown in Figure 5.17. Notice the yellow box indicating the level of the keyframe as you drag it to 0. Figure 5.17. Fading up from black.  -
The shot will now fade up from the keyframe at the beginning of the clip for a duration set from the beginning to the second keyframe. Try dragging the second keyframe with the Pen tool from left to right to change its duration. When the keyframe is being used correctly, a tiny + appears to let you know that you are on that keyframe. -
Play the clip in the Timeline to see the "fade up" you created. Highlight the "Cap up mtn side dusk" still frame clip in the Timeline. Select Sequence, Render Selection, or press Opt+R. Save the project. (FCP 4 includes many changes to rendering options. We'll discuss them in Chapter 11, "Video Filter Effects and Basic Compositing.") Add Music to the Clip The wind is lonely-sounding, but you'll add even more sadness to the establishing shots by adding some music. This time, to get to the clip you want, you'll use the Find command. -
Press Cmd+4 to activate the Browser, and then press Cmd+F. The Find dialog box opens, as shown in Figure 5.18. Figure 5.18. The Find dialog box.  -
Select the Name column from the pop-up menu in the lower left. Type music in the bottom-right box, next to the word Contains. Click the Find All button. The Find Results window opens, as shown in Figure 5.19. It contains all the music in the movie. Figure 5.19. The Find Results window. 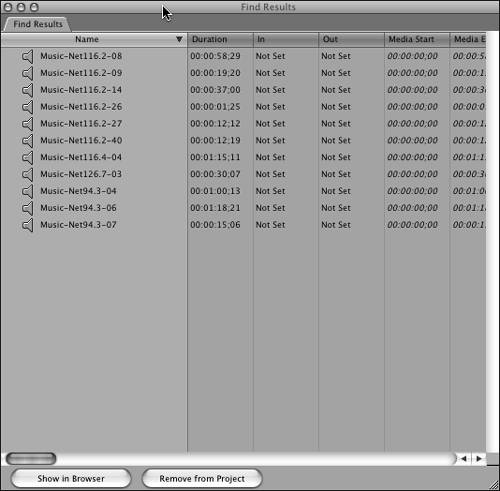 You can highlight the Music-Net116.4-04 clip and click the Show in Browser button to find the clip quickly. You can also double-click this clip to have it open in the Viewer too. While we're at it, let's create a bin just for these music clips. -
Click the FCP Project tab in the Browser (or press Cmd+4). Create a new bin there (press Cmd+B), and name it Music. Then drag all the clips from the Find Results window to this new bin (see Figure 5.20). The next time you need some music, you can find it faster this way. Figure 5.20. The Music bin after step 3. 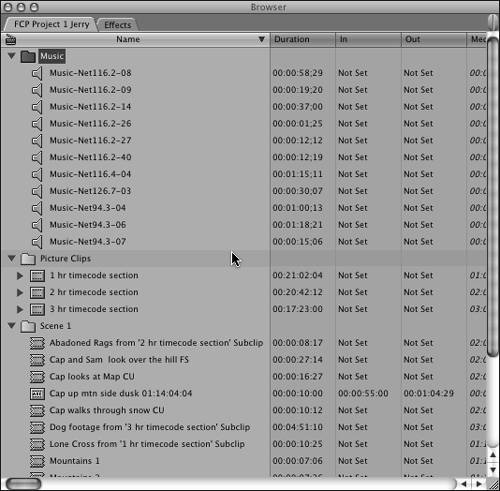 -
Close the Find Results window. -
Navigate to the Music-Net116.4-04 clip in the Music bin, and double-click its icon to open it in the Viewer. You'll use this entire music clip, so you don't need to mark any In or Out points within it. -
In the Canvas window timecode position indicator box, type 1724 . Notice that I don't have you type 1001724 to indicate that the number you want has one-hour code assigned to it. FCP knows one- hour code is being used in the sequence, so it adds the extra numbers (100) at the head for you. -
Press I, and then clear any Out point that might be showing in the Canvas by pressing Opt+O to clear it. -
This time, instead of scrolling to the tracks to target them, click the expand window button in the top-left corner of the Timeline window to maximize the window. Target tracks 8 and 9, and then press the expand window button again to put the Timeline back in its "home" position. This might be the best way for you to work if you are using something other than a dual-monitor setup or a very large display such as a Cinema Display. It's quick and effective. -
Drag the clip's hand-on-speaker icon to the Overwrite box in the Canvas window overlay, or press F10 (overwrite) to add the edit to your sequence. I use the function keys for editing as much as possible; it's faster. After this edit, the Timeline should look like Figure 5.21. Figure 5.21. The Timeline after the first three edits.  -
Open the Lone Cross clip from the Scene 1 bin in the Viewer window. Set an In point at 01:16:53:26 and an Out point at 01:17:01:24. note As we go along in the project, I'll dispense with the steps we've covered already. You've seen more than one way to create edits with Final Cut Pro, and you should begin to choose the one that makes the most sense for you. If an edit can be made easier using one method or another, I'll point this out. -
Turn on snapping (press N or look at the button bar in the Timeline window to see if snapping is active). Drag the clip from the center of the Viewer directly to the Timeline, placing the clip next to the "Cap up mtn side dusk" clip that is already there. The Snapping tool makes this really easy. You'll know that you have set this clip right next to the "Cap up mtn side dusk" clip when you see the little triangles appear in the Timeline's position indicator, as shown in Figure 5.22. Experiment with this a moment to see how it works. Figure 5.22. Overwriting a clip from the Viewer to the Timeline.  note In Figure 5.22, the arrow pointing down indicates an overwrite edit. If you raise the ghosted clip a bit, the arrow points to the right, which indicates an insert edit. I purposefully edited this shot to cut out at the beginning of the next phrase of music. This tends to make the music drive the shots forward. When you edit your own material, this technique can be effective.
Add a Cross-Dissolve To further add a matching feel to this edit, you'll add an effect that follows the sound of the cello's melody. A cross-dissolve that follows the length of this phrase of music is just right. -
Click the Effects tab in the Browser window. -
Open the Video Transitions folder by clicking the triangle next to it. -
Open the Dissolve folder. Drag the cross-dissolve icon to the Timeline, placing it over the edit between the two video clips. -
Release the mouse button to add the cross-dissolve to the edit point, as shown in Figure 5.23. Figure 5.23. Adding a cross-dissolve from the Effects tab to the Timeline.  -
Play the edit. You'll see right away that it has problems. The first problem is that the frames before the cross-edit's In point show the slate footage. The other problems are that the dissolve's default position is center (starting too early), and its default duration is 1 second, which is just too short. This isn't what I had in mind, so let's modify the dissolve. -
Double-click the dissolve in the Timeline to open the Effects Editor window in the Viewer, as shown in Figure 5.24. Click the Start on Edit button, as shown in the figure. This removes the frames with the slate and gets the dissolve to start where it should. There's no problem here, because the frames past the edit point of the outgoing Dawn Scenics clip are just part of the freeze you created. They will just continue through the dissolve. Figure 5.24. The Transition Effects Editor in the Viewer.  -
The edit starts at the edit point, as I wanted, but it's only 1 second long and is shorter than the cello's music phrase. Therefore, in the duration time box, change this to 3 seconds by typing 300 or 3. . -
Now play the Timeline in this area to see the difference. The edit lasts the duration of the cello's phrase and leads into the shot of the cross. You should save the project again (press Cmd+S). This should become a habit. Add the Poem It's time to introduce the poem. Its first line is also an establishing element. The poem is read by the actor who plays Cap. The phrases of the poem that are used in the film are all labeled with DANCLEAN.AIF and a number. -
Open the Sound Clips bin to locate the poem files. You can also use the Find command to locate them. In the FCP Project 1 tab's window, create a new bin and name it Voice Over. Then drag all the DANCLEAN.AIF files to this bin. -
Open the DANCLEAN.AIF-01 clip in the Viewer. Mark an In point in the Canvas at 01:00:32;19 and edit the entire DANCLEAN.AIF-01 there on track A3 (don't forget to target it). Pressing F10 is the quickest way to overwrite this edit. -
Open the "Abandoned rags" clip in the Viewer. Its duration is too short for the next edit, so create a freeze frame of it. Navigate to 02:01:54:10 in the Viewer, and press Shift+N to create the freeze. The menu command for this freeze creation works too; it's under the Modify menu at Modify, Make Freeze Frame. You could even put a freeze frame button in the Modify set of buttons in the Viewer's button bar if you needed to perform this task often. (You won't do it much here, though.) -
Drag from the center of the Viewer to the Scene 1 bin to save this freeze for possible use later. (You never know when you might want it again.) -
Set an In point in the Canvas at 01:00:34;15 and an Out point at 01:00:42;21. Then overwrite this edit to the V1 track. Never forget to target the tracks you are getting ready to edit to. -
Play back the sequence. The cut is abrupt, so add another 3-second dissolve between the two clips that ends on the transition. If you don't end it there, you run out of media in the Lone Cross clip, and you can't get it to be as long as 3 seconds. -
Experiment with modifying this 3-second transition to be centered on the cut and to start on the cut. You'll see that you are constrained to using a shorter transition duration, because there isn't enough media in the Lone Cross clip to accommodate the extra 45 frames past the original edit point to create a 90-frame centered transition, let alone one that might start there. warning This issue is absolute. You must have enough media on both sides of the transition you want to add to an edit point. If you want to add a transition to any edit point, you must have enough media unused in the incoming shot and the outgoing shot to accommodate the extra duration that the transition calls for. If you use all the media on both sides of an edit point, you cannot add a transition to it. Another way to think about this is that the clips must overlap each other so that they can be on the screen at the same time during the transition. If the transition starts at an edit point, you need frames past the original cut point of the outgoing shot. If you want to end the transition at the cut point, you must have frames before the original In point of the incoming shot to start seeing them during the transition, which will start before the original cut point. This issue is the same in any nonlinear editing application. When you are done experimenting, leave a transition that ends on the edit with a duration of 3 seconds. -
Drag the Scene 1 bin's tab or double-click its folder in the Browser to open it in its own window. -
Ctrl-click in the bin away from the clips to view this bin as Medium Icons or Large Icons. Take a moment to think about the next set of edits. You could use some of the unused mountain scenery , but I think it's better to get on with the introduction of the two heroes. After you've established the scene, you've established the scene, and it's better to get on with the story than to bore your audience with more shots that really don't add anything to the situation other than to say, "Here are some more mountains; they're cold too." Remember to move your story along. Just because it was shot doesn't mean it should be used. This is the axiom you must live by as an editor. Establishing Edits in Sets of Odd Numbers When discussion arises about just how many shots to use when establishing a time or place in your story, I really like an odd number of shots, especially three. Just as composition is more interesting when three objects are highlighted in the scene, so are odd-numbered sets of shots that relate to each other. The reason is that humans are very familiar with even-numbered things. We have two hands, two arms, two eyes, and so on. We have a mom and dad, aunt and uncle, and so on. When we encounter something that there are three of, it piques our interest, because it's "unfamiliar" or not quite "natural." Historically, the number 3 is found in many powerful symbols. The Trinity comes to mind. Even a single shot is better than two, and five shots are better than four. Again, this is more unusual and has a rhythm all its own, and it piques our interest. |
Introduce the Characters Four shots here contain the actors: -
Cap walks through snow CU -
Reverse, Cap and Sam look over the hill LS -
Cap and Sam look over the hill FS -
Cap looks at map CU You'll use three of them to establish the heroes. You've already heard one of the actors in the voice-over, so let's see him walking in close-up. Then you'll add a rather unrevealing shot just to tease the audience further. Next you'll use the reverse shot. Finally, you'll let the audience see the actors in the full shot. Then you'll go to the close-up of Cap, which starts the action after the three establishing shots. -
Arrange the four shots just mentioned in the order in which they're listed by dragging them to a row of their own. This is one of my favorite ways to use this view of the bins. You have a storyboard of them to see how they will sort of cut to each other. -
Double-click each shot one at a time to see them in the Viewer. Remove any In or Out points you might have put in them. -
If you Ctrl-click the scrubber bar, you pull up a menu to remove edit marks, as shown in Figure 5.25. Or you can press Opt+X to eliminate both In and Out marks. Or press Opt+I to delete just an In mark, and press Opt+O to delete an Out mark. Add some In and Out points, and then play with these keyboard shortcuts to master them. You'll use them the rest of your editorial life with Final Cut Pro. But leave the clips without any In point or Out point selected in them. Figure 5.25. The scrubber bar shortcut menu.  Storyboard Editing What's even more powerful than just arranging a storyboard is editing that storyboard into the Timeline in one move. -
Make sure that snapping is turned on. Shift-click each clip to highlight all four. If you drag the mouse across all of them, you can lasso them. -
Drag one of the highlighted clips to the V1 track in the Timeline window and place it to the right of the "Abandoned rags" clip so that it comes immediately next. Having snapping turned on should make this easy. Keeping the Timeline's position indicator away from the Out point of the "Abandoned rags" clip should make things easier too. When you're done, your sequence should look like Figure 5.26. Figure 5.26. The Timeline with the first 10 edits.  -
Play back the sequence of these new shots. There are some problems such as slates at the beginning of them. And they don't cut together very well. We'll fix them one by one. -
The first shot has a slate and a nonwalking actor. Move the position in the Timeline to 01:00:48;12 by typing in the Timeline's timecode position indicator box, as shown in Figure 5.27. Figure 5.27. The Timecode position indicator box in the Timeline window.  -
Press B or click the Razor Blade tool in the Tools Palette. It is available only when the mouse is positioned in the Timeline. -
Position the Razor Blade on the current position indicator in Sequence 1, and click to create a new edit point. This new edit might end up with little red triangles indicating that it is a through edit. A through edit is one that has contiguous frames from the same media on either side of it. During playback, you do not see any change as you play through it. If you do not see the frames, turn them on. From the Sequence menu (or by pressing Cmd+0), access the Timeline Options tab in the Sequence Settings window, as shown in Figure 5.28. You can turn on frames by checking the Show Through Edits check box. This set of sequence settings acts only on the currently selected sequence, unlike the ones chosen from the Audio/Video settings, which affect only new sequences. Figure 5.28. Sequence Settings.  -
Press A to activate the Selection tool again. -
Highlight the first portion of this clip. Ctrl-click it to open the shortcut menu, and select Ripple Delete, as shown in Figure 5.29. This portion of the shot leaves the Timeline, and all shots past it move to the left. Ripple Delete is also available on the Sequence menu or by pressing Shift+Delete. Figure 5.29. The Timeline clip shortcut menu.  -
Ctrl-click the edit point at the end of the "Abandoned rags" clip to bring up yet another shortcut menu, and select Add Transition 'Cross Dissolve,' as shown in Figure 5.30. This shortcut menu adds whatever default transition you selected from the Effects tab in the Browser by Ctrl-clicking the desired transition from the list there. (A 1-second cross-dissolve is the default transition unless you change it.) Figure 5.30. The effect shortcut menu.  -
Ctrl-click the new dissolve in the Timeline. From the shortcut menu, select Transition Alignment, End On Edit, as shown in Figure 5.31. Figure 5.31. The transition shortcut menu.  -
Using the same menu, select Duration to change the duration. You see the dialog box shown in Figure 5.32. Change the duration to 3 seconds. Figure 5.32. The Duration dialog box.  -
Save the project. Cutting Instead of Dissolving and Changing the Pacing -
Using establishing shots with a series of dissolves leaves the viewer with a "general and nonspecific time" impression of the setup. Notice too that the three establishing shots have served the story, indicating cold, death, and loneliness (a great way to start a comedy ). Now that the movie has introduced the characters, a series of cuts to bring the viewers to the "present" is in order. Cutting instead of using dissolves also serves to pick up the pace. We don't want to bore the viewers , so you'll "surprise" them with cuts. Navigate to 01:00:44;11 in the Canvas. -
Razor blade (press B) the V1 track. Highlight the rest of the close-up of the walking (on the right side of the through edit), and select Ripple Delete. -
Navigate to 01:00:51;05 in the Canvas. Razor blade an edit in the V1 track, and then ripple delete the left side of the through edit (Ctrl-click the clip). You need to match the footsteps of the close-up of the walk to the incoming reverse angle. -
Take a look at the last frame of the close-up of Cap's feet. We've left him with his left leg down and the right one moving forward. Hold down the K key while pressing the L key to creep through the next (reverse) shot until you find a matching frame. There is a good one at 01:00:45;00 in the Timeline's timecode. -
Select the Razor Blade again (press B). While you're parked on 01:00:45;00, slice another edit there and ripple delete the left side of this shot to pull up this frame next to the outgoing frame of the close-up. -
Play from before the last dissolve through this cut. This works like gangbusters. This edit is called a matching action edit. You "matched" the action of the outgoing shot to that of the incoming shot and really put the viewers into the present with it. -
Trim the Out point of the reverse shot. Move the Timeline indicator to 01:00:47;12 (so that Sam, the character following, just stops walking). Make a Razor Blade edit at that point, and then ripple delete the excess footage from there to the end of the clip. View the Characters You've seen where the heroes are and have placed them in the snowy mountains. Now it's time to see what they really look like. The next shot moves to the other side so that the viewers can see the characters' faces. We'll dwell on them for a moment to show that Cap is the "leader." The composition of the shot reinforces this. He is in front and on higher ground, and he also carries the all-important map to riches. -
Move the Timeline's playhead to 01:00:50;20 and make another Razor Blade edit there. -
Ripple delete the front portion of the shot with the slate in it. Then move the Timeline's position indicator to 01:00:51;14. Use the Razor Blade to slice an edit there. -
Move only the footage past the new edit contained in the rest of the clip to the other side of the incoming close-up clip. You'll use it after the close-up to end the scene. -
You can move the back half of this clip in the Timeline by pressing A and then highlighting and dragging the clip in the Timeline past the "Cap looks at map CU" clip. Turning on snapping (press N) makes it easy to ensure that you have not left a gap between the clips. -
After you move the Cap and Sam clip, there is a blank space between the close-up and the last shot. Highlight both of the clips past this point, and drag them to the left to remove the gap. When the gap is closed, the Timeline should look like Figure 5.33. Again, using the snapping feature makes this a snap. Figure 5.33. The Timeline after the completion of step 5, viewing the characters.  -
Move the position indicator to 01:00:57;02 in the Timeline and make a Razor Blade edit there. Ripple delete the first portion of the close-up, move the Timeline to 01:00:54;07, and make a Razor Blade edit there. Toggling between the Selection tool (by pressing A) and the Razor Blade tool (by pressing B) should be a habit by now. Ripple delete the section of the close-up clip on the right side of this new edit. -
Move the Timeline position indicator to 01:00:57;12. Make a Razor Blade edit there. Ripple delete the first portion of this shot, move the Timeline position indicator to 01:01:09;22, and make a Razor Blade edit there. Delete the section of this clip on the right side by highlighting it and pressing Delete. Save the project file. -
Save your project file. If you really want to protect your work, save a copy of it in another folder. Better yet, save it on a Zip or CD-R disc. Especially do this if you are in an environment in which many users share the same Mac. Take a look at the sequence. You started with a series of three shots, establishing the location and atmosphere. You used music in a minor key to indicate sorrow and struggle. You spiced things up with the sound of wind, reinforcing the cold. Then you brought the viewers into the "present" by no longer using dissolves between shots that introduce the characters. (In the next chapter, you'll use dissolves for a different reason.) |