| Final Cut Pro contains a set of tools that help you get organized and break down your source material to group related clips. Sorting the material saves you a lot of time during the edit and reacquaints you with the material. The Browser is where source material is organized. -
Open Project 1. You will preserve this original project file and create another one for your own use. That way, you can always start over if you need to without reloading everything from the DVD. Select File, Save Project As. Type FCP Project 1 " your name " in the Save As: field. It's OK to put this file in the same folder as the original, or you can put it in a new folder, as shown in Figure 4.4. Keep this file on your startup disk, not your media disk (if you have one). Figure 4.4. The Save dialog box. 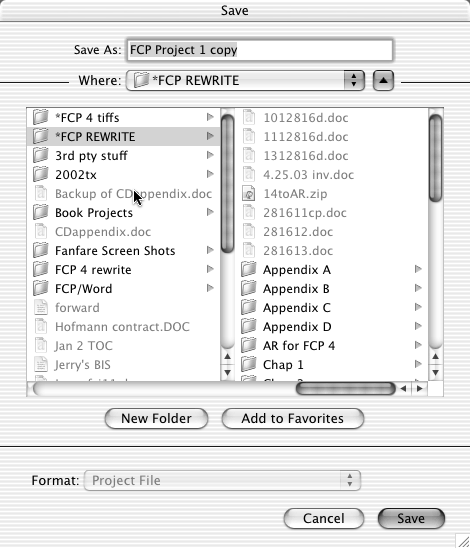 -
Click the triangle next to the Picture Clips bin in the Browser. It opens, and its contents are revealed, as shown in Figure 4.5. Double-click the Picture Clips bin's folder to open it in its own window, as shown in Figure 4.6. This also closes the bin in the project window. Arrange this new window to the side of the Browser window if it's not already there so that you can see its tab and the other tabs in the Browser at the same time and so that clicking either does not hide the other. Drag the tab near the top of the Picture Clips bin to the area where the FCP Project 1 and Effects tabs are. The bin's tab should now be part of a set of three tabs contained in the Browser, as shown in Figure 4.7. Clicking a tab is a quick way to get to a particular bin. If you Option-click a bin, it opens as a tab in the Browser. Figure 4.5. Opening a bin with the disclosure triangle. 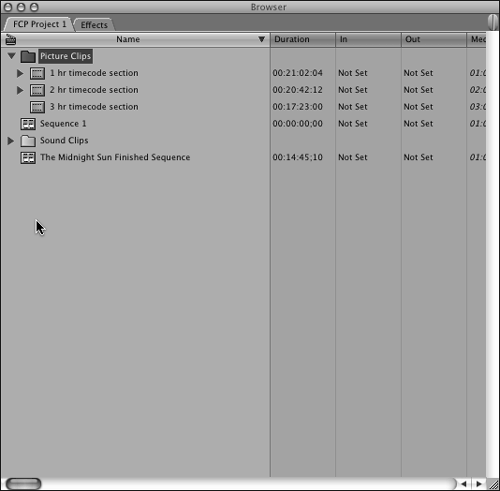 Figure 4.6. The open bin window. 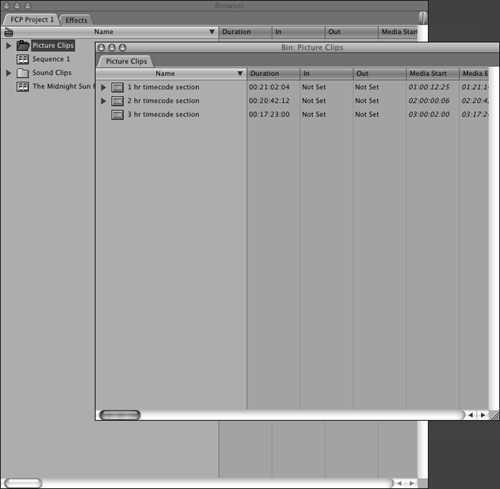 Figure 4.7. The quick access tab. 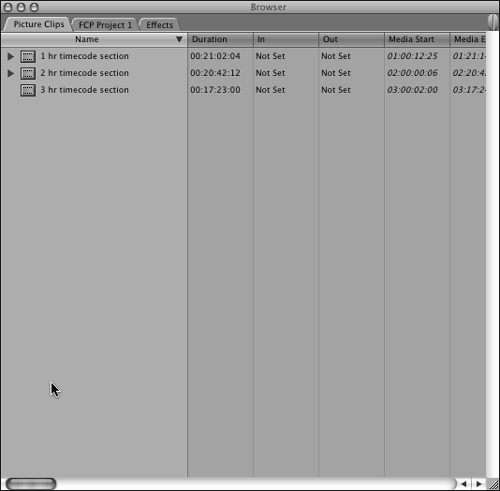 If you have 30 or 40 bins, this might save you a lot of time searching for the one or two bins you are currently using. Leave it open for now, but to close the tab in the Browser, Ctrl-click the tab and choose Close Tab. You can also put bins inside bins. Let's say you have a set of bins broken into scenes. Within these scenes are clips of an on-camera host and shots to illustrate the points the speaker is talking about (these shots are often called b-roll). You could keep the host in the scene bin in another bin created inside the scene bin and the b-roll shots in another. The more organized you are, the easier and quicker it is to make edit decisions. Also, you're less likely to miss a really wonderful edit because you forgot about that special element or couldn't find it. -
Click the FCP Project 1 tab. Create a new bin in it by selecting File, New, Bin or by pressing Cmd+B. Notice that the bin's name is highlighted and ready to change, as shown in Figure 4.8. You don't need to delete the old name; just start typing. Type Scene 1 and Press Enter. You'll look for opening or "establishing" shots to set the movie's mood. Figure 4.8. Renaming bins.  -
Open the Picture Clips bin and click the disclosure triangle next to "2 hr timecode section." You see the markers I've placed there for you. Highlight the marker named Abandoned Rags and press Cmd+U. A new subclip with the same name is created in the Picture Clips bin. It might be out of view, so scroll down to find this new subclip. -
Drag the tab in the Browser of the Picture Clips bin to the side so that it opens in a second window and reveals the rest of the Browser's contents in the first window. Then drag this new subclip, named "Abandoned Rags from '2 hr timecode section' Subclip," to the Scene 1 bin in the first window. Clicking the disclosure triangle next to the Scene 1 bin reveals that the subclip is now there, as shown in Figure 4.9. Notice its serrated clip icon. Figure 4.9. The Scene 1 bin containing a new subclip. 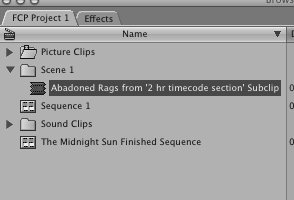 -
Let's do another subclip from marker creation. Open the "1 hr timecode section" disclosure triangle by clicking it, and reveal the markers contained in it. Locate the marker named "Cap up mtn side dusk," which starts at 1:13:03:22, and press Cmd+U. Then drag this new subclip to the Scene 1 bin. note The source footage from the film transfer used throughout this book is nondrop frame timecode. Also note that none of the film transfers have any audio tracks. Sync sound can't be recorded to the film. For what little sync sound is used in the film, you'll have audio files that were created from the Nagra that recorded the sound. -
Drag the "Cap up mtn side dusk" marker from the Scene 1 bin to the Viewer, or simply double-click it. Either way, it opens there. The reason to use this copy is that you will create subclips from it. They will appear in the Scene 1 bin as you make them, not in the Picture Clips bin, where I find it convenient to store all master clips. Subclips are created in the same bin in which the clips or subclips they are created from reside. You are primarily looking for establishing shots for the opening of the movie. -
Click the Play button in the Viewer. You see a few false starts, and then two takes of Cap pulling Sam's body up a hill, followed by some scenic long shots of snow-covered mountains. The most vivid color in these shots is the sky behind the mountains in Cap's takes, but unfortunately there is not much footage in this shot without Cap walking through it. These were the only long shots taken for an establishing shot for the story, so you'll use a frame of Cap's background without Cap in it and freeze it. I rather like the balance of the frame at 01:14:04;04. Click the time-code display in the upper right of the Viewer, type 1140404 in the time-code display box, and press Enter. The Viewer displays that frame. There's no need to type the colons, the semicolons, or the first 0. Final Cut Pro adds 0s to the beginning of any time-code numbers so that they contain a total of eight numbers, which all time-code numbers contain. If you typed 1000 , the Viewer would display code at 00:00:10;00 (as long as that time-code number is in the clip you are navigating with). -
Select Modify, Make Freeze Frame or press Shift+N. A freeze frame with this background is created, with a default duration of 10 seconds from its In point to its Out point. This duration is as it was set in the General tab of the User Preferences window. This freeze's full duration is 2 minutes. Open the Scene 1 bin by double-clicking it. Click and drag the clip from the center of the Viewer back to the Scene 1 bin. (Drag it to the Name column.) As you drag, you see a ghosted version of the clip drag with the mouse. When you let go, a graphic clip is saved in your bin that is this freeze frame, as shown in Figure 4.10. Notice that the frame's timecode number becomes part of its name, and it has a new icon, indicating that it is a graphic file, as shown in Figure 4.11. Figure 4.10. Dragging a clip from the Viewer. 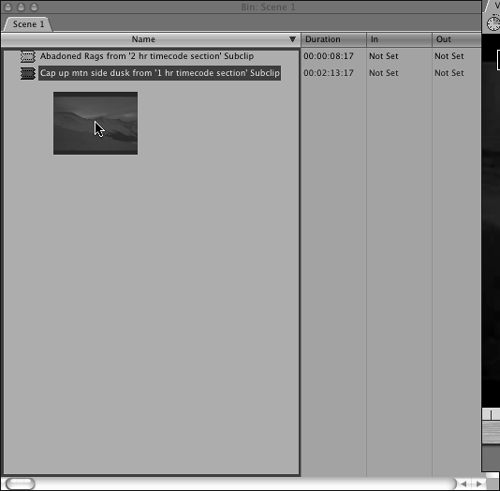 Figure 4.11. A freeze frame clip after being dragged from the Viewer. 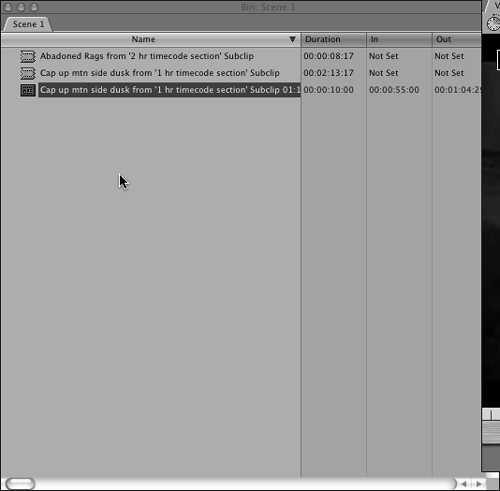 -
Click the recent clips list in the lower-right corner of the Viewer, and select "Cap up mtn side dusk from '1 hr timecode section' Subclip," as shown in Figure 4.12. It reappears in the Viewer. Scroll through it to 1:14:33;14 and mark an In point. Either click the Mark In button or press I. Then click the Play button or press L until the end of this particular shot. Set an Out point there. This time, instead of dragging, choose Modify, Make Subclip or press Cmd+U. A subclip appears in the Scene 1 bin, ready to rename. Type Pan of Mountains . Double-click this new subclip's icon. The subclip opens in the Viewer. You'll find that it contains only the footage you selected. Figure 4.12. The Recent Clips shortcut menu. 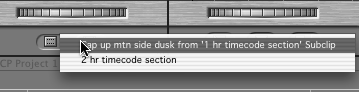 -
Take a look at the Pan of Mountains subclip. Reload the "Cap up mtn side dusk" subclip into the Viewer, but do it this time by highlighting the Scene 1 bin and using the up or down arrow keys to navigate to it. Highlight "Cap up mtn side dusk from '1 hr timecode section' Subclip" and press Enter. The subclip reopens in the Viewer. There is a way to keep your hands on the keyboard instead of going back and forth between it and the mouse. If you type Cmd+4 to activate the Browser, you can navigate to any item in the Browser by using the four arrow keys to do so. The up and down keys do what you'd expect, and the right and left arrow keys will open an item with a disclosure triangle to navigate down or up through its contents. You may find you can navigate very fast this way. Where the position indicator (or playhead) is sitting is where you'll mark an In or an Out point if you press I or O. The Viewer must be the active window if you press L for play (or the spacebar, which also toggles play on and off), K for stop, or J to play backward. Holding down the K key and then holding down either the L key or J key plays a clip slowly. The right and left arrow keys advance or step forward and backward through a clip one frame at a time for precise movements. Using the mouse for this works too, but in the long haul it takes more time to get to exactly where you want to go. -
Try the different methods of marking and creating subclips and navigating in the Viewer to find the In and Out points. I think you'll find that you will become more efficient using the keyboard commands to mark In, mark Out, and create the subclip. You can also drag the position indicator to scroll through the clip. Normally, you would subclip the two takes of Cap's walk up the hill, but later we'll edit the section that contains this shot as a pre-edited scene. When you get done trying things on your own, delete any subclips you've created so that your Scene 1 bin contains only the same clips as Figure 4.13. Just highlight any subclip and press the delete key to delete it. Figure 4.13. The first four items. 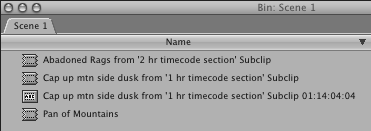 -
Create three more subclips of the shots that follow the last subclip the same way as earlier and name them Mountains 1, 2, and 3. When you are done, you should have a bin that contains the same six clips shown in Figure 4.14. When you are finished, delete the "Cap up mtn side dusk" subclip from the Scene 1 bin. (Be sure not to delete the freeze frame.) Don't worry; you still can access it from the Picture Clips bin. (There will be less to sort through later in the Scene 1 bin.) Figure 4.14. The first six items. 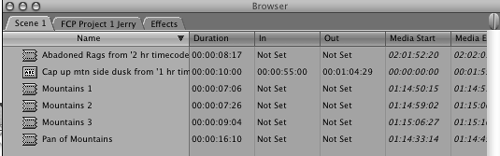 Work with the Button List, Button Bar, and Keyboard Layout -
Press Opt+J to open the button list, or navigate to the Tools menu and select it from there. Then open the Modify menu's disclosure triangle by clicking it. -
At the top of the list is the Make Subclip icon. Drag it to the button bar in the Browser, as shown in Figure 4.15. Figure 4.15. Dragging a button from the button list to the Browser's button bar. 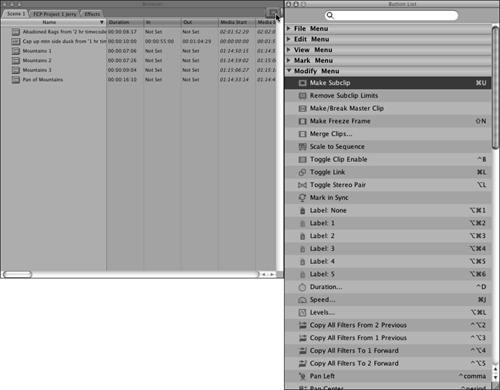 -
Ctrl-click the newly placed button, and change its color. -
While you're here, take a close look at the button list. This is the same list that opens with the Keyboard Layout window. Note the organization of this enormous list of buttons . The menus across the top of Final Cut Pro 4's interface are repeated here, as are the commands on the pull-down menus . -
Open the keyboard layout by pressing Opt+H or by navigating to it using the Tools menu. The button list closes, and the default keyboard layout opens. Click the cmd tab to reveal the default keyboard layout when the Command key is used. Note that Cmd+U is the default setting for the Modify, Make Subclip command. -
Click the lock button in the lower left of the Keyboard Layout window to unlock it. Take some time to drag buttons from the list on the right and drop them on the keyboard so that you get a feel for how this works. When you are done, click the Reset button in the keyboard layout to reset the layout to the default settings for now. As soon as you get a handle on tasks you often perform ( especially those with no default keyboard equivalent), you'll know when it's time to either learn a default keyboard shortcut or map a button to the keyboard or a button bar to ease your workflow. It will be when you navigate to a menu item repeatedly. When you are done experimenting and you've reset the keyboard layout to its default, close the Keyboard Layout window by clicking the close button in the top-right corner. Discover Marker Shortcuts and Begin Working with Markers -
Navigate to the Picture Clips bin and double-click the "1 hr timecode section" master clip to load it into the Viewer. -
Press the Home key to bring the playhead to the first frame of the clip in the Viewer. -
Press Shift+M to jump to the first marker. Pressing Shift+M repeatedly moves the playhead from marker to marker. Try this. -
Press Opt+M to move the next marker earlier in the clip. Obviously, you could just edit from here, but your clip names in the Timeline would all be named the same as this master clip. This would be very inefficient later. Therefore, you'll continue to create subclips from these markers. -
Open the "3 hr timecode section" master clip in the Viewer by double-clicking it. You'll create your own set of markers for this clip. To create one, you need to move the playhead to the starting frame of the marker by pressing M twice. A dialog box opens, allowing you to name the marker. (This name will also be used in the subclip you'll create from the markers.) -
Navigate to 03:00:02:00, press M twice, name the subclip "Sam Asks Cap for Cremation tk 1 Pan," and press Enter. You see a marker in the scrubber bar and a disclosure triangle next to the master clip in the Picture Clips bin. Click the disclosure triangle next to the master clip's name to reveal the list of markers. You can change a marker's name if you need to by clicking it. -
Next, using the following log, create a marker at each time-code number in the list, and name them accordingly . Don't deviate, because the way this works as you edit these clips depends on the exact positions of the subclips you'll end up creating. | Sam Asks Cap for Cremation tk 2 Pan | 03:01:21;10 | | CU Sam looking at picture | 03:02:38;15 | | CU over shoulder of Picture | 03:03:00;14 | | Unusable footage | 03:03:27;21 | | Wide angle Cap lights match in snow | 03:03:35;28 | | CU Cap lights match in snow tk 1 | 03:04:34;28 | | CU Cap lights match in snow tk 2 | 03:04:44;26 | | Reverse Cap lights match in snow tk 1 | 03:05:09;25 | | Reverse Cap lights match in snow tk 2 | 03:05:29;22 | | Dog footage | 03:06:07;04 | | Med shot Cap reverse on sled | 03:10:58;14 | | CU Dog | 03:11:33;03 | | Cap pulls body over ridge of snow | 03:11:53;29 | | Dogs under trees resting | 03:12:34;17 | | Cap looks at smoke tk 1 | 03:13:29;20 | | CU Lake Labarge Sign | 03:13:45;27 | | Smoke coming from behind hill | 03:13:56;26 | | Smoke bkg 1 | 03:14:12;06 | | Cap walks away LS | 03:14:27;09 | When you are done, opening the "3 hr timecode section" clip in the Picture Clips bin looks like Figure 4.16. Figure 4.16. The Picture Clips bin after you place the markers for "3 hr timecode section." 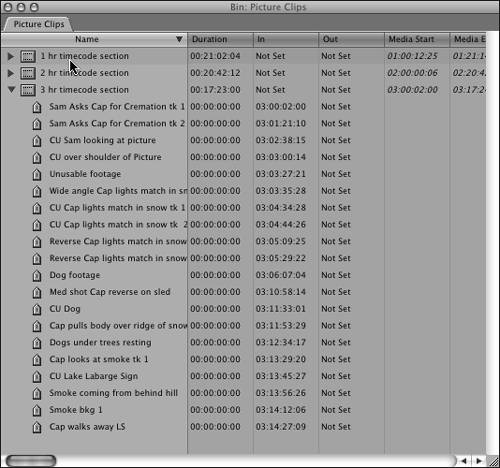 -
Navigate to the Picture Clips bin. Open the marker named Lone Cross contained in the "1 hr timecode section" master clip in the Viewer by highlighting it and pressing Enter. Play the clip. Because it contains only this one shot, activate the Browser, make sure the Lone Cross marker is highlighted, and click the newly placed Subclip button in the Browser's button bar. Drag the new subclip to the Scene 1 bin. As explained in Chapter 3, these are reference files. They can also be thought of as aliases to a media file and, in this case, a portion of the actual media file. You didn't copy the media file; you created another pointer clip to it. Also keep in mind that each copy of a new clip is an independent reference to the media file it points to. If you change a clip, such as by setting an In point or Out point, any other clip that references this same media will not reflect the change you made in the first clip. Also be warned that if you delete the media associated with one of these matching clips, you delete the media to all these subclips and the master clip they were subclipped from. -
Navigate back to the Picture Clips bin, and load the Dog footage marker in the "3 hr timecode section" clip into the Viewer. Create a subclip of the shot, and drag it into the Scene 1 bin. -
Locate the Map Footage marker in the "2 hr timecode section" clip in the Picture Clips bin. Open this marker in the Viewer, and play it. This marker contains several shots, so we'll break it down. Create a subclip of the Map Footage marker, and drag it to the Scene 1 bin. -
Double-click the new Map Footage subclip to open it in the Viewer. -
Create subclips of the four shots contained in this subclip. Set an In point at 02:08:43;08, and mark an Out point at 02:08:59;04. Highlight the subclip in the Browser, and press Cmd+U or click the Viewer's button bar's Make Subclip button. The new subclip appears in the Scene 1 bin. Name this subclip "Reverse Cap and Sam look over the hill LS" (LS stands for long shot). The second subclip runs from 02:09:00;07 to 02:09:10;14. Name the second subclip "Cap walks through snow CU" (CU stands for close-up). The third subclip runs from 02:09:11;11 to 02:09:38:24. Name it "Cap and Sam look over the hill FS" (FS stands for full shot). The last subclip runs from 02:09:38;27 to the end of the shot at 02:09:55;23. Name this last clip "Cap looks at map CU." Delete the "Map Footage" subclip in the Scene 1 bin. It's been broken down further anyway, so you don't need it any longer. -
Double-check your work. Your Scene 1 bin should contain the same clips as shown in Figure 4.17. Save the project by pressing Cmd+S. You can't save too often. I'll prompt you once in a while, but it's wise to save often and back up your project file to a medium not on your computer, such as a CD or Zip disc, at least at the end of each editing session. Figure 4.17. The first 12 items. 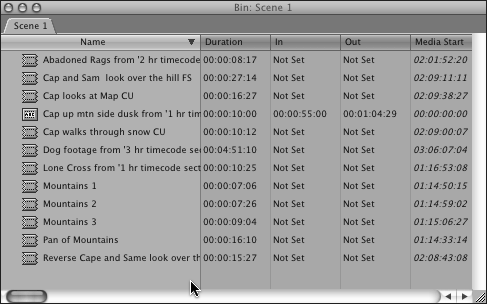 |