| The Browser window, shown in Figure 3.2, is where you organize your source material and keep your edited sequences. It's a visual list of records that is displayed as icons next to names . This window also contains information about your source material and your edit decisions. These records are not the media files; they are pointer files to the separate media files you have captured, digitized, or copied into your computer's hard drives for use in your project. Figure 3.2. The Browser window. 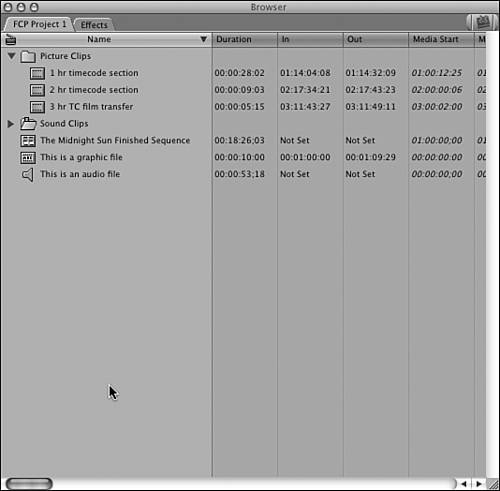 The Browser window stores a reference file to every element your project contains. You'll probably also end up storing elements you didn't use in your finished program here. You drag these clips around the interface to move shots or elements into your edited program. There are two tabs in the most basic setup of this window. One is the Project tab (named "FCP Project 1" in Figure 3.2), which contains the pointer files, and the other is the Effects tab, which contains a logically sorted list of available effects. If the Effects tab is not present, you can activate it from the menus by selecting Window, Effects or by pressing  +5. You can bring it forward in the Browser by clicking its tab (see Figure 3.3). Your project will have its own tab at the top of this window. +5. You can bring it forward in the Browser by clicking its tab (see Figure 3.3). Your project will have its own tab at the top of this window. Figure 3.3. The Effects tab in the Browser window. 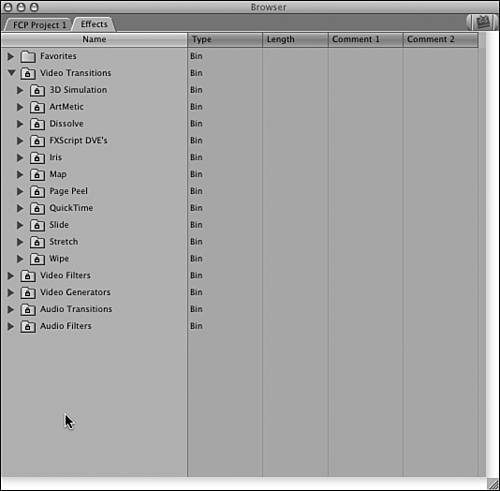 You can have as many projects open at the same time as you want, and you can edit between them. You can close these tabs by Ctrl-clicking (click while holding down the Ctrl key) the tab and invoking the Close Tab command (see Figure 3.4). The Close Tab menu is just one of many pop-up context menus that are available in many places around the interface. We'll explore them as we edit our movie. You can close the whole Browser window by clicking the button in the upper-left corner. Figure 3.4. The Close Tab menu.  Types of Reference Files Many types of elements are contained in the Browser window, as shown in Figure 3.5. Each element has its own icon (the little picture to the left of the clip name ). An audio-only clip (the little speaker), a graphic clip (the little square with ABC on it), and a still frame of video each has its own icon, giving you a visual reference as to what type of element it is. Figure 3.5. The Browser window with all types of elements referenced in Final Cut Pro. 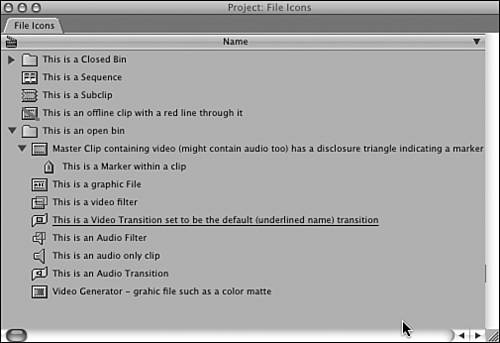 Clips are reference files that reference individual moving picture, still, and/or sound elements such as QuickTime files, CD audio files, and still frames . Master clips have square icons. These square clips contain video and might or might not contain audio. If they do contain audio, it is usually the sound that was recorded at the same time the pictures were recorded (sync sound). There is a way to "marry" an audio clip to a video clip. New to FCP 4 is the ability to merge clips. A merged clip is typically an audio file you've "married" to a video file. You can merge as many as 24 audio tracks to a single video file, for example. A great use of this feature is to sync your sound to a video clip, such as in the case of a film shoot where you've recorded audio on a DAT machine. When you edit with a merged clip, the synchronized audio and video act as if it was a single media file. You can merge up to 24 different audio tracks to one another without a video track. To merge a clip, highlight the video (or audio) clip in the Browser and an audio clip you find useful for a merge, and Ctrl-click one of the two or more selected clips. The Merge Clips window opens, as shown in Figure 3.6. Select the appropriate method for FCP to merge the clips, and click OK. Final Cut Pro creates a new clip that, when opened, acts like a single audio/video file. It also renames this new clip with the video file's name with the word "merged" added to the end. In the case of merging only audio clips, the topmost clip's name is used, with the word "merged" added to the end. Figure 3.6. The Merge Clips dialog box. 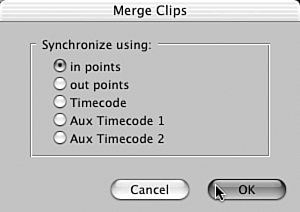 After they are created, the only change you can make to these clips is a subframe audio slip. A way to re-create a merged clip is to edit it into a sequence and then delete the original merged clip in the Browser. Then, unlink the items in the Timeline and make any sync changes. (To unlink clips in the Timeline, use the toggle button in the top-right area of the Timeline window, or press Shift+L.) Relink the clips (just click the linking button again or press Shift+L) and then drag them back into the Browser from the Timeline to create a new merged clip. Sequences contain these clips, all your edit decisions, and your finished program. A sequence icon is a box with yellow and blue boxes within it. You can create as many sequences and clips as you want. This comes in handy for different edited versions of the same material or different areas of your finished programs. You can use multiple sequences in many other ways, such as for a series of similar shots or a sequence for each scene of your feature film. You can edit from sequence to sequence too, not just from clips. One way is to copy and paste a clip or set of clips between sequences. You can even add an entire sequence to another sequence by dragging its icon to the other sequence in the Timeline window, creating a nest. A nest appears to be a single clip, but it contains the contents of its source sequence. It's similar to what After Effects calls a precomposition and similar to what happens in Avid when you collapse a sequence. When you add an entire sequence by dragging its icon to another sequence, you see a single clip, but if you double-click this nested clip, its source sequence of clips opens in the Timeline window. Any changes made to this source sequence are reflected in the nested clip that is contained in the sequence you add it to. A subclip is a portion of a clip you've set apart as an element you can quickly access. For example, this could be a single shot from a media file or a master clip (any original media file) that began as an entire tape with many shots. The subclip icon has serrated edges. You can make subclips from subclips. You can make subclips from audio-only clips, but their icons remain the same as what the audio-only master clip uses (the speaker icon). We'll use subclips extensively as we edit the film. When clips are offline, they have a red line through them. Offline in this context means that no picture or sound files (media files) connect to them. The rest of the icons are as follows (see Figure 3.5): -
Video transition An effect between clips, such as a dissolve -
Audio transition An effect between audio clips, such as a fade or audio dissolve -
Video filter An effect applied to a video clip -
Audio filter An effect applied to an audio clip -
Video generator Effects that Final Cut Pro makes, such as to a title or color bar -
Marker A reference point within a clip -
Graphic file Pict files or tiffs are examples -
Audio-only clip Contains no video The Browser window also can contain bins . They are represented by blue folders that can contain clips, sequences, subclips, or even more bins to reduce clutter and organize your source material. Also notice in Figure 3.5 the little triangles next to the bins and one of the master clips. These collapsible triangles , called disclosure triangles, open and close the bins or open and close the list of markers contained in a clip or subclip. Triangles that point down are open. Triangles that point toward the icon are closed. The bin or clip closes and opens another area for viewing items simultaneously . To open and close them, simply click them. You can have as many sequences and clips stored in the Browser window as you want, but for good order, you should store clips in a logical bin structure. The icons are actually buttons you click to command Final Cut Pro to call up the media files to play for you in the Viewer window or Canvas window. (See the sections "The Viewer Window" and "The Canvas Window.") If you click the names of these items, you can type a name for them. When clicking the icon of these files, you can drag them or open them in the Viewer, Canvas, and Timeline windows . This entire display of references (clips, sequences, and effects), as stored and displayed in the Browser window and project settings, comprises the content of the project file. Because the project files are only text files, you can easily back them up on all sorts of different media away from the computer. A large project file might be 15MB in size . Backup has to be a way of life for intensive work such as editing. You definitely don't want to lose the log or the editing that's been done. It's a great habit to back up your project file at the end of each session on media that can be stored away from the computer. The Importance of Backing Up Your Project File A word to the wise: More than one editor has lost his job because he failed to back up his project file. Think of what could happen if you edited something for months and then lost the use of your project file. I never want to be in that position, and I'm sure you don't either. Disaster happens from time to time during the life of any nonlinear editor (NLE), so don't get caught on this one. Backing up is absolutely the most important computer chore for anyone . Final Cut Pro can open a saved project file and recapture it on any Mac that runs the same or a newer version of Final Cut Pro. It recaptures all time-coded source material contained in these logs automatically in a process called batch capture. You can find further discussion of backup and recapture strategies in Appendix C, "Solving Common Problems." Media files such as video captures are quite large and might be too cumbersome to back up. Project files, though, are much smaller and can easily be backed up on a Zip disc or CD. If you lose your media drives, you can restore your media files from a backup of your project file. You also can restore all the work you've done with sequences. There is an auto backup feature within Final Cut Pro called the Autosave Vault, but you probably will save these backups to your startup disk, and you could lose that disk, so it's still best to back up on a Zip disc or a CD at the end of each session. The worst case is that you could lose a day or two of work, not months' worth. |
Clip Information Clip information can include reel number, media start and end points, tracks contained, file format information, and more. Clip information is stored in the columns to the right of the clip names. Figure 3.7 shows only a portion of them; you can use the arrows or the bar at the bottom of the Browser window to scroll through them. I grabbed the handle on the bottom-right corner to expand the Browser. Figure 3.7. An expanded view of the Browser.  Table 3.1 is a complete list of what clip information can be stored in the columns. Table 3.1. Columns in the Browser Window | Column | Information | | Name | The clip's name as you entered it. | | Media Start | The time code where your clip begins on your source tape. | | Media End Length | The time code where your clip ends on your source tape. The duration of the entire media file. | | In Point | The time code position that is set after you select an edit start point in the Viewer or Canvas window. | | Out Point | The time-code position that is set after you set an edit ending point in the Viewer or Canvas window. | | Duration | The duration of the In point to the Out point in hours, minutes, seconds, and frames. | | Tracks Good | Video and/or audio tracks. A check mark to quickly sort the best takes feature. | | Audio | Specifies whether the clip is stereo, for example. | | Frame Size | Expressed as pixels, such as 720x480. | | Compressor | Which compressor or codec the clip or sequence uses. | | Data Rate | Expressed in kilobytes per second (KBps). | | Audio Rate | The clip's sample rate in KHz. | | Video Rate | Expressed in frames per second (fps). | | Audio Format | Expressed as bits and format. | | Alpha | Displays the type of alpha that FCP detects. | | Reverse Alpha setting | Can be set to yes or no. A check mark reverses the current setting to invert the alpha channel. | | Composite | Expressed as a type that is selectable. | | Pixel aspect | Expressed as a ratio. | | Anamorphic | A check mark indicates whether the medium is anamorphic. You also can set this to force this condition. | | Description | A user -entered phrase, for example. | | Scene | A place where scene descriptions or numbers can be kept. | | Shot/Take | A column for shot or take numbers. | | Reel | The number or name of the tape the clip is from. | | Last Modified | A date and time. | | Aux TC 1 | User-assigned auxiliary time code number 1. | | Aux TC 2 | User-assigned auxiliary time code number 2. | | Type | A sequence, clip, subclip, or bin. | | Log note | Another place to keep notes. | | TC | Where the time code is from. | | Size | The media file size in bytes. This is great for media-management decisions. | | Label | User-selectable. | | Source | Where the medium is stored on your disk drive. | | Thumbnail | A user-selectable still frame that displays a user-selectable frame that the clip contains. | | Comment columns | You can have custom names for four user-definable comments columns. You can change their names by selecting Edit, Project Properties. | Quite a bit of information is stored in these columns. The information is arranged much like a spreadsheet, with column headings at the top and the data that's particular to each clip in the rows and columns beneath the top row of column headers. What's exciting is that all the information is sortable and searchable. Furthermore, Final Cut Pro gathers much of the information stored here automatically. This automation is a necessity if you are editing a feature-length program with thousands of clips. To sort a column, click its header name at the top of a bin or the Browser window. Click again to reverse the sort. To find a clip, select Edit, Find or press +F. You can also use the up and down arrows on the keyboard to move the highlight from element to element in this project/displayagain, much like a spreadsheet. Pressing letter keys moves the highlight between clips whose name starts with that letter. When the clip or sequence is highlighted, you can press the Return key to load the clip or sequence from the Browser into the Viewer, Canvas, and Timeline windows. By dragging the column name headers, you can move the columns to the position of your choice. This powerful feature allows you to quickly view the information of your choice next to the Name column, for example. You can also add or take away columns from your view by Ctrl-clicking any column header. A context menu opens, as shown in Figure 3.8. You also can save and restore custom column layouts from this menu. These layouts are saved in the User>Library>Preferences>Final Cut Pro User Data>Column Layouts folder. New in Final Cut Pro 4, these layouts can be moved from system to system. Figure 3.8. The Browser Column context menu. 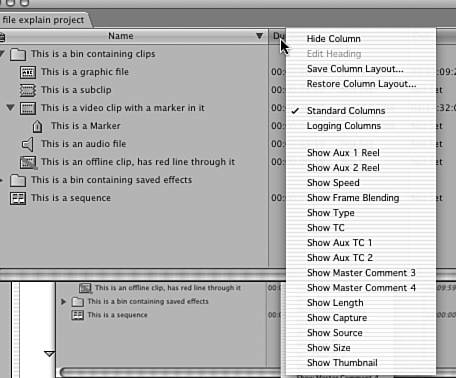 You can resize the Browser window by dragging the lower-right corner of the window or clicking its green expansion button to expand its view. Keep the Browser window handy, because you select all source material for your sequence or edited show from this window. The sidebar gives you a quick lesson on some automatic arrangements that can come in handy. Arranging Those Four Windows Using the Window menu, you can arrange Final Cut Pro in many ways. Saving frequently used window arrangements for tasks you perform often enhances your monitor setup. If you have multiple monitors or a cinema display, your standard window arrangements might be different from a person who has just one 15-inch monitor. Accessing these window arrangements is a snap. Just pull down the Window menu to access some arrangements that Final Cut Pro supplies , and then start with one you like. Modify the arrangement by dragging the windows to where you want to work with them, and then -click and select Window, Arrange, Save Custom Layout 1 or 2. Alternatively, you can set this new custom arrangement to be accessed through keyboard shortcuts. Final Cut Pro then has this setting available when you work in this particular project. If you want to use this setting in any or all projects, you need to create a custom layout. After you've set up the windows as you want them to be, save them by selecting Window, Arrange, Save Layout. After you have saved the windows, you can restore them in any project by selecting Window, Arrange, Restore Layout. When you select this command, you see a window that allows you to select any of the saved layouts you've created for this or earlier projects. |
Viewing Options in the Browser Window There are four ways to look at items in the Browser: the List View, and three different icon views. Figure 3.9 shows the Large Icons view. To access the context menu shown in Figure 3.9, Ctrl-click a blank area of the Browser or an open bin. Note the Arrange option. Selecting this in one of the three icon views forces the pictures to fit into the Browser. Figure 3.9. The Large Icons view. 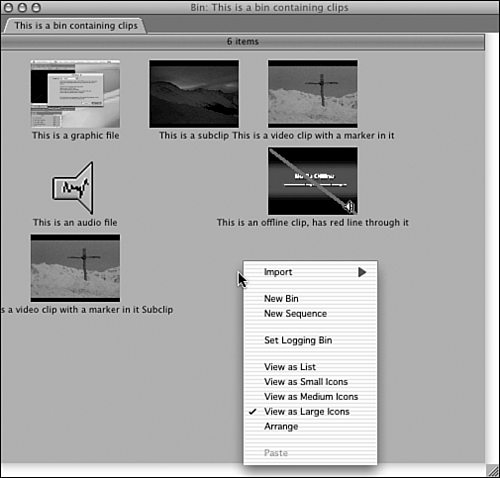 Three other views are listed in the context menu shown in Figure 3.9: Small Icons, Medium Icons, and Large Icons. Experimenting with them is your best bet. When you select these views, the clip information is replaced by a representative frame of the clip in the case of video clips and by larger views of the icons in the case of the other types of files. You can open a separate bin window by double-clicking its icon in the Browser. You can use all but the List view to arrange your clips in a certain order by dragging them around and then dragging them as a group to the Timeline in order from left to right and then top to bottom. It's sort of like creating a storyboard and then dragging it to the Timeline in the order of your choice. You can trim these complete shots with the tools supplied by Final Cut Pro. The Arrange selection in the pop-up menu arranges the icon views to fit the pictures into the window shape you are currently working in. One other context menu can be opened from this window. If you Ctrl-click a clip icon, you can pull up a set of commands to use on that selection, as shown in Figure 3.10. Figure 3.10. The context menu containing commands available for an item in the Browser. 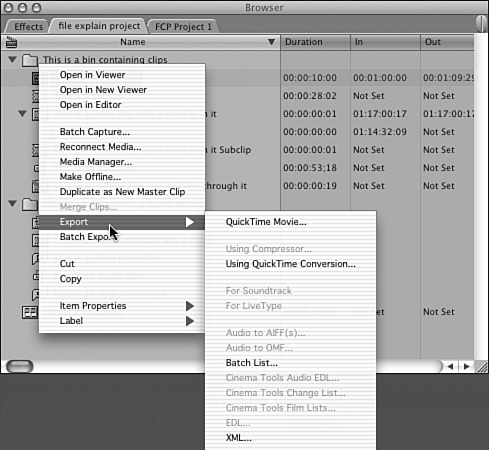 The Effects tab, shown in Figure 3.11, contains all the effects you have at your disposal within Final Cut Pro. They are organized into six folders. If you open the triangle next to one of the folders, you can see the list of effects that can be applied to your clips and edit points. Figure 3.11. The Effects tab. 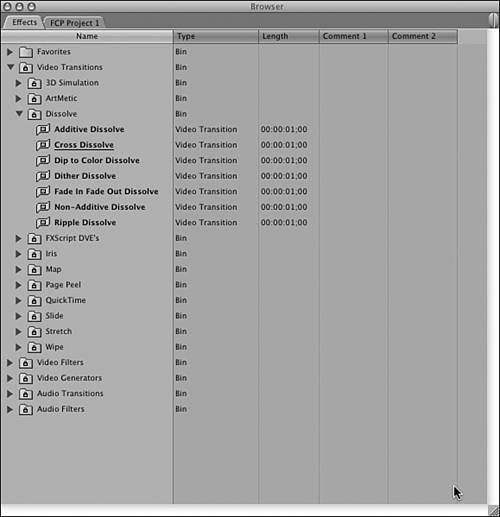 The difference between a filter and a transition, whether it's video or audio, is in how it's applied. A filter applies to a clip or a portion of a clip (such as a color correction), and a transition is an effect used between two clips (such as a dissolve). Some are audio-only filters and transitions, and some are video-only filters and transitions. In the Favorites folder, you can drag any effect you have customized for quick access as you edit. In the Video Generators folder, you can access all the elements you can create from within Final Cut Pro, such as titles, shapes , gradients, highlights, noise, and audio tone. There are also plug-ins that can be added to Final Cut Pro, such as Boris's Graffiti and Boris's Red. They too show up in this window as generators if they have been added to your system. Note that there are no audio + video filters. Each of these elements must be affected separately. You can add plug-in effects such as After Effects filters, which show up and are sorted into the appropriate effect categories accessed under this tab. To add a filter or transition to audio or video, drag the effect from the Effects tab to the clip or cut point you want to affect. |