| In this workshop, you'll add the now-finished effects you've been creating in other Timelines. You'll experiment with using nested sequences to get a feel for how this feature works. You'll also work with the Media Manager. Add the Final Logo to the End of the Movie -
Locate the Final Composite 2 sequence in the Animation Sequences bin. With snapping turned on (press N), drag the sequence directly from the bin, and put it directly past the Title Crawl at the end of the movie. -
Notice that the sequence is automatically converted to the OfflineRT mode you have set for it. Rendering this massive file will go much faster. You'll make one last change. Highlight this nest in Sequence 1 and press Enter to open it in the Viewer. Notice that you could add filters to the entire nest here if you needed to. Either set a 100 (3:10 seconds) frame fade-up in the Opacity parameter in its Motion tab, or use the Pen tool on the clip overlay in Sequence 1 to create the fade-up. Create a fade-down at the end of 45 frames . When you are finished, the end of Sequence 1 should look like Figure 14.5. Figure 14.5. The end of the sequence after step 2. 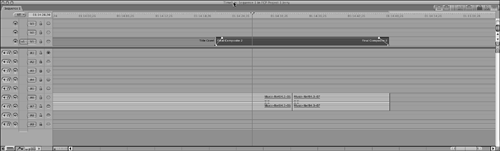 -
Highlight the nest in Sequence 1. If you want to take the time now, render it (press Opt+R). Everything in your sequence will be rendered, but it will take a long time. Rather than take the time, as you normally would, open "The Midnight Sun Finished Sequence" and copy and paste the file already made for you there. It's the last video clip in the sequence named Final Composite 2. Just copy and paste it from the finished sequence to your sequence. tip This is an example of a file you might want to back up if you ever wanted to bring this project back online in your computer, saving you the long render later. It was created by exporting the Final Composite 2 sequence to Compressor and using the Photo JPEG codec to create it. If you were actually doing a higher-resolution finish to this project, you could back up this file on a CD or DVD and save it for use later.
Prepare the Smoke, Stars, and Boat Composites -
Locate the *Stars Composite, *Boat Composite, and *Smoke Composite sequences in the Composites bin. Highlight all three sequences and select File, Batch Export. They open in the Export Queue window. -
Click the Settings button in the bottom of the Export Queue window. In the Batch window, set the Format to be QuickTime Movie. Change the Settings format to OfflineRT NTSC (Photo JPEG). Set Include to Video Only. Check the Make Self-Contained check box. When you have set things up correctly, the settings should be as shown in Figure 14.6. Figure 14.6. Batch 1 export settings after step 2. 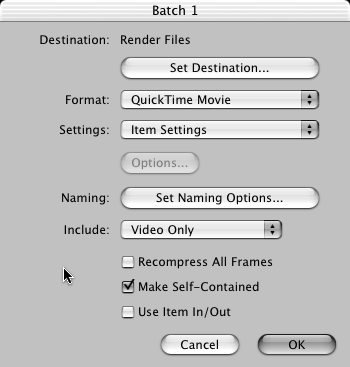 -
Look at the top of the window to see if the Destination is set to where you've been keeping the book's files. If not, click the Set Destination button, select the location you have been importing all the files from, and click OK. -
Click the Export button. After the new files are created, the status column shows them as Done. With the Batch 1 folder still highlighted, click the View Exported button. Each clip opens in a separate Viewer window. Drag from the center of each Viewer to import these new clips, and place them in the Composites bin. Close each Viewer after you have imported the new files into the Composites bin. You'll note that you now have a clip that has the same name as the sequence it came from. This is OK, because they are different types of clips and are easily distinguished from one another. -
Save your project file, and close the Export Queue window. Edit the Stars Composite into Sequence 1 -
Navigate to 01:02:55;14 in Sequence 1; you should be sitting on the last frame of the "Cap reverse CU looks at stars" clip. Open the new "*Stars Composite" clip in the Viewer and press the End key on the keyboard. Drag from the center of the Viewer to the Replace overlay in the Canvas window. Render the 2-second dissolve to see the change. -
Save your project file. Edit the Boat Composite into Sequence 1 -
Navigate to 01:09:17;13 in Sequence 1. This should be the first frame of Cap looking at the boat that (so far) isn't there. Set an In point on the first frame of this shot and an Out point on the last frame of the Center Section clip, or use the shortcut (press X) to mark the clip for the same result. The duration window in the Canvas should be 3:17. -
Double-click the *Boat Composite clip in the Composites bin to open it in the Viewer. Edit it (using the first frame as the In point) to Sequence 1, replacing the end of the "Center Section" clip on V1. -
Create a 30-frame fade-out at the end of the new boat composite in the sequence. Use the Pen tool with the clip overlay turned on, or double-click to open this composite in the Viewer, and then change the opacity in the Opacity parameter. -
Take a look at the series of shots in this area before the composited boat shot. The previous scene is very blue. The scene at the lake doesn't continue with the blue and very cold feeling of the previous scene, where Cap is dragging Sam's body up the slope. -
Change your window arrangement to Color Correction, and then click the Frame Viewer in the Tool Bench window. Set the lower-right pop-up menu to Next Edit and the lower-left pop-up menu to Next Edit. Remove the dissolve at the end of the "Cap up mtn side dusk" shot and before the "Cap sees lake tk 1" shot. (If you don't do this, you'll see the first frame of the incoming edit displayed in the middle of the dissolve.) You'll add it back later. -
Place the playhead in the Timeline window over the "Cap up mtn side dusk" clip. Note how green (and thus warmer) the "Cap sees lake tk 1" shot looks compared to the previous "Cap up mtn side dusk" shot. Add a Color Corrector 3-way filter to the "Cap sees lake tk 1" clip. Move the Mids color wheel button around a third of the way to the B (blue) until your display looks like Figure 14.7. Figure 14.7. Color correction after step 6.  -
Add back the 2-second cross-dissolve. Click the 1 and 2 arrow icons next to the hand icon in the upper right of the "Cap sees lake tk 1" clip's color correction, as shown in Figure 14.8. Doing this adds this same color correction to the next two shots. All three match each other better, and they also look much colder. Furthermore, after the fade-out and fade-up, the contrast between the warm cabin in the boat and the cold exterior is accentuated, emphasizing the story . Cap has finally found a warm and dry-enough place to burn Sam's body. Figure 14.8. The two arrows that copy this filter to the next two shots. 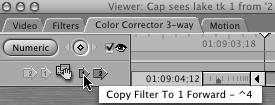 -
Change your arrangement to the Standard arrangement by pressing Ctrl+U. Save your project file. Edit the Smoke Composite into Sequence 1 -
Navigate to 01:10:36;11 in Sequence 1. Press X to mark the "smoke background tk 1" clip. -
Double-click the "*Smoke Composite" clip in the Composites bin to open it in the Viewer. -
Using the first frame of the "*Smoke Composite" clip in the Viewer as an In point, overwrite it to the V1 track to replace the noncomposited clip. -
Save your project. Render Everything -
With the Timeline window active, press Opt+R to render everything in Sequence 1 if you haven't already. -
The render might take some time, so you might want to do it a bit later. When you're done, take a look at your handiwork from the beginning to the end of the film. Then pat yourself on the back. I hope you've learned a lot. Prepare for a High-Resolution Recapture If you were working in full resolution editing this movie, you would be ready to lay it out to tape now. There are no more edits to perform; you're finished. However, pretend that you have been working in OfflineRT and are now ready to recapture just the material actually used in Sequence 1 in full resolution. In the case of "The Midnight Sun," this is Digital Betacamthe format used in the Telecine (film-to-tape transfer). We have a small problem. For educational purposes, this tutorial had to be edited using techniques to show features. It wasn't done as if it were going to be recaptured in high resolution. In reality, if this had been a true offline edit, you might not have created the three exported composite files you just edited into the sequence. Instead, you might have copied the sequences into Sequence 1 instead to retain the proper timecode information . The timecode now associated with these exported and then imported clips is not the correct information at all . In fact, had this been a true offline, a better workflow would be to do the compositing after the offline was finished and after you had recaptured the files in full resolution (except in the case of the final company logo you created in higher resolution). The reason for this is that composites come out better in higher resolution. Assume, though, that the current composites are correct (you might have received them on their own Digital Betacam tapes done in a program like Apple's Shake), and follow along with a preparation technique and Media Manager exercise. -
Undo the step where you added the prerendered clip for the company logo. Simply drag the Composite 2 sequence back into the Sequence 1 sequence to replace the clip used now. (You can undo this later if you want.) -
Highlight Sequence 1 in the Browser. Ctrl-click its icon and select Media Manager from the context menu that opens. You see the Media Manager window. -
Figure 14.9 shows how you should set each parameter in this window. In the pop-up menu "media referenced by duplicated items," select Create offline. This creates a new sequence with offline clips that have timecode and reel name information. In this case, it is the film footage. However, any clips such as audio files will be online in this new sequence and connected to the current media they are connected to now. If you will finish and recapture on the same computer, this isn't a problem. But if you are moving to another computer, you'll need to move these connected media files with the new project file you are creating to the new system. You won't need to recapture them, but you will need to use them for your online session. Figure 14.9. Media Manager settings for online preparation. 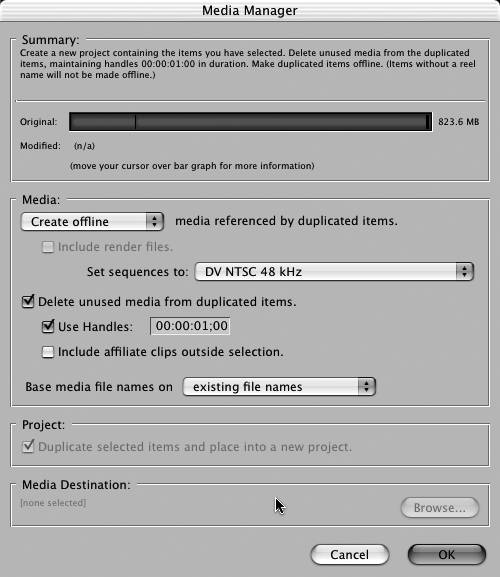 -
In the "Set sequences to:" pop-up menu, select DV NTSC 48 kHz. (I am assuming that your camera masters were DV and not the Digital Betacam they actually are.) -
Check "Delete unused media from duplicated items." When you do this, you are not deleting media. Instead, you are creating a new sequence that doesn't reference any media not used in the sequence. So when you recapture this sequence, you capture only the media needed to re-create it, not all 55 or so minutes of tape that was shot for it. This could be important if you have 100 hours of source material for a 1- hour program. If you don't check this option, all the source material originally captured for each of the clips used in the sequence as it is now is captured in the online session too. -
Check Use Handles and set it to 00:00:01:00. In this case, you will leave just a bit of fudge room in case you want to slip or trim just a bit of footage after you've seen the program in full resolution. You might want to change a bit of duration when you see this film projected full-screen (in a video projection system, for example). I've often seen movies that were edited on NLE software with those really small windows , and when I've seen the same film projected on a 30- foot screen, the whole feel of the pacing changed. It will be nice to be able to easily add that extra beat needed for a moment in the film. Adding this extra second on either end of each clip's capture won't take up much space, and it will give you options you wouldn't have otherwise . How about if you needed to add a dissolve without deleting time with the new clips? You can add a new dissolve of up to 60 frames on either end of each shot if need be. You can shorten these new clips, but not lengthen them unless you add some handles. tip I strongly suggest that you never delete the lower-resolution media if you don't have to. If you do, you should check this new project file against the information your lower-resolution sequence provides before you delete the lower-resolution media files . Furthermore, I also strongly suggest that you read the Summary . If you make a mistake with the Media Manager, some options could permanently alter your current media files, such as selecting the "Use existing" option. Better safe than sorry. -
After you have selected the proper settings, read what the Summary at the top of the window says about what will happen after you click OK. In this case, you'll create a new project file with a partially offline set of clips. They are partial because the audio files don't need to be reacquired from tape. Any other video files (such as the titles and the logo at the end) don't have to be reacquired from tape. Remember that they didn't come from tape in the first place, and FCP is smart enough to know this. FCP assumes that you need to recapture only items from tapes, so it creates a sequence with offline items that are only those associated with a reel name. -
Click OK. A dialog box opens, asking you to create a new name for this new project file. Save it in a place you can find later, and name it "FCP Project 1 High Resolution." When you click Save, the project opens. -
Rename the Sequence 1 sequence in the new project "High Resolution Sequence 1." Save your project file. Examine the New Project -
Ctrl-click theFCP Project 1 tab in the Browser to close it. If you are asked to save it, do so. -
Double-click the High Resolution Sequence 1 sequence in the new project file. -
Notice that all clips added by file in the first place are now linked to this sequence. All the audio is there, and new clips for it have been imported into the Clips bin you created when you checked the appropriate box in the Media Manager window. -
Note that the nested sequence created from files you created for it at the end of the Timeline is still there, ready to render to DV. -
Note that the high-resolution titles are ready for rendering. Also note that all clips with no tape name are still online. You have not deleted any of the media associated with your Project 1 file. All media online in this new sequence references the same media files, and they are of the same quality they were originally. None of the video files referenced in the new sequence are low-resolution . -
If you had the original tape that the film transfer was done with, you could load it and batch-capture the rest of the sequence in this new project. You do this by Ctrl-clicking the High Resolution Sequence 1 sequence and selecting Capture. You can't perform this operation, because you don't have the original tapes, but you can see what the process involves. |