Section 1.4. Creating Reusable Graphics
1.4. Creating Reusable GraphicsYou may find that you need to use a graphic several times in one movie, whether it's a box, a logo, or a character. To avoid adding substantially to the file size of the finished project as a result, use symbols. A symbol is a reusable asset that resides in a Library in every Flash document (see the sidebar "The Library"). When a symbol is dragged from the Library to the Stage, the on-Stage element is called an instance of that symbol. This is because the element is not removed from the Library. Instead, the instance references, or points to, the Library symbol. Multiple instances can be spawned from a single symbol, without significantly increasing file size. On-Stage changes (such as adjustments to width, height, rotation, opacity, etc.) can be made to individual instances of a symbol, and the original symbol will remain intact. However, if persistent changes are made to the symbol in the Library, all instances derived from that symbol will be affected. Think of symbols this way: a symbol is analogous to an actor in a movie. Each instance of that symbol is analogous to a character played by the actor. The actor can play multiple characters in the movie, simply by changing costume or make-up. However, if the actor is replaced with another actor, all of the characters will also be changed. This discussion is focused on reusability and file optimization, but in nearly every remaining chapter of this book, you will see that symbols are central to Flash development. Most notably, they are the building blocks within every Flash file that can be controlled by ActionScript. You'll learn more about that throughout this book. For now, take a look at how to create and use symbols. 1.4.1. Creating SymbolsIt's time to create a reusable box symbol that you can use in your designs:
Figure 1-13. The Convert to Symbol dialog box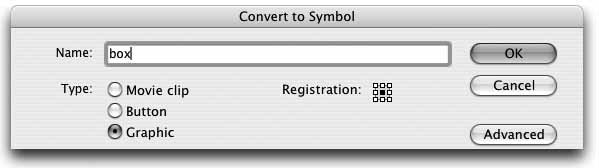 It's important to understand that a grouped image is not the same as a symbol. A grouped image is raw graphic data on the Stage, whereas a symbol is the defined blueprint for one or more instances of the same asset. If you made a copy of a group, you would literally be copying the vector data required to draw that group and, therefore, measurably increasing the file size. If you made a copy of a symbol instance, on the other hand, you would essentially be creating another reference to the single symbol residing in the Library. As you'll see next, the duplicated instance contributes negligibly to the size of your file. 1.4.2. Reusing SymbolsNow that you have a symbol, you can reuse it as many times as you want without re-creating the drawing or adding significantly to the file size of the project:
1.4.3. What's Next?You may notice that many Flash terms and concepts, such as "the Stage" and "movie," were borrowed from the film industry. Using a filmmaking metaphor can help you grasp many Flash concepts. For example, much like in a film, anything that appears on the Stage appears in the finished movie. A graphic that resides off-Stage is not seen in the final movie unless it moves onto the Stage at some point. To help cement this analogy, think about what other aspects of Flash development might be similar to filmmaking. (Hint: Look back over the section on symbols and instances.) If you want to experiment some more before moving on to the next chapter, try editing the two stars you created earlier. To edit drawing objects, use the same technique you used for editing groups. Double-click each star, and the rest of the Stage will dim, allowing you to focus on editing the drawing object in place. Experiment by selecting the star, clicking on the fill color swatch, and changing the white fill's Alpha value to 50% in the pop-up color palette. Next, try cutting a star out of the background by breaking it apart, selecting it, and deleting it. (By breaking apart the drawing object, you're allowing it to merge with the underlying background shape.) Finally, try something totally new: finish off the Hendrix poster image by adding some text with the Text tool. With your new knowledge of the basic drawing tools in Flash, you can start drawing everything from cartoon characters and backgrounds to logos and layoutsso get to it! This book is all about playing around, so have some fun. In the next chapter, you'll learn how to make creating Flash magic quicker and easier by customizing your workspace. You'll focus on:
|
 New.
New.
EAN: 2147483647
Pages: 117