5.2 Configuring the management server
|
| < Day Day Up > |
|
5.2 Configuring the management server
This section discuss the installation of the management node. What is presented in this section is a description of the typical steps of a full management node installation, including the Linux operating system and CSM. The following is an overview of the management node installation process:
-
Execute the Hardware Update Plan as listed in 5.1.4, "Develop a plan to update your hardware" on page 101
-
Install your distribution of Linux as detailed in 5.2.1, "Red Hat Linux 7.3 installation" on page 108.
Note You can find a listing of supported Linux distributions in 3.6, "Software requirements to run CSM" on page 67.
-
The notes listed here under letters a-f are placed there for ease of reference, and to complement the information that is listed in Section 5.2.1 (that is, the following bullets are not intended to take the place of any information listed in Section 5.2.1).
-
Install Source RPMs, Compilers, and Required Services from media previously gathered in 5.1.6, "Installation media" on page 103.
-
Upgrade Kernel (Only Upgrade If Necessary, this action might force you to update some of your other lib files, in order to finish the installation of future packages) in accordance with the best practices.
-
Install Drivers and Configure Hardware.
-
Configure the following services:
-
NTP, as listed in 5.2.4, "NTP configuration" on page 111.
-
Syslogd, as detailed in 5.2.5, "Fix syslogd" on page 113.
-
DHCP, as shown in Example 5-10 on page 116.
-
DNS services, as listed in 5.2.6, "Domain Name System (DNS) configuration" on page 114.
-
UUCP, as detailed in "Modifying the /etc/uucp/port file" on page 121.
-
-
Install all required packages for CSM, as detailed in the Product Manual "CSM Planning and Installation Guide" (Due to the detail and many various distributions that are listed in that document, ensure that you are referencing the correct operating system distribution and versioning information).
-
Install the recommended Red Hat updates as listed in 5.2.3, "Install Red Hat Linux 7.3 updates" on page 111.
-
-
If not already taken care of, in Step 2, install the Equinox Driver and Diagnostic Utility as listed in "Installing the ESP driver" on page 118.
-
Execute 5.1.2, "Develop a network plan" on page 100.
-
The older Equinox Terminal Servers only respond to bootp, and as such will not function properly during the installation phase, unless directly connected to the server, or CDP / spanning tree protocols are disabled on the switch.
-
-
Configure the Terminal Server as listed in 5.2.7, "Install Terminal Server" on page 114 (the information listed here is designed to complement the information listed in Section 5.2.7).
-
Reset the Equinox Terminal Server, via the small (right) pin hole on the front of the unit.
-
Press button for 6 seconds to clear current settings.
-
Press button for 10 seconds to release IP address / All settings. (You will notice that when you hold the button that the LEDs will blink rapidly for a few seconds (this is phase one), and then a few seconds later they will blink even faster (this is phase two) until all of the blinking leds stop (this is the completion of phase two)).
-
-
-
Configure and document RSA devices as detailed in "Remote Supervisor Adapter configuration" on page 122.
-
Configure and document ASM devices as detailed in "ASM processor configuration" on page 123.
-
Install the CSM core package, as detailed in 5.2.11, "Installing the CSM core package" on page 125.
-
Install CSM on the management node using the installms script as detailed in 5.2.12, "Running the CSM installms script" on page 125.
-
Install the CSM license, as detailed in 5.2.13, "Install the license" on page 129.
-
Verify the installation, as detailed in 5.2.14, "Verify the CSM installation on the management node" on page 130
5.2.1 Red Hat Linux 7.3 installation
For the Red Hat Linux 7.3 installation, you can use any of the standard install procedures, including CD-ROM, ftp, or http. However, you will need the actual Red Hat media for future steps of this procedure.
If you are not familiar with installing Red Hat Linux, we recommend you accept all of the defaults offered by the installation program with the following exceptions:
-
At the Installation Type screen, select Install Custom System.
-
At the Disk Partitioning menu, select Manually Partition with Disk Druid.
We suggest you partition the system as in Table 5-1. Any additional space should be allocated to /home or another partition based on your expected usage.
Table 5-1: Recommended partitioning File system
Dimension
/boot
64 MB
/
1024 MB
/usr
4096 MB
/opt
1024 MB
/var
1024 MB for a 128 nodes cluster
/tmp
1024 MB
/csminstall
2048 MB
/home
2048 MB
swap
Twice RAM size for RAM less than 2 GB. Equal to RAM if more.
-
At the Package Group Selection window, choose the desired packages, and make sure that at least the following group of packages are selected and installed:
-
X Windows System
-
GNOME and/or KDE
-
Network Support
-
NFS File Server
-
DNS Name Server
-
Software Development
-
Kernel Development
-
| Helpful hints: |
|
5.2.2 Install additional Red Hat Linux 7.3 packages
The CSM installation script will automatically copy the packages it requires from the Red Hat Linux 7.3 media. It will also copy a number of additional non-Red Hat packages that are necessary for CSM operation.
There are two additional packages that you should consider installing:
-
NTP should also be installed on all clusters. This requires the ntp-4.1.1 package. We discuss configuring NTP on the management node in 5.2.4, "NTP configuration" on page 111.
-
If you are going to be using the Equinox Serial Provider (ESP) for serial connectivity to the cluster nodes, you need to install uucp-1.06.1.
Check to see if these packages are already installed by running:
# rpm -qa | grep ntp # rpm -qa | grep uucp
If these commands return no output, then perform the following sequence of steps in order to install them:
-
Insert the first Red Hat Linux 7.3 CD-ROM and mount it with the following command:
# mount /mnt/cdrom
-
Install the NTP package by typing:
# rpm -ivh /mnt/cdrom/RedHat/RPMS/ntp-*
-
Unmount the first disc:
# umount /mnt/cdrom
-
Insert the third Red Hat Linux 7.3 CD-ROM in the drive and mount it:
# mount /mnt/cdrom
-
Install the UUCP package by typing:
# rpm -ivh /mnt/cdrom/RedHat/RPMS/uucp-*
-
Unmount the third disk:
# umount /mnt/cdrom
Example 5-1 shows the installation output of both NTP and UUCP packages.
Example 5-1: Installation of additional Red Hat 7.3 packages
[root@master /]# mount /mnt/cdrom [root@master /]# rpm -ivh /mnt/cdrom/RedHat/RPMS/ntp-* Preparing... ########################################### [100%] 1:ntp ########################################### [100%] [root@master /]# umount /mnt/cdrom [root@master /]# mount /mnt/cdrom [root@master /]# rpm -ivh /mnt/cdrom/RedHat/RPMS/uucp-* Preparing... ########################################### [100%] 1:uucp ########################################### [100%] [root@master /]# umount /mnt/cdrom [root@master /]#
5.2.3 Install Red Hat Linux 7.3 updates
You should check to see if your system needs any updates:
http://rhn.redhat.com/errata/rh73-errata.html
For example, there are known problems with the implementation of the ext3 file system in the stock kernel shipped with Red Hat Linux 7.3.
To install the updates, follow the instructions in the associated advisories. Most of the time, you simply update the RPMs by typing:
# rpm -Uvh <package>
Where, <package> is the name of the package to be upgraded.
We recommend that any update RPMs that you download from the Red Hat site should be copied into the /csminstall/Linux/RedHat/7.3/i386/updates directory on the management server. This directory does not exist by default, but can be easily created using the mkdir -p command. When the update RPMs are stored in this directory, CSM will push them out to your compute nodes, where they are installed using Software Maintenance System (SMS) feature. See 6.6, "Software maintenance system (SMS)" on page 173 for more details.
5.2.4 NTP configuration
Time synchronization plays an essential role in cluster operations. We highly recommend that you configure the management node as an NTP server for your cluster. You can configure your management node to use an external time source, or just synchronize all cluster nodes to the management node itself.
In Example 5-2 we provide a very simple NTP configuration for the management node. NTP has many options and features which are beyond the scope of this book, so for more details, see http://www.ntp.org.
Example 5-2: Management node /etc/ntp.conf file
server 127.127.1.0 fudge 127.127.1.0 stratum 10 # if you have real servers to sync with, specify them here: (and uncomment) # server realserver1.domain.com # server realserver2.domain.com driftfile /etc/ntp/drift
The /etc/ntp/step-tickers file should contain the IP addresses for each of the real time servers listed in /etc/ntp.conf. This file should be empty if the management node is acting as the reference server without an external time source.
Start NTP by running the following commands:
# chkconfig --level 345 ntpd on # service ntpd start
Example 5-3 shows NTP being started.
Example 5-3: Starting the NTP daemon
[root@master /]# service ntpd start Starting ntpd: [ OK ] [root@master /]#
It may take about five minutes for the management node to start serving time to other nodes. The NTP daemon uses this interval to establish a "drift rate" between itself and a reference time server.
Confirm NTP is operating by running the following command:
# service ntpd status
The ntpq -p command may be used to verify that the time server has selected a reference time source. This is indicated by an asterisk in the first column for the server that has been chosen, as in Example 5-4.
Example 5-4: Checking NTP status
[root@master /]# service ntpd status ntpd (pid 3550) is running... [root@master /]# ntpq -p remote refid st t when poll reach delay offset jitter ============================================================================== *LOCAL(1) LOCAL(1) 12 l 23 64 17 0.000 0.000 0.004 [root@master /]#
5.2.5 Fix syslogd
By default, syslogd does not listen for remote messages; the -r switch needs to be passed when syslogd starts if you want to receive logs from the compute nodes.
To accomplish this, you need to edit the syslogd system configuration file.
Edit the /etc/sysconfig/syslog file and add -r to the SYSLOGD_OPTIONS (see Example 5-5):
# vi /etc/sysconfig/syslog
Example 5-5: /etc/sysconfig/syslog
# Options to syslogd # -m 0 disables 'MARK' messages. # -r enables logging from remote machines # -x disables DNS lookups on messages received with -r # See syslogd(8) for more details SYSLOGD_OPTIONS="-m 0 -r" # Options to klogd # -2 prints all kernel oops messages twice; once for klogd to decode, and # once for processing with 'ksymoops' # -x disables all klogd processing of oops messages entirely # See klogd(8) for more details KLOGD_OPTIONS="-x"
Restart the syslog service (see Example 5-6 on page 113):
Example 5-6: syslog restart
[root@master /]# service syslog restart Shutting down kernel logger: [ OK ] Shutting down system logger: [ OK ] Starting system logger: [ OK ] Starting kernel logger: [ OK ] [root@master /]#
5.2.6 Domain Name System (DNS) configuration
You should configure a domain name server with all of the cluster nodes defined, as the CSM installation scripts depend on accurate and complete host information.
See "DNS server" on page 276 to see how to configure the management node as a DNS server.
Verify and edit, if necessary, /etc/resolv.conf so the management node will first look to itself before referring to external domain name servers. Example 5-7 shows a sample /etc/resolv.conf.
Example 5-7: Sample /etc/resolv.conf
[root@master /]# cat /etc/resolv.conf search cluster.com nameserver 172.20.0.1 [root@master /]#
Verify that your server is able to resolve the IP address of the cluster nodes (see Example 5-8).
Example 5-8: host command output
[root@master /]# host node1 node1.cluster.com. has address 172.20.3.1 [root@master /]#
| Important: | You should also create an /etc/hosts file with the host name and IP addresses of ALL NODES. If hosts are missing in this file, the installation of CSM on the computes nodes through KickStart files will fail. |
5.2.7 Install Terminal Server
The IBM ![]() 1350 Cluster will be preconfigured with one or more terminal servers. Currently, the MRV In-Reach Terminal Server and the Equinox Serial Provider are supported. Refer to the appropriate section below for installation and configuration instructions based on your hardware configuration.
1350 Cluster will be preconfigured with one or more terminal servers. Currently, the MRV In-Reach Terminal Server and the Equinox Serial Provider are supported. Refer to the appropriate section below for installation and configuration instructions based on your hardware configuration.
MRV In-Reach 20 or 40 Port Terminal Server
If you are able to successfully ping your MRV In-Reach Terminal Server, no further action is required. The terminal server has been properly configured. Otherwise, follow the steps described in the next sections to configure the device.
Assigning an IP address
In order to assign an IP address to the MRV terminal server, perform the following steps:
-
Insert the PCMCIA flash card that came with your cluster into the slot in the front of the unit.
-
Attach a serial terminal to the command port. The default command port is the last port (either port 20 or 40, depending on the size of the unit.)
-
Power the unit on and press Enter until you receive a Login> prompt.
-
At the Login> prompt, type access.
-
At the Username> prompt, type system.
-
At the IN-Reach> prompt, type set-priv.
-
At the Password> prompt, type system.
-
From the IN-Reach_Priv> prompt, type show ip to see the current network settings.
-
Type define ip address www.xxx.yyy.zzz to set the IP address.
-
Type define ip primary gateway address www.xxx.yyy.zzz to set the gateway address.
-
Type define ip subnet mask www.xxx.yyy.zzz to set the subnet mask.
-
Type init delay 0 to save the configuration and restart the MRV.
Configuring the serial ports
If your MRV In-Reach did not already have an IP address, it may need further configuration so that the serial ports operate properly. In order to configure the serial ports, perform the following steps:
-
Telnet to the IP address assigned to the MRV in the previous section.
-
At the Login> prompt, type access.
-
At the username> prompt, enter system.
-
At the IN-Reach> prompt, enter set priv.
-
At the Password> prompt, type system.
-
Define the ports by entering the following at the IN-Reach_Priv> prompt, as shown in Example 5-9.
Example 5-9: MRV IN-Reach port configuration

IN-Reach_Priv> define port 1-20 access remote IN-Reach_Priv> define port 21–40 access remote IN-Reach_Priv> define port 1-20 flow control enabled IN-Reach_Priv> define port 21–40 flow control enabled IN-Reach_Priv> define port 1-20 speed 9600 IN-Reach_Priv> define port 21–40 speed 9600 IN-Reach_Priv> define port 1-20 que disable IN-Reach_Priv> define port 21–40 que disable IN-Reach_Priv> lo port 1-20 IN-Reach_Priv> lo port 21–40 IN-Reach_Priv> init delay 0
Note Do not perform the port 21–40 commands as shown in: Example 5-9 on a 20 port Terminal Server.
The last command in Example 5-9 will cause the MRV to save any configuration changes and restart. The IN-Range Terminal Server should now be fully operational.
Equinox Serial Provider (ESP)
There are three steps to installing the Equinox Serial Provider:
-
An IP address needs to be assigned to the device.
-
A Linux device driver needs to be built and installed.
-
The ESP device itself must be configured.
Assigning an IP address
The Equinox Serial Provider should have been assigned an IP address when your cluster was installed. Check to see if you can ping the assigned IP address. If not, then use these procedures to configure an address:
-
Record the MAC address on the unit.
-
Attach a cable to the local network.
-
Set up the DHCP server running on your management node with a reserved address for the ESP, as shown in Example 5-10 on page 116.
Example 5-10: dhcp configuration file for the Equinox terminal server
# The following is an Example of a working dhcpd.conf file from our cluster. not authoritative; # This keeps your DHCP server from taking over the Network. deny unknown-clients; # Only allows clients in this file to receive leases. option routers 172.20.0.1; # Defines client's gateway option domain-name "cluster.com"; #Defines DNS suffix for clients. option domain-name-servers 172.20.0.1; #Defines Client DNS. subnet 172.20.0.0 netmask 255.255.0.0 #Defines Client DHCP Range and Mask. { # Starts Function default-lease-time -1; # Sets Lease Time to Unlimited filename "/tftpboot/pxelinux.0"; # Tells new clients to pxe boot from image.0 next-server 172.20.0.1; # Tells Clients - Name Server to use first subnet 172.22.0.0 netmask 255.255.0.0 { # Start of Nested Function - Layer 2 default-lease-time -1; # Sets Lease Time to Unlimited filename "/tftpboot/pxelinux.0"; # Tells new clients to pxe boot from image.0 next-server 172.22.0.1; # Tells Clients - Name Server to use first range dynamic-bootp 172.22.30.1 172.22.30.1; # Sets to Server bootp Mode host mgesp1 { # Start of Nested Function - Layer 3 by hostname hardware ethernet 00:80:7D:80:D6:0E; # Tells DHCP Server to respond to equinox fixed-address 172.22.20.1;# Tells DHCP Server to set address for equinox static } # End of Nested Function - Layer 3 } # End of Nested Function - Layer 2 } # End of Nested Function - Layer 1 # This ends example one, CSM will build out this file later on. # Here is a simpler version of an initial dhcpd.conf file, from an old cluster. # Please note that some of the following options only work some times. subnet 172.22.0.0 netmask 255.255.0.0 { option domain-name "cluster.com"; option domain-name-servers 172.22.0.1; range dynamic-bootp 172.22.30.1 172.22.30.10; default-lease-time 21600; # these options are not the best for bootp - max-lease-time 43200; # - enabled device. "-1" is a better default. # we want the Equinox to appear at a fixed address host mgesp1 { hardware ethernet 00:80:7D:80:D6:0E; fixed-address 172.22.30.1; } } -
The dhcpd daemon should only listen for DHCP requests on internal cluster network interfaces. Modify the /etc/sysconfig/dhcpd file to specify the appropriate interfaces (in this case our cluster VLAN is on eth0) (see Example 5-11):
# vi /etc/sysconfig/dhcpd
Example 5-11: /etc/sysconfig/dhcpd
# Command line options here DHCPDARGS="eth0"
Note Be sure to use quotes in /etc/sysconfig/dhcpd if you are specifying more than one argument.
-
This option, is only needed if you fail to place the "non-authoritative" and "deny unknown-clients" statements within the target function of the dhcpd.conf file.
-
-
Start the dhcpd daemon:
# service dhcpd start
-
Power on the ESP.
-
Wait a few minutes and verify that the ESP is correctly inserted on the network (see Example 5-12):
# ping 172.22.30.1
Example 5-12: Pinging the ESP to confirm its insertion on the network
[root@master cfg]# ping mgesp1 PING mgesp1.cluster.com (172.22.30.1) from 172.20.0.1 : 56(84) bytes of data. 64 bytes from mgesp1.cluster.com (172.22.30.1): icmp_seq=1 ttl=60 time=0.908 ms 64 bytes from mgesp1.cluster.com (172.22.30.1): icmp_seq=2 ttl=60 time=1.74 ms 64 bytes from mgesp1.cluster.com (172.22.30.1): icmp_seq=3 ttl=60 time=0.912 ms --- mgesp1.cluster.com ping statistics --- 3 packets transmitted, 3 received, 0% loss, time 2016ms rtt min/avg/max/mdev = 0.908/1.186/1.740/0.393 ms [root@master cfg]#
| Attention: | CSM will create a new dhcpd.conf during node installation, so keep these files in a secure place in case you need to reset the ESP. |
Installing the ESP driver
Once the ESP has been given an IP address, you need to install the Linux device drivers.
-
Download the espx-3.06.tar file from http://www.equinox.com or otherwise retrieve this file.
-
Extract the tar file into an empty directory:
# mkdir /tmp/espx # cd /tmp/espx # tar xvf espx-3.06.tar
-
Run the ./espx-cfg script to complete the installation. The output is shown in Example 5-13.
Example 5-13: Output of espx-cfg
[root@master /]# ./espx-cfg Equinox ESP (espx) Installation (from source RPM) 1) validating build environment ... 2) installing source RPM: espx-3.06-1 ... 3) building binary RPM: espx-3.06-1.i386.rpm (please wait) ... 4) installing binary RPM: espx-3.06-1.i386.rpm ... 5) make driver initialized + loaded at boot time ... 6) loading device driver and initializing device files ... 7) discover and configure ESPs ... installation complete. logfile is located at /var/tmp/espx-log [root@master /]#
| Note | You must have the kernel-source package installed before running espx-cfg. The package should have been installed automatically in 5.2.1, "Red Hat Linux 7.3 installation" on page 108. If not, they can be installed manually from the second Red Hat CD-ROM. |
Configuring the ESP
By typing ./espx-cfg above, the ESP configuration tool should have launched automatically. If it did not, you can start the configuration tool by typing:
# /etc/eqnx/espcfg
| Note | espcfg tries to search for ESPs on a subnet; if it does not find any, you have to enter them manually. |
If espcfg is unable to find the ESP:
-
Select Install from the espcfg menu, as in Figure 5-3.
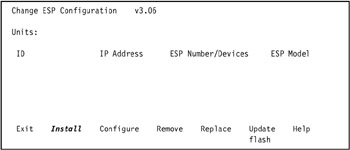
Figure 5-3: ESP installation (1 of 3) -
Select I know the IP address, as in Figure 5-4 on page 120.

Figure 5-4: ESP configuration (2 of 3) -
Enter the IP address of the ESP unit.
-
On the Install ESP: Specified ESP Found screen, select Finish or change the ESP number if you have more than one (see Figure 5-5). A total of 64 ESPs can be created on the management node, which allows 1024 ports/nodes to be available.
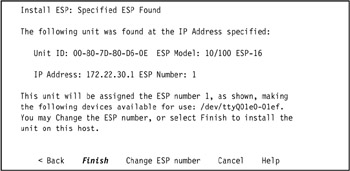
Figure 5-5: ESP Configuration (3 of 3) -
On the Change ESP configuration v3.06 screen, select Exit.
| Note | The espcfg command creates the /etc/eqnx/esp.conf file.
[root@master /]# more esp.conf /dev/esp1 00-80-7D-80-D6-0E 172.22.30.1 4000 4000 172.20.0.1 255.255.0.0 16 10/100 It also creates /dev/ttyQxxey device files. For example:
|
Modifying the /etc/uucp/port file
We recommend adding the following two lines (Example 5-14) to the end of /etc/uucp/port. This helps eliminate occasional problems with flow control for the serial consoles.
Example 5-14: Changes to /etc/uucp/port
[root@master /]# cat /etc/uucp/port # This is an example of a port file. This file have the syntax compatible # with Taylor UUCP (not HDB, not anything else). Please check uucp # documentation if you are not sure how Taylor config files are supposed to # look like. Edit it as appropriate for your system. # Everything after a '#' character is a comment. port Direct type direct [root@master /]#
5.2.8 System Management hardware configuration
The following sections discuss the setup required for the RSA and ASM adapters, respectively.
Remote Supervisor Adapter configuration
For the nodes that contain an RSA card, you need to take the following steps using the IBM Remote Supervisor Adapter Support CD. Once you have booted from this CD-ROM, select Configuration Settings -> Ethernet Settings, and use the arrow keys to navigate to each field (as shown in Figure 6-12 on page 144).
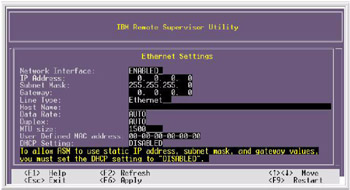
Figure 5-6: IBM Remote Supervisor Utility - Ethernet settings
Where:
| Network Interface | The default value is Enabled; verify that it is still set to Enabled. |
| IP address | Type the IP address of the Remote Supervisor Adapter (for example, 172.22.30.2). |
| Subnet Mask | Type the subnet mask used by the Remote Supervisor Adapter (for example, 255.255.0.0). |
| Gateway | Type the IP address of the gateway (for example, 172.22.0.1). |
| Host Name | Type the host name of the Remote Supervisor Adapter (for example, mgrsa1). |
| DHCP Setting | Set this to Disable. |
Press the F6 key to apply the changes.
Press Escape In the Warning window that opens, press Enter to restart the Remote Supervisor Adapter.
Your Remote Supervisor Adapter is now ready for Telnet or HTTP advanced configuration. To learn how to use the advanced configuration option, refer to the IBM ![]() xSeries Model 335 Remote Supervisor Adapter User's Guide and to the IBM
xSeries Model 335 Remote Supervisor Adapter User's Guide and to the IBM ![]() xSeries Model 345 Remote Supervisor Adapter Installation Guide, both available at http://www.pc.ibm.com/support.
xSeries Model 345 Remote Supervisor Adapter Installation Guide, both available at http://www.pc.ibm.com/support.
ASM processor configuration
Verify that the ASM service processor ID for each node is set to the host name of that node. A new or repaired node may have the system serial number recorded in this field.
| Tip | The ASM, is a processor that is internal to all xSeries Clients. The ASM controls each client, and provides the external interface for the RSA cards, which in turn allow for remote management to take place. |
To reconfigure each node, use the following procedure:
-
Determine the host name of the RSA used to control the node. Refer to your cluster diagram or planning sheet for his information.
-
Start a Web browser on the management node and enter the host name of the RSA into the location field.
-
When prompted, log in to the RSA and select an appropriate inactivity timeout. The default (case sensitive) user and password for the RSA are USERID and PASSW0RD (with a zero).
-
Select Access remote ASM from the menu on the left.
-
Click on the ASM name that you want to change. It will match the NodeID from the lshwinfo output above.
-
Log in to the ASM. The default user and password are the same as for the RSA.
-
Select System settings from the menu on the left.
-
Change the Name field to the correct value.
-
Scroll down and select Save.
-
For the settings to be reflected, the ASM must be re-started. Select Restart ASM from the menu on the left.
-
Click Restart then OK when prompted.
It will take the service processor (ASM) a few seconds to restart.
5.2.9 Configuring environment variables
First, add the CSM directories to your PATH and MANPATH environment variables. The best way to do this is to create the following files:
-
The /etc/profile.d/csm.sh file, shown in Example 5-15.
Example 5-15: /etc/profile.d/csm.sh
[root@master /]# cat csm.sh # csm path initialization if ! echo $PATH | /bin/grep -q "/opt/csm/bin" ; then PATH="/opt/csm/bin:$PATH" export PATH fi if ! echo $MANPATH | /bin/grep -q "/opt/csm/man" ; then MANPATH="/opt/csm/man:$MANPATH" export MANPATH fi [root@master /]#
-
The /etc/profile.d/csm.csh file, shown in Example 5-16.
Example 5-16: /etc/profile.d/csm.csh
[root@master /]# cat csm.csh # csm path initialization echo ${PATH} | grep -q "/opt/csm/bin" || \ setenv PATH /opt/csm/bin:${PATH} echo ${MANPATH} | grep -q "/opt/csm/man" || \ setenv MANPATH /opt/csm/man:${MANPATH} [root@master /]#
Make sure that after you have created the files you change the permissions in order to allow for the .csh files to execute properly.
5.2.10 Deciding which remote shell protocol to use
The distributed shell program (dsh) is used to issue remote commands from the management server to the nodes. It is contained in the csm.dsh package, which will be installed in the next step using the installms command. The dsh program uses a remote shell of your choice to issue remote commands to the managed nodes.
The default remote shell is ssh.
To override the default at installation time, add RemoteShell=/your/shell/path to the end of the installms command line.
Once the cluster is installed, you can temporarily override the RemoteShell setting by defining the DSH_REMOTE_CMD environment variable, with the full path name of the remote shell command. For example:
# DSH_REMOTE_CMD=/usr/bin/rsh
5.2.11 Installing the CSM core package
Now that the hardware and non-CSM software configuration is complete, it is time to install the CSM code itself. The first step is to install the csm.core package, which contains primary executable files that are required on all cluster nodes.
Insert the CSM CD-ROM into the management node, and mount it by typing:
# mount /dev/cdrom /mnt/cdrom
Install the csm.core fileset as follows:
# rpm -i /mnt/cdrom/csm.core-*
| Note | Once it has been mounted, be sure not to unmount the CSM CD-ROM until you are prompted to do so. |
5.2.12 Running the CSM installms script
The remainder of the installation on the management server is performed using the installms script. This script does several things:
-
All necessary packages from the installation media are copied into the /csminstall directory. This includes the SRC, RSCT, and CSM packages, as well as Red Hat Linux and any required third-party packages. These files are used for both the management node and other cluster nodes.
-
All required packages are then installed on the management server and CSM and its underlying components, SRC and RSCT, are started.
-
All the predefined conditions, responses, relationships, and nodegroups, as discussed in 3.3, "CSM monitoring" on page 50, are properly configured.
-
The CSM rconsole application is configured and started.
The installms command usage shown in Example 5-17.
Example 5-17: installms usage
Usage: installms [-p <pkg_path> | -x] [-f] [-D] [-v | -V] [-h] [Attr=value [Attr=value...]] -p <pkg_path> List of directories containing packages (p1:p2:p3) -f Force install -D Install the IBM Director Agent and Linux Cluster Support Extension (Linux Only). -x Do not copy packages. -v | -V Verbose mode -h Display usage information Valid attributes (see the installms man page for details): RemoteShell SetupRemoteShell
To start the installation, make sure you are not in /mnt/cdrom or any of its subdirectories, and type:
# /opt/csm/bin/installms
If the source files are in a directory other than /mnt/cdrom, type:
# /opt/csm/bin/installms -p <pkg_path>
where <pkg_path> is the directory where the CSM source files are located.
During the installation, you will be prompted to insert the Red Hat Linux media. You will also need to acknowledge license terms by pressing Enter.
| Note | As you insert the Red Hat Linux CD-ROMs, X Windows will automatically launch a GUI file manager (GMC) displaying the contents of the media. Be sure to close these windows before installms is finished with the disc. If the window remains open, a process remains active on the /mnt/cdrom file system and installms will not be able to eject the media. If installms prompts for the next CD-ROM but the current disc has not been ejected, make sure to close the GMC window and eject the disc using another shell window by typing eject /mnt/cdrom. |
Here is some helpful insights into the installms variables:
The following syntax will allow for you to install the default package:
[root@master /]# /opt/csm/bin/installms -p /mnt/cdrom
The only caveat is that, if you need to use newer packages or sources for some of the non-IBM RPM's, then you will need to append a new path that includes the location for those files. The following syntax shows the new default path added for the additional files:
[root@master /]# /opt/csm/bin/installms -p /mnt/cdrom:/csminstall/reqs
During our installation in the Lab we had to update the Linux Kernel to be in compliance with the "Best Recipe", and that cascaded into new requirements, that forced us to update the non-IBM RPM's, in our lab we proofed that the following steps worked for us:
-
Download new RPM's, and compile if needed.
-
Create the /tmp/reqs directory.
-
Place the newer RPM's in the /tmp/reqs.
-
Run the following command:
[root@master /]# /opt/csm/bin/installms -p /mnt/cdrom:/tmp/reqs
Example 5-18 show the output of the installms command.
Example 5-18: Example of using installms
[root@master /]# /opt/csm/bin/installms -p /mnt/cdrom:/tmp/reqs About to copy CSM, RSCT and required RPMs. Copying csm.client-1.3.1-3.i386.rpm. Copying csm.core-1.3.1-1.i386.rpm. Copying csm.server-1.3.1-1.i386.rpm. Copying csm.diagnostics-1.3.1-1.i386.rpm. Copying csm.gui.dcem-1.3.1-1.i386.rpm. Copying csm.dsh-1.3.1-1.i386.rpm. Copying src-1.2.0.0-0.i386.rpm. Copying rsct.core-2.3.0.10-0.i386.rpm. Copying rsct.core.utils-2.3.0.10-0.i386.rpm. Copying csm.director.agent-1.3.1-1.i386.rpm. Copying csm.director.server-1.3.1-1.i386.rpm. Copying csm.director.console-1.3.1-1.i386.rpm. About to copy open source prerequisites required by CSM. Copying atftp-0.3-1.i386.rpm. Copying syslinux-1.64-1.i386.rpm. Copying IBMJava2-JRE-1.3-13.0.i386.rpm. Copying conserver-7.2.2-3.i386.rpm. Copying perl-libnet-1.0703-6.noarch.rpm. Copying autoupdate-4.3.4-1.noarch.rpm. Copying ITDAgent-4.10-1.i386.rpm. About to copy Linux RPMs Insert Red Hat Linux 7.3 disk 1. Press Enter to continue. Copying perl-5.6.1-34.99.6.i386.rpm. Copying tcl-8.3.3-67.i386.rpm. Copying tk-8.3.3-67.i386.rpm. Copying XFree86-libs-4.2.0-8.i386.rpm. Copying freetype-2.0.9-2.i386.rpm. Insert Red Hat Linux 7.3 disk 2. Press Enter to continue. Copying nfs-utils-0.3.3-5.i386.rpm. Copying dhcp-2.0pl5-8.i386.rpm. Copying rdist-6.1.5-16.i386.rpm. Copying expect-5.32.2-67.i386.rpm. Insert Red Hat Linux 7.3 disk 3. Press Enter to continue. Copying pdksh-5.2.14-16.i386.rpm. Installing LINUX OS PRE REQUISITIES RPMs. Installing OPEN SOURCE PRE REQUISITIES RPMs. CSM requires the Freeware Packages atftp and syslinux to be installed. These Freeware Packages are provided "AS IS" and are not warranted or supported by IBM. IBM disclaims all liability for any damages (including without limitation direct and indirect damages) arising in connection with these Freeware Packages. The Freeware Packages are licensed under the terms of the GPL, a copy of which is included in each Freeware Package. For more information about the license terms and source availability of these Freeware Packages, see http://www.linux.org/info/gnu.html, http://freshmeat.net/projects/syslinux, and http://freshmeat.net/projects/atftp. Press enter to install atftp, syslinux and CSM, or any other character to quit: Installing atftp-0.3-1.i386.rpm . Installing syslinux-1.64-1.i386.rpm . Installing IBMJava2-JRE-1.3-13.0.i386.rpm . Installing conserver-7.2.2-3.i386.rpm . Installing RSCT RPMs. Installing src-1.2.0.0-0.i386.rpm . Adding srcmstr to inittab... Installing rsct.core.utils-2.3.0.10-0.i386.rpm . Installing rsct.core-2.3.0.10-0.i386.rpm . 0513-071 The ctrmc Subsystem has been added. 0513-071 The ctcas Subsystem has been added. 0513-059 The ctrmc Subsystem has been started. Subsystem PID is 8113. Installing CSM RPMs. Installing csm.dsh-1.3.1-1.i386.rpm . Installing csm.server-1.3.1-1.i386.rpm . 0513-071 The ctrmc Subsystem has been added. 0513-071 The ctcas Subsystem has been added. 0513-059 The ctrmc Subsystem has been started. Subsystem PID is 8249. 0513-059 The ctcas Subsystem has been started. Subsystem PID is 8307. Waiting for ERRM to start... ERRM is started. Executing the "/opt/csm/bin/predefined-condresp -m" command. Executing the "/opt/csm/bin/predefined-nodegroups -m" command. Executing the "/usr/bin/chrsrc-api -s "IBM.AuditLog::Name='ERRM'::MaxSize::20"" command. Setting up rconsole... Installing csm.diagnostics-1.3.1-1.i386.rpm . Installing csm.gui.dcem-1.3.1-1.i386.rpm . About to copy CSM command binaries. Installation of CSM has successfully completed! [root@master /]#
5.2.13 Install the license
Next, you need to install a license to use CSM. You can use either a Full Production license, or a 60-day Try Before You Buy license. Your Full Production license for CSM will have been provided to you separately in a file named csmlum.full, located on the CSM license CD-ROM. This license is specific to your cluster, and will not work anywhere else.
In order to accept the 60-day Try Before You Buy license, run the csmconfig command as follows:
# csmconfig -L
You can double-check the expiration date of your license by issuing the csmconfig command with no parameters. The output should be similar to the one shown in Example 5-19.
Example 5-19: csmconfig output for the Try Before You Buy CSM license
AddUnrecognizedNodes = 0 (no) ClusterSNum = ClusterTM = 9078-160 ExpDate = Tue July 12 20:45:16 2003 MaxNumNodesInDomain = -1 (unlimited) RemoteShell = /usr/bin/ssh SetupRemoteShell = 1 (yes)
In order to accept the Full Production license, perform the following steps:
-
Mount the CSM CD-ROM and run the csmconfig command specifying the license file:
# mount /mnt/cdrom # csmconfig -L /mnt/cdrom/csmlum.full
-
At the prompt, enter your language by choosing the appropriate number and pressing Enter.
-
Press Enter to view the license agreement.
-
Press 1 and Enter to accept the license agreement.
-
The csmconfig command returns an exit9 message when successful.
This completes the licensing of CSM, and you are now ready to verify the installation.
| Note | Be sure to keep the license media you have been provided in a safe location. This media will be required if you have to reinstall CSM again in the future. |
5.2.14 Verify the CSM installation on the management node
To verify that the management node was installed correctly, issue the following commands. The output should be similar to the following examples.
-
The nodegrp command (the output is shown in Example 5-20)
Example 5-20: nodegrp command output
[root@master /]# nodegrp XseriesNodes KickstartNodes PreManagedNodes RedHat72Nodes RedHatNodes LinuxNodes AllNodes RedHat73Nodes ManagedNodes [root@master /]#
-
The lscondition command will list out the current condition information: the output is shown in Example 5-21.
Example 5-21: lscondition command output
[root@master /]# lscondition Displaying condition information: Name Node MonitorStatus "NodePowerStatus" "master.cluster.com" "Not monitored" "NodeChanged" "master.cluster.com" "Monitored" "NodeGroupMembershipChanged" "master.cluster.com" "Not monitored" "AnyNodeTmpSpaceUsed" "master.cluster.com" "Not monitored" "UpdatenodeFailedStatusChange" "master.cluster.com" "Monitored" "AnyNodeFileSystemSpaceUsed" "master.cluster.com" "Not monitored" "AnyNodeProcessorsIdleTime" "master.cluster.com" "Not monitored" "AnyNodeVarSpaceUsed" "master.cluster.com" "Not monitored" "NodeFullInstallComplete" "master.cluster.com" "Monitored" "MinManagedInstalled" "master.cluster.com" "Not monitored" "NodeManaged" "master.cluster.com" "Monitored" "AnyNodeFileSystemInodesUsed" "master.cluster.com" "Not monitored" "CFMRootModTimeChanged" "master.cluster.com" "Not monitored" "NodeReachability" "master.cluster.com" "Not monitored" "AnyNodePagingPercentSpaceFree" "master.cluster.com" "Not monitored" [root@master /]#
-
The lsresponse command (the output is shown in Example 5-22)
Example 5-22: lsresponse command output
[root@master /]# lsresponse Displaying response information: ResponseName Node "MsgEventsToRootAnyTime" "master.cluster.com" "LogOnlyToAuditLogAnyTime" "master.cluster.com" "BroadcastEventsAnyTime" "master.cluster.com" "rconsoleUpdateResponse" "master.cluster.com" "GatherSSHHostKeys" "master.cluster.com" "DisplayEventsAnyTime" "master.cluster.com" "RunCFMToNode" "master.cluster.com" "CFMNodeGroupResp" "master.cluster.com" "CFMModResp" "master.cluster.com" "LogCSMEventsAnyTime" "master.cluster.com" "UpdatenodeFailedStatusResponse" "master.cluster.com" [root@master /]#
|
| < Day Day Up > |
|
EAN: 2147483647
Pages: 123