Prerequisites for Using Apache SOAP
|
Creating and Deploying an Apache SOAP Web Service
The Apache SOAP implementation is powerful because Java gives you a lot of options for utilizing Web Services because you have the ability to compile code on multiple platforms with Java. Microsoft .NET, on the other hand, is limited for now to just Windows. Thus, the Apache SOAP library offers a great deal more flexibility. There are, however, rumors of .NET being ported to Linux.
The code needed to develop a Web Service appears similar to the code used to generate a Web Service in Chapter 6, in C#. In some ways it is simpler because Visual Studio.NET generates so much code, which works behind the scenes, for every Web Service.
This section covers writing and compiling the code for an Apache Web Service and the process for deploying it.
The Web Service
The following code is the Java version of our SimpleStockQuote example that has been used throughout this book. It starts out with the package declaration. Note that the statement package samples.simplestock indicates that this example exists in a directory structure /samples/simplestock somewhere in your CLASSPATH. To compile this example, you’ll need the environment on your system to match the one discussed in the prerequisites section of this chapter.
The first two import statements are standard libraries for handling URLs and Java input and output. The second two import statements, which include org.w3c.dom.* and org.xml.sax.* bring in functionality for different models of parsing XML. The javax.xml.parsers.* allows a program to obtain and manipulate an XML parser, and finally org.apache.soap.util.xml.* allows access to the functionality in the Apache SOAP library. You don’t really need to worry about which import statements are used because these examples use the imports that all Apache Web Service code needs.
After all the import statements, the code finally gets to the functionality that allows the Web Service to work. First, the class SimpleStockQuote is defined. Note that the file must be named SimpleStockQuote.java to compile it. (This is different from C#.) Then there is the simple code for the method getTestQuote, which returns the same values as all the other Stock Quote examples in this book.
package samples.simplestock; import java.net.URL; import java.io.*; import org.w3c.dom.*; import org.xml.sax.*; import javax.xml.parsers.*; import org.apache.soap.util.xml.*; public class SimpleStockQuote { public String getTestQuote (String symbol) throws Exception { if (symbol.equals("C") ) { return "55.95"; } else { return "-1"; } } Now that the service is written, you can compile it by typing javac SimpleStockQuote.java. This will create the SimpleStockQuote.class file which is the compiled byte code Apache SOAP needs to execute the Web Service.
| Note | In order for you to get this Web Service working quickly, put this Web Service in the samples directory of your Apache SOAP installation. |
Deploying the Service
To deploy an Apache SOAP Web Service, creating an XML file called a “deployment descriptor” is necessary to register a service with the server. It identifies the class, methods, and the name used to expose the functionality via Web Services.
The following XML example is the deployment descriptor for the Web Service created in the previous example. The root element defines the needed namespace and the ID attribute describes the name needed to call the methods in that service. When you write the client for this example, the URN called will be simple-stock-quote. The provider element defines the exposed method and the type of Web Service. In this case, you used Java. The scope attribute has three possible values: request, session, and application. Table 7.1 explains each option.
| Option | Purpose |
|---|---|
| Request | The SOAP implementation removes the object once the request is complete. |
| Session | The values a particular object holds only last the life of the HTTP session. |
| Application | The object lasts as long as the servlet that is managing the SOAP object is in service. |
The isd:java tag describes the location of the class. Remember that SimpleStockQuote was part of the samples.simplestock package.
Finally, the fault listener tag describes the class that handles any SOAP fault returned from the server. In this case, it is the default class provided by the Apache group. If you needed to, you could add your own fault listener to provide custom error handling for an application.
<isd:service xmlns:isd="http://xml.apache.org/xml-soap/deployment" > <isd:provider type="java" scope="Application" methods="getTestQuote"> <isd:java /> </isd:provider> <isd:faultListener> org.apache.soap.server.DOMFaultListener </isd:faultListener> </isd:service>
Now that you have a deployment descriptor, you must use tools provided with the Apache SOAP library to actually deploy the Web Service.
Deploying SimpleStockQuote
Now that you have a deployment descriptor, you can execute the following class to complete deployment.
org.apache.soap.server.ServiceManagerClient.
Ensure that you have the CLASSPATH set up as described earlier in the chapter.
| Tip | If you are unable to execute the following examples, not having the CLASSPATH configured properly is the most likely culprit. The second most likely cause is not having your path set up so you can execute Java. Also check to ensure that you modified the startup script of Tomcat. |
Start Tomcat and allow it to load all the different webapps that are installed. This includes /soap. To install the SimpleStockQuote example, execute the following from the directory where you have the code.
java org.apache.soap.server.ServiceManagerClient http://localhost:8080/soap/servlet/rpcrouter deploy DeploymentDescriptor.xml
| Tip | If you receive a connection refused error, you probably haven’t started Tomcat. |
When you execute the deploy command, no information comes back to let you know that the deployment was successful other than that there was no error. Looking in the SOAP Admin tools will confirm the installation of SimpleStockQuote. By going to http://localhost:8080/soap/admin/index.html you can see what functionality has been deployed. Click on the “List” icon and you should see the SimpleStockQuote Web Service as the only deployed Web Service. Figure 7.5 shows the results in Internet Explorer. Remember that in the deployment descriptor you gave the Web Service the following unique identifier: urn:simple-stock-quote. This is how the Admin tool lists the various services.
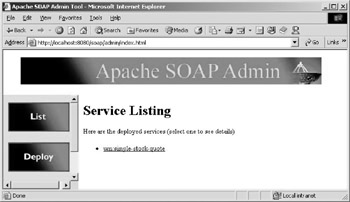
Figure 7.5: How the SOAP Admin tool lists the SimpleStockQuote Web Service.
Another option for listing the available services on a particular system is to execute the following command from the DOS prompt.
java org.apache.soap.server.ServiceManagerClient http://localhost:8080/soap/servlet/rpcrouter list
The response is a list of deployed services and yours should simply look like this:
Deployed Services: urn:simple-stock-quote
The next section covers how to secure the deployment of Web Services to your server.
Securing the Deployment of Web Services
With the default configuration of Apache SOAP, anyone can deploy Web Services to your system, and that’s very dangerous from a security perspective. This is fine when the server is in a development environment where it is protected by a firewall and possibly a subnet, but when you put your system into production you want to be sure that you control who installs Web Services.
By changing one configuration file and adding another, you can turn the remote installation of Web Services off. The first step is to modify the SOAP distribution’s web.xml file. This is the configuration file for the servlets that support the RPC router and the “Admin” tool. If you installed Tomcat into the suggested directory, the web.xml file resides in the c:\xmlapache\tomcat\web-apps\soap\WEB-INF directory. When opened, this file should look like the following.
<web-app> <display-name>Apache-SOAP</display-name> <description>no description</description> <servlet> <servlet-name>rpcrouter</servlet-name> <display-name>Apache-SOAP RPC Router</display-name> <description>no description</description> <servlet-class> org.apache.soap.server.http.RPCRouterServlet </servlet-class> <init-param> ... snip snip
This is just a sample of first part of the file because you only need to modify the beginning. Right after the description tag, add the following information.
<context-param> <param-name>ConfigFile</param-name> <param-value>c:/xmlapache/soap.xml</param-value> </context-param>
This creates a pointer to a configuration file, soap.xml, where you can tell Apache SOAP to do different things. In the soap.xml file, add the following XML code.
<soapServer> <serviceManager> <option name="SOAPInterfaceEnabled" value="false" /> </serviceManager> </soapServer>
This disables your ability to add Web Services from the command line. If you try to add a service, you will get the following response.
Ouch, the call failed: Fault Code = SOAP-ENV:Server.BadTargetObjectURI Fault String = Unable to determine object id from call: is the method element namespaced?
| Note | Even though you can now prevent people from installing Web Services from a DOS or other command prompt, users coming from the Web can still access the “Admin” tool. That’s why it’s important to use Tomcat with a Web server like Apache. Apache has ability to protect certain Web pages from being accessed and even also provides a means of authorization. |
Viewing the SOAP Messages
In Microsoft’s implementation of .NET Web Services, the SOAP messages are part of the Web page the service generates. With Apache SOAP, there is a means of looking at the messages of Apache SOAP and other implementations using the TCPTunnelGui tool. This tool provides you with a means of viewing the actual message the client and server are exchanging. To execute the tool, use the following command from a DOS prompt. (Note the returns are added to make it easier for you to read.)
java org.apache.soap.util.net.TcpTunnelGui 8000 localhost 8080
The TCPTunnelGui acts as a proxy to the Web Service requests and response. It takes the request, prints it to the screen, and then forwards it to the server. It does the same thing with the response. Thus, the number “8000” in the previous example is the port it is listening to, localhost is the server it forwards requests to, and 8080 is the port that server is listening to. Then you must modify your client to send requests to port 8000 to make this work. Figure 7.6 illustrates TCPTunnelGui showing the request and response messages for the SimpleStockQuote example.
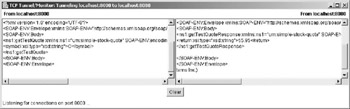
Figure 7.6: Screen capture of the TCPTunnelGui displaying a request and response for the SimpleStockQuote example.
For closer examination, here is the complete SOAP request for the SimpleStockQuote example.
Content-Type: text/xml; charset=utf-8 Content-Length: 461 SOAPAction: "" <?xml version='1.0' encoding='UTF-8'?> <SOAP-ENV:Envelope xmlns:SOAP- ENV="http://schemas.xmlsoap.org/soap/envelope/" xmlns:xsi="http://www.w3.org/2001/XMLSchema-instance" xmlns:xsd="http://www.w3.org/2001/XMLSchema"> <SOAP-ENV:Body> <ns1:getTestQuote xmlns:ns1="urn:simple-stock-quote" SOAP-ENV:encodingStyle="http://schemas.xmlsoap.org/soap/encoding/"> <symbol xsi:type="xsd:string">C</symbol> </ns1:getTestQuote> </SOAP-ENV:Body> </SOAP-ENV:Envelope> <t>And the response from the Server for SimpleStockQuote: HTTP/1.0 200 OK Content-Type: text/xml; charset=utf-8 Content-Length: 483 Set-Cookie2: JSESSIONID=3bymuj1261;Version=1;Discard;Path="/soap" Set-Cookie: JSESSIONID=3bymuj1261;Path=/soap Date: Thu, 08 Aug 2002 00:45:49 GMT Servlet-Engine: Tomcat Web Server/3.2.4 (JSP 1.1; Servlet 2.2; Java 1.4.0; Windows 2000 5.0 x86; java.vendor=Sun Microsys <?xml version='1.0' encoding='UTF-8'?> <SOAP-ENV:Envelope xmlns:SOAP- ENV="http://schemas.xmlsoap.org/soap/envelope/" xmlns:xsi="http://www.w3.org/2001/XMLSchema-instance" xmlns:xsd="http://www.w3.org/2001/XMLSchema"> <SOAP-ENV:Body> <ns1:getTestQuoteResponse xmlns:ns1="urn:simple-stock-quote" SOAP-ENV:encodingStyle="http://schemas.xmlsoap.org/soap/encoding/"> <return xsi:type="xsd:string">55.95</return> </ns1:getTestQuoteResponse> </SOAP-ENV:Body> </SOAP-ENV:Envelope>
These request and response messages look similar to the other SOAP examples shown in this book so far.
Now that you understand how to create, deploy, and monitor an Apache SOAP Web Service, you should be ready to create consumers in Java.
|
EAN: 2147483647
Pages: 128