Oracle Warehouse Builder
6.2 Oracle Warehouse Builder
Oracle Warehouse Builder (OWB) is Oracle's tool for designing and deploying data warehouses, data marts, and business intelligence applications. It is part of the Oracle 9i Developer Suite, which includes products for application development, such as 9i Jdeveloper, 9i Designer, and 9i Forms Developer. The Business Intelligence area includes products such as Oracle Discoverer (described later in this chapter), Oracle Reports (described in Chapter 8), and Oracle Warehouse Builder.
Building any type of application is not a task to be undertaken lightly, and the many steps to be completed when building our data warehouse and BI application can be facilitated by Oracle Warehouse Builder. It can:
-
Design and create the data flows between sources and targets
-
Design, create, manage, update, and upgrade the data warehouse schema
-
Manage and update the source definitions
-
Import data source definitions
-
Design and create the OLAP and ad hoc query environment
-
Take advantage of all Oracle database features
Within OWB you will find a repository stored in an Oracle database, and this is where OWB keeps all of its metadata. There is the OWB client, which is used to design and create the data warehouse and application. A code generator is provided to create the scripts from your design that are applied to the data warehouse, and there is a reporting environment so that you can view your metadata from a browser.
You may be wondering why you should use a tool such as Warehouse Builder to design and create your data warehouse and associated application, why not design it by hand? Yes, you could do that, but some of the benefits of using Warehouse Builder include:
-
System design time is reduced, due to the GUI.
-
The design is held in one place, so users are guaranteed that they are not working with an out-of-date model.
-
The code generated by OWB is free from errors and works the first time.
Let us now look at how we would use OWB to design our data warehouse or data mart.
6.2.1 Setting up Warehouse Builder
Before your data warehouse can be designed using Warehouse Builder, a small amount of setup is required to create the repository that Warehouse Builder uses when designing your warehouse. Launching the Repository Assistant, the screen shown in Figure 6.1 shows us the steps that have to be completed to set up our Warehouse Builder Repository. Although there are quite a few steps, this entire process does not take very long, so you will soon be up and running Warehouse Builder.
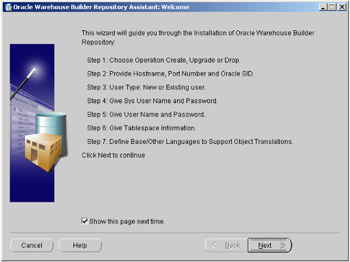
Figure 6.1: Warehouse Builder—steps to setup.
You can choose in which database the OWB repository will reside, and then you must connect using a user name that has the SYSDBA privilege. A user name and password must be supplied for the OWB repository, as well as which tablespace to use for repository data and which language you would like to use. Click on Finish and your repository is created; now Oracle Warehouse Builder is ready to use.
6.2.2 Oracle Warehouse Builder client
Once the Oracle Warehouse Builder repository has been built, it is time to start using this tool to design our data warehouse, where we can:
-
Define the logical view of our warehouse schema
-
Define data sources and targets
-
Describe ETL processes, where we extract, transform, and load
-
Generate the SQL required to create the data warehouse
-
Schedule loading and refresh jobs using Oracle Enterprise Manager
In OWB, your data warehouse is defined inside a project and within that project there is what is known as a set of formal definitions defining how the warehouse looks from a logical standpoint. These definitions are referred to as modules.
The steps we need to go through to create our data warehouse include, defining the source and target databases. We then need to describe how the data will be moved from those sources to our data warehouse. In moving the data, we will need to describe transformations to get the data into the format we require inside the warehouse. Then we have to generate the design and code to implement and load our warehouse.
6.2.3 Creating modules
One of the first steps is to define where the data for our warehouse will originate. This is achieved by defining a module using the New Module Wizard; this requires the completion of four steps. One of the first steps is shown in Figure 6.2, where we give our module a name, Order_Entry_system. Then from a drop-down list we can choose our module's status and, since we are defining the source of our data, we have selected production.
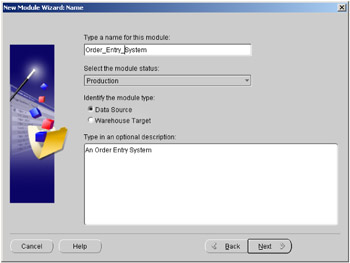
Figure 6.2: Warehouse Builder—creating a module.
| Hint: | Spaces in the module name are not allowed if you are defining a physical object. |
OWB provides several sources for our data, including flat files and SAP. In Figure 6.3, we have selected an Oracle database.
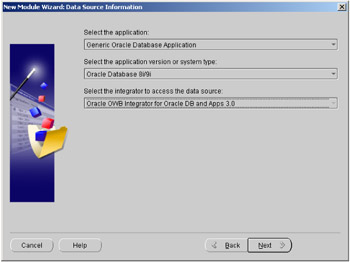
Figure 6.3: Warehouse Builder—type of data source.
Since we specified that one of our data sources is an Oracle database, we must now determine whether it is an Oracle database or if we wish to take our design from the repository in Oracle Designer. Then all we have to do is create a dblink to our database using the supplied screen, as shown in Figure 6.4, and our data source is now defined.
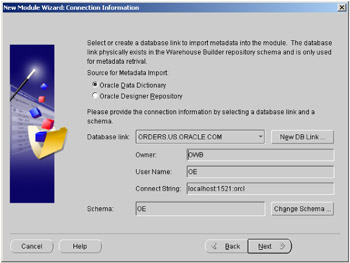
Figure 6.4: Warehouse Builder—data source defined.
This process can then be repeated again to specify where our data warehouse is to be located. In Figure 6.5, we can see the main navigator from OWB Client, showing that we have two modules created: EASYDW_DW, which is our data warehouse, and ORDER_ENTRY_SYSTEM, which is one of the sources of data for our warehouse. Another useful feature is that since we are actually building the data warehouse, OWB gives us the ability to say what type of data warehouse we require and that at this time it does not have to physically exist.
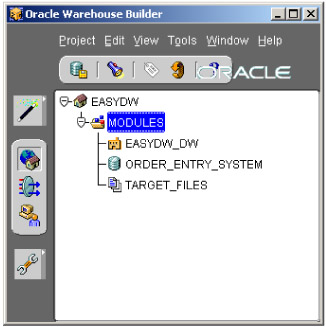
Figure 6.5: Warehouse Builder—two modules created.
After doing all of this work it is extremely important that your work is saved, because OWB does not automatically save your work. Therefore, when you are satisfied with the state of the objects, you must commit the changes by either clicking on the Commit icon or selecting Commit from the File option on the strip menu at the top.
6.2.4 Defining the tables in our data warehouse
In the previous section we defined the sources for our data and our data warehouse. Now is the time to define the tables that we require inside our data warehouse. This can be achieved by either defining the tables manually or importing them from another database.
Importing the table definitions illustrates how OWB can save on development time, because it can be quite time consuming defining the tables by hand and it is also error prone. When you are defining these tables, which are going to be the sources for your data, it's very important that they are defined exactly as they exist in your production systems. If you have to define them by hand, then it's easy to make mistakes, which can subsequently delay implementation of your data warehouse. The table definitions are imported using the Import Metadata Wizard, which is shown in Figure 6.6, where we have selected some tables from another database.
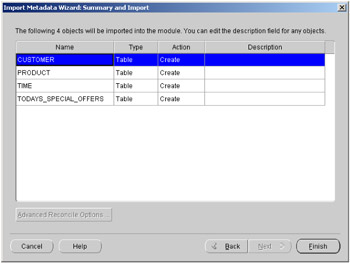
Figure 6.6: Warehouse Builder—import a table.
Some of the tables may have to be defined manually, and this can be achieved using the New Table Wizard. Simply double-click on the module, EASYDW_DW, as shown in Figure 6.5. This will start the new window, shown in Figure 6.7, which is the Warehouse Module Editor. Here, select Table and then click using the right mouse button; the Create Table option will appear.
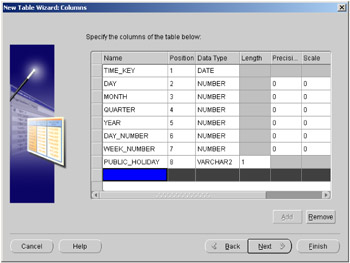
Figure 6.7: Warehouse Builder—manually define a table.
Now we can define our table manually by specifying all of the columns, as shown in Figure 6.8. While using this wizard, don't forget that you can also specify constraints, such as primary key, foreign key, and check constraints. When the definition is complete, click on the Finish button to complete the definition of our table.
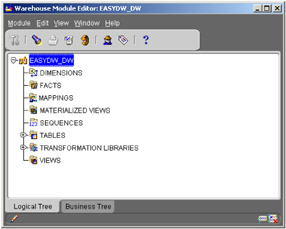
Figure 6.8: Warehouse Builder—Warehouse Module Editor.
At this time we have only shown how to create a table (see Figure 6.7), which shows the Warehouse Module Editor. Here you can also define materialized views, which were described in Chapter 4.
6.2.5 Creating dimensions
Typically a data warehouse is comprised of tables, which can include fact and dimension tables. At this stage in the development of our data warehouse, we probably only have a model of our data warehouse, described in terms of facts and dimensions. OWB allows us to define these logical objects and then when it is time to generate our design, OWB will physically create the tables to represent these facts and dimensions.
A dimension is created in OWB by using the Dimension Wizard, which is selected from the Warehouse Module Editor by right-clicking on Dimensions and then selecting either Create Dimension or Create Time Dimension.
The process is very similar to the one we saw in Chapter 4 for creating a dimension. That is, you must name the dimension, define each level and its attributes, and then describe the hierarchy. In Figure 6.9, we see one of the Dimension Wizard screens, where we are defining the hierarchy for our customer dimension.
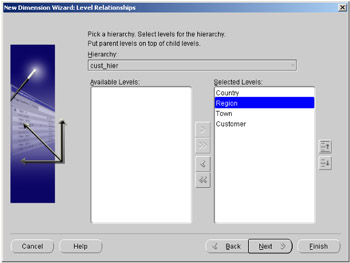
Figure 6.9: Warehouse Builder—dimension hierarchy.
If you want to create a time dimension, OWB will automatically suggest appropriate levels, attributes, and hierarchies, and then you can choose what is appropriate for your system. This means that time dimensions can be created very quickly and easily. OWB also provides a PL/SQL routine, which will insert data into the time dimension; it can also be configured to generate an arbitrary set of dates.
6.2.6 Creating fact tables
Once the dimensions have been created, the next step in our design process is to define one or more fact tables. In OWB a fact table is a logical object in that only when the physical design is generated, does our fact table become an actual physical table. It is created by right-clicking on Fact in the Warehouse Module Editor and selecting Create Fact; the New Fact Wizard now appears. One of the screens is shown in Figure 6.10, which is where the foreign keys for our fact table are defined. In this example, OWB automatically offers a foreign key to each dimension that was previously defined.
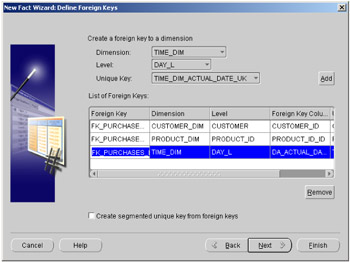
Figure 6.10: Warehouse Builder—fact table creation.
The wizard also allows you to add measures, and by clicking on the Finish button our fact table is created. We can now see the dimensions and facts in Figure 6.11 in the Warehouse Fact Table Editor.
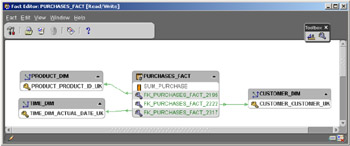
Figure 6.11: Warehouse Builder—Fact Table Editor.
| Hint: | Validate your design and individual components frequently. |
At any time while the data warehouse is being defined, the various parts of the design can be validated by selecting the Validate option, described in section 6.2.9. Any problems that are identified can be corrected immediately before proceeding to defining the next part of the design.
6.2.7 Transformations
There is more to the design of our data warehouse than simply defining a few tables. We are using OWB because we want to be able to easily define how data is to be moved from our source database into our data warehouse. We saw in Chapter 5 how data, while it is being moved from one source to another, often needs to undergo some transformations. In OWB we can define these transformations using:
-
Procedures
-
Package procedures
-
PL/SQL functions
-
Package functions
Once again, there should be no need for us to write anything new, because OWB comes with a number of supplied transformations, which should match your requirements. In Figure 6.12, we can see some of the supplied functions. OWB groups the functions together, and here we can see some of the date functions that are available, such as ADD_MONTHS or find the LAST_DAY.
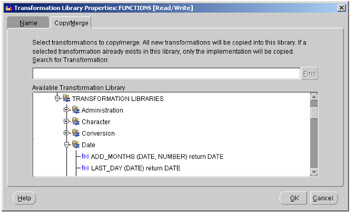
Figure 6.12: Supplied functions for transformations.
In the unlikely event that there is nothing suitable in the supplied libraries, you can easily create your own functions and procedures within Oracle Warehouse Builder; but hopefully this should not be necessary. Now that we know these functions are present in OWB, we can start to define how we move our data from our source databases into our data warehouse.
6.2.8 Defining source to target mappings
The real power of Oracle Warehouse Builder starts to become apparent when we see how it can be used to define how data is moved from our sources, such as our OLTP system, into our data warehouse. In Chapter 5 we learned of the various techniques we can use to load and perform transformations. Now, inside Oracle Warehouse Builder, using its GUI interface, we can graphically represent these processes by defining a mapping. When the design is finally generated, OWB even creates the procedures required to transform and load the data. Now we will look at just a few of the many different types of mappings that are possible.
Mapping a source to a target
A mapping is defined from the Warehouse Module Editor by right-clicking on Mappings and selecting Creating Mappings, the Mapping Editor appears, as shown in Figure 6.13. The first mapping we are going to define is extracting information from our ORDERS OLTP system and moving it into our data warehouse. OWB can also take information from flat files or from SAP.
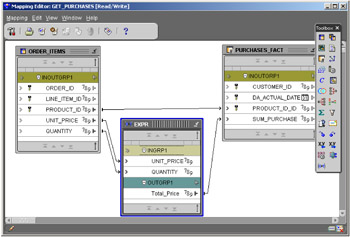
Figure 6.13: Mapping Editor.
When the blank Mapping Editor appears, click on the Mapping Table icon and drag it onto the Editor. It now asks you where your table is to come from, and we are going to select the ORDER_LINES table from our source ORDER_ENTRY_SYSTEM, which we defined earlier. Then click on the Mapping Fact icon and select PURCHASES_FACT. In our editor we now have two tables: ORDER_ITEMS and PURCHASES_FACT.
Now we must specify which items are to be moved from each table. First we are going to move the item PRODUCT_ID from the ORDER_ITEMS table to the PURCHASES_FACT table. This is achieved by dragging a line from product_id in ORDER-ITEMS to product_id in PURCHASES_ FACT. In Figure 6.13 we can see the line that OWB has drawn between the two items.
Computing a value
The next column to be defined in PURCHASES_FACT is the value of the order, and this can only be obtained by computing its value from two columns in the ORDER_ITEMS table. To compute this value an intermediate expression box must be created, as illustrated in Figure 6.13.
Click on the Expression icon and drag that onto the Mapping Editor. An empty box appears with empty input and output groups. Take the two columns from ORDER_ITEMS, unit_price and quantity, and drag them over to the input group box. Now we have to use the right mouse button to add a new attribute in the output group, which we will call Total_Price. Then select that item's properties and click on the Expression box and the Expression Builder. Here you can specify how the attribute is to be computed, which in our case is to multiple the two numbers together. Then drag a line from Total_Price to the column Sum_Purchase in PURCHASES_FACT to complete the mapping operation.
| Hint: | Its probably worth validating periodically so that you don't create mappings and transformations that are invalid. |
Joining tables to obtain data
Another common task that our warehouse designer has to perform is joining data from two or more tables to extract information that is used as input to another table. In Figure 6.14, we see a join that we have created between ORDERS and ORDER_ITEMS to enable us to store one record in our data warehouse about the total value of the order. Note that the expression we created in Figure 6.13 has now been used as input to the join.
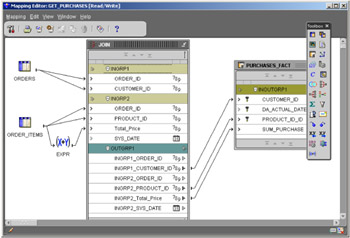
Figure 6.14: Mapping Editor with joins.
| Hint: | When you have finished working on a part of the design, such as the expression to compute the value of the sales, you can minimize the box to give you more working space. |
Key lookup
Previously in this book we have described surrogate keys, where the keys used in the sources for your data warehouse are transformed into a key used by the data warehouse. In OWB we can define exactly how that transformation should occur using the key lookup feature.
In Chapter 5 we described the process of converting the product code used in out OLTP system to a surrogate key in the data warehouse. In Figure 6.15, this has been implemented in OWB by showing that the column product_id in ORDER_ITEMS is input to the key lookup process.
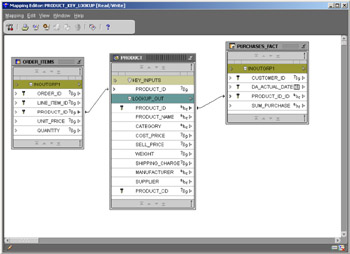
Figure 6.15: Product key lookup.
Although not visible, a mapping has been defined that states that product_ id is to be matched to product_cd. The resulting output is the column product_id, which is sent to the PURCHASES_FACT table.
Filtering data
When data is being extracted from sources such as our OLTP system, there may be times when we do not want all of the data to be sent across to our data warehouse. In OWB this is not a problem, because it allows us to filter the incoming data in a variety of ways.
In Figure 6.16, we are filtering the items from the ORDER_ITEMS table according to a criterion that we have specified. For example, we could say that we are only interested in data where the total value of the order is greater than a specified amount. Also, after we have filtered the data, we then apply the expression we defined in Figure 6.13 to the data that have passed through the filter.
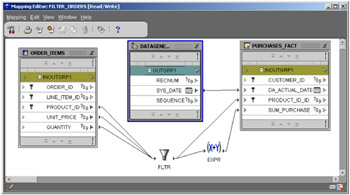
Figure 6.16: Filtering source data.
Using data generators
There may be times when, rather than extracting data from a source, this data must be automatically generated. OWB has this capability, and it can automatically create:
-
Record number
-
Sequence number
-
System date
In Figure 6.16, we can see the system date being used to set the date for our order. This was achieved by dragging the Data Generator icon onto the Mapping Editor and then selecting the item required and attaching it to the fact table.
So far in this chapter, we have barely touched the surface on the types of transformations and mappings that are possible with Oracle Warehouse Builder. We have kept these examples simple, but in a real warehouse they would be connected together. We started to show this in Figures 6.14 and 6.16, where the expression was being used as input to another stage in the loading process.
6.2.9 Validating the design
Once the design is complete, or while it is being developed, it must be validated before Oracle Warehouse Builder can create all the components needed to build, load, and manage our data warehouse. You can validate each component individually or validate the entire project. It's probably easier to resolve problems if you validate each component as it is defined.
To validate any component simply select Validate from the list of menu options. In Figure 6.17, we see that when we validated our key lookup, there was a problem with the column we are comparing against not being unique. We can now fix this problem by making the column PRODUCT_CD in the PRODUCT table unique; then this module will validate without errors.
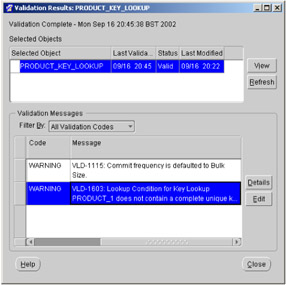
Figure 6.17: Validating the design.
While the design is being validated, Oracle Warehouse Builder displays its progress, as shown in Figure 6.18. This is extremely useful when you are validating the entire design. It actually has quite a lot of work to do, and it's nice to see how it is progressing; otherwise, you might think that the validation process has stalled.
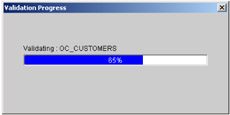
Figure 6.18: Validation progress.
6.2.10 Generating and configuring the design
With our design validated, we are now ready to ask Oracle Warehouse Builder to generate our design. From the Warehouse Module Editor, shown in Figure 6.7, we can generate each component individually by selecting Module and then Generate. OWB will ask if we want to create some scripts it is capable of generating:
-
SQL for creating the database
-
PL/SQL for executing within the database
-
Procedures for loading the data
-
SQL*Loader files for working with our flat files
-
TCL for Oracle Enterprise Manager
In Figure 6.19 we can see the various components that OWB generates for us. There are the schema objects, such as our PRODUCT table. By clicking on the button View Code, we can see the table definition; alternatively, we can click on Save as File so we can implement it later. If we decide that we want to do it now, then click on the Deploy button, OWB will ask us into which database this is to be created and then it will create it there.
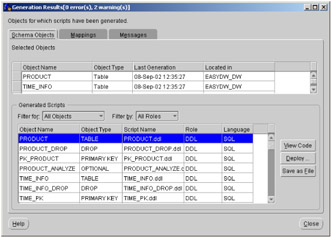
Figure 6.19: Implementing the design.
If we click on the Mappings tab, we would see that OWB has created a package for us to load the data we defined in Figure 6.14. Clicking on the View Code button, we can see part of this long procedure generated by OWB in Figure 6.20. Just look at where the slider bar is to see how much code OWB has created. The section we have shown here is part of the INSERT statement, but prior to this there are variable definitions and lots of other things that we would have had to write ourselves.

Figure 6.20: Code generated by Oracle Warehouse Builder.
In this example OWB has chosen to use a SQL INSERT statement, but since OWB has been designed to take advantage of features in the database, it can use statements such as MERGE, which we saw in Chapter 3 in the code that it generates.
Although we have generated a design, it is most likely that it does not include all of the physical aspects of our design, such as whether a table is partitioned and what indexes are needed. These physical components can be configured in OWB by selecting the module to be configured; from Edit on the menu, select Configure. Figure 6.21 lists all of the properties you can configure. In this example for our PURCHASES_FACT table, we can see that foreign-key constraints already exist; the table is going to be stored in the tablespace, USERS, and we haven't yet partitioned the table.
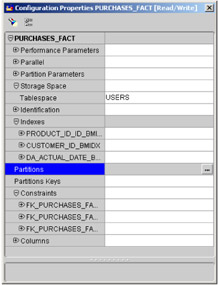
Figure 6.21: Configuring the physical design.
In the Indexes section you will see that three bitmapped indexes are present. These have been automatically configured by OWB, as illustrated in Figure 6.22; by clicking on the Add button for an index, Generate is pressed and it recommends bitmapped indexes on the foreign-key columns.
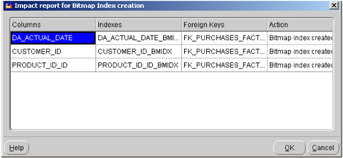
Figure 6.22: Bitmapped index recommendations.
Hopefully you now have an appreciation of what OWB can do. This is a very powerful product, and we have only been able to highlight some of its features. There are many benefits from using tools such as Oracle Warehouse Builder. You can save huge amounts of time, because you no longer have to write the code needed to implement and load data into your warehouse. The code that OWB generates is optimized for the Oracle database and it works immediately. It also provides a visual representation of your warehouse, and by using the various wizards that are available, it is easy to complete the tasks needed for building the warehouse. In addition, when changes to the environment occur, you can visually see the impact of them; OWB can easily incorporate them into the environment. Finally, even if you prefer to design your warehouse by hand, there are bound to be some of the monotonous tasks associated with warehouse design that OWB can complete quickly and accurately.
EAN: 2147483647
Pages: 91