Interactive Landscape
What use is an isometric 3D world if you can't play in it? In this example, your old friend the sphere will be making a comeback to take a stroll around the isometric world that you just created. Having an interactive character brings up a few more issues you need to handle when it comes to z-ordering, as you'll see in the exercise.
-
As usual, you're going to be building upon the previous effect, so open diamond_terra.fla from the previous exercise. The finished version of this example is available in the sample files as diamond_walk.fla .
-
The major addition to your isometric world in this example comes in the form of a sphere that you can move around the grassy areas of your isometric world using the keyboard. To start, duplicate the grid tile movie clip by right-clicking (CMD-clicking on a Mac) on this symbol in the Library and selecting Duplicate from the context-sensitive menu. Call the new movie clip symbol sprite , and give it the linkage ID sprite .
-
Double-click on the newly created sprite movie clip to open it up for editing. Make the guide layer invisible by clicking on its Show/Hide bullet in the timeline (it's the one underneath the eye icon). Also, make the tile layer a guide by double-clicking on the layer icon in the timeline and selecting Guide from the Layer Properties window.
-
Lock both the tile and guide layers , create a new layer for the sphere, and move it to the top of the stack. On this layer, draw a sphere of arbitrary size using the Oval Tool (O) and constraining it to a circle by holding down the SHIFT key as you drag. Click on the sphere to select it and set its dimensions to 14 pixels by 14 pixels, its x-coordinate to 9 , and its y-coordinate to -3 (we found these values by trial and error, using the tile grid as a guide). Note that if you place the sphere too high, at some point it will appear to float.

-
That's it ”you've created your sphere! Exit out of editing the sphere by clicking on the Scene 1 link in the timeline to return to the main stage.
-
Modify the script in frame 1 of the actions layer using the listing below. Although the organization of the script has changed considerably, we haven't bothered to highlight sections that have merely moved to new places in the listing below if the code itself has not changed (for example, some chunks of code have now been placed within a function). This should make it easier for you to see how we've moved things around.
// define global constants with (_global) { // the starting stage x-coordinate for the isometric 3D world WORLD_X = 225; // the starting stage y-coordinate for the isometric 3D world WORLD_Y = 75; // the width of a floor tile in our world TILE_W = 32; // the height of a floor tile in our world TILE_H = 15; // an array to hold tile symbol IDs tiles_array = [ "grass", "short wall", "tall wall", "really tall wall", "anim wall" ]; // map of our lovely garden map_array = [ [1, 1, 1, 2, 0, 0, 0, 2, 1, 1, 1], [1, 0, 0, 0, 0, 0, 0, 0, 0, 0, 1], [1, 0, 0, 0, 0, 0, 0, 0, 0, 0, 1], [2, 0, 0, 1, 1, 4, 1, 1, 0, 0, 2], [0, 0, 0, 1, 2, 2, 2, 1, 0, 0, 0], [0, 0, 0, 4, 2, 4, 2, 4, 0, 0, 0], [0, 0, 0, 1, 2, 2, 2, 1, 0, 0, 0], [2, 0, 0, 1, 1, 4, 1, 1, 0, 0, 2], [1, 0, 0, 0, 0, 0, 0, 0, 0, 0, 1], [1, 0, 0, 0, 0, 0, 0, 0, 0, 0, 1], [1, 1, 1, 2, 0, 0, 0, 2, 1, 1, 1] ]; } // calculates the depth of a tile given its grid coordinates function getTileDepth ( gX, gY ) { // the minimum depth to start attaching movie clips var MIN_DEPTH = 1000; // spacing between consecutive depths var DEPTH_SPACING = 10; return MIN_DEPTH + map_array.length * gY * DEPTH_SPACING + gX * DEPTH_SPACING; } // calculates the stage x- and y-coordinates, given grid coordinates function gridToStage ( gX, gY ) { var stageCoor = new Object(); stageCoor.x = WORLD_X - gY * 0.5 * TILE_W + gX * 0.5 * TILE_W; stageCoor.y = WORLD_Y + gY * 0.5 * TILE_H + gX * 0.5 * TILE_H; // return the stage coordinates object return stageCoor; } // draws the isometric map using the map and tiles arrays function drawMap() { // iterate through the rows of the map array for (var gridY = 0; gridY < map_array.length; gridY++) { // iterate through the columns of the map array for (var gridX = 0; gridX < map_array[gridY].length; gridX++) { // find the tile ID for the current tile from the array var currentTile = map_array[gridY] [gridX]; var tileID = tiles_array[currentTile]; // calculate the depth to assign to the tile var tileDepth = getTileDepth ( gridX, gridY ); // attach the tile movie clip movie clip to the stage _root.attachMovie(tileID, "gridTile"+tileDepth+"_mc", tileDepth); // calculate the stage x- and y-coordinate of the tile var stageCoordinates = gridToStage( gridX, gridY ); // short-cut reference to tile var theTile = _root["gridTile"+tileDepth+"_mc"]; // position the tile theTile._x = stageCoordinates.x; theTile._y = stageCoordinates.y; } } } // attaches and initializes the sprite movie clip function createSprite() { // set initial starting coordinates for sprite spriteXGrid = 5; spriteYGrid = 0; spriteDepth = getTileDepth( spriteXGrid, spriteYGrid ) + 1; // attach the sprite movie clip _root.attachMovie("sprite", "sprite_mc", spriteDepth); // calculate the sprite's coordinates spritecoordinates = gridToStage( spriteXGrid, spriteYGrid ); sprite_mc._x = spriteCoordinates.x; sprite_mc._y = spriteCoordinates.y; } // places the sprite at a specified grid/map location function placeSprite ( spriteXGrid, spriteYGrid ) { // calculate the sprite's coordinates and depth spriteCoordinates = gridToStage( spriteXGrid, spriteYGrid ); sprite_mc._x = spriteCoordinates.x; sprite_mc._y = spriteCoordinates.y; spriteDepth = getTileDepth( spriteXGrid, spriteYGrid ) + 1; sprite_mc.swapDepths(spriteDepth); } // checks that the destination tile is a ground tile (tileID = 0) // returns true if it is, false if it is not function checkDestination ( spriteXGrid, spriteYGrid ) { return !map_array[spriteYGrid][spriteXGrid]; } function createKeyListener() { // Create a new object. We will make this a key listener // so it gets notified of keyboard events. keyListener = new Object(); // onKeyDown handler: Gets called whenever the user presses a key keyListener.onKeyDown = function() { // user wants to move up the z-axis using the Up Arrow key if ( Key.isDown(Key.UP) ) { if ( spriteYGrid > 0 ) { // bound check ok - user has not reached the top of the map if ( checkDestination ( spriteXGrid, spriteYGrid - 1) ) { // decrement the Y map/grid position spriteYGrid--; // place the sprite at the new location placeSprite( spriteXGrid, spriteYGrid ); } } } // user wants to move down the Z axis using the Down Arrow key if ( Key.isDown(Key.DOWN) ) { // find the vertical limit of the grid (number of rows - 1) var gridYLimit = map_array.length - 1; if ( spriteYGrid < gridYLimit ) { // bound check ok - user has not reached the bottom of the map if ( checkDestination ( spriteXGrid, spriteYGrid + 1) ) { // destination ok - tile is a ground tile // increment the Y map/grid position spriteYGrid++; // place the sprite at the new location placeSprite( spriteXGrid, spriteYGrid ); } } } // user wants to move left along the x-axis using Left Arrow key if ( Key.isDown(Key.LEFT) ) { if (spriteXGrid > 0) { // bound check ok - user has not reached left edge of map if ( checkDestination ( spriteXGrid - 1, spriteYGrid) ) { // destination ok - tile is a ground tile // decrement the X map/grid position spriteXGrid--; // place the sprite at the new location placeSprite( spriteXGrid, spriteYGrid ); } } } // user wants to move right along the x-axis using Right Arrow key if ( Key.isDown(Key.RIGHT) ) { // find the horizontal limit of the grid (number of colums - 1) var gridXLimit = map_array[spriteYGrid].length - 1; if ( spriteXGrid < gridXLimit ) { // bound check ok - user has not reached right edge of map if ( checkDestination ( spriteXGrid + 1, spriteYGrid) ) { // increment the X map/grid position spriteXGrid++; // place the sprite at the new location placeSprite( spriteXGrid, spriteYGrid ); } } } }; // add the key listener object as a key listener Key.addListener(keyListener); } /* Main */ // draw the isometric map drawMap(); // create the sprite createSprite(); // start listening for keyboard events createKeyListener();
 Phew! Although you've added quite a bit of code and moved things around a bit, you haven't actually changed anything about how the isometric world is drawn. The biggest organizational change you've made is to split up your code into functions. This is a much better way of organizing your movie ( especially larger ones) than having all your code together in one huge mess (or, even worse , scattered all around the place attached to movie clips). Going one step beyond this is to use object-oriented programming (OOP) techniques and classes to organize your code. In fact, we use classes in Chapters 3 and 4, but a detailed study of the intricacies of OOP and a demonstration of how to create classes are beyond the scope of this book.
Starting from the top, you'll notice that you're defining your constants on the _global namespace now so that they can be accessed easily from everywhere within your movie (any timeline or object). Next , you have the getTileDepth function which, when passed the grid x-and y-coordinates for the map_array, returns the depth that you should use when attaching a tile on the stage for that position. Take a look at the math behind it:
MIN_DEPTH + map_array. length * gY * DEPTH_SPACING + gX * DEPTH SPACING
This formula is responsible for assigning individual depths to each tile, and the depth between tiles essentially increases in tens because of the DEPTH-SPACING variable. For instance, a sphere placed on the tile whose depth is 1400 receives a depth that is equal to one more than the tile it is on. And, since you have set aside nine depth positions between any two tiles that appear next to each other along the x-axis, you could theoretically have nine sprites on a tile at the same time with correct z-order. The z-order for the sprite is handled by the placeSprite function:
function placeSprite ( spriteXGrid, spriteYGrid ) { // calculate the sprite's coordinates and depth spriteCoordinates = gridToStage( spriteXGrid, spriteYGrid ); sprite_mc._x = spriteCoordinates.x; sprite_mc._y = spriteCoordinates.y; spriteDepth = getTileDepth ( spriteXGrid, spriteYGrid ) + 1; sprite_mc.swapDepths(spriteDepth); }There, you find the sprite's coordinates using the gridToStage function (which contains the same code you were using to find the coordinates of tiles in the earlier example). Based on these coordinates, you calculate what the depth of the tile at that position is and add one to the result to arrive at the depth you will use for your sprite.
The createSprite function is very similar to the placeSprite function but it is called just once, when the sprite's movie clip is being attached to the stage for the first time.
The next important addition you make is to create an object to act as a key listener. A listener is an object that has methods that get called when specific events occur. The keyListener object you create is a plain old empty object with functions in it until you make it a key listener by adding it as a listener to the built-in Key object of Flash. To do this, you use the addListener method of the Key object.
Your keyListener object listens for just one event: the onKeyDown event, which occurs when the user presses down on a key. By adding the keyListener object as a listener to the Key object, you tell it that you want to receive keyboard events when they happen. Although the Key object broadcasts one other message ( onKeyUp ), you only want to know when a user pressed down on a key so you only create an onKeyDown handler. The Key object will still broadcast onKeyUp messages to your keyListener object, but since you haven't set up an onKeyUp handler to listen for these events, you won't hear them.
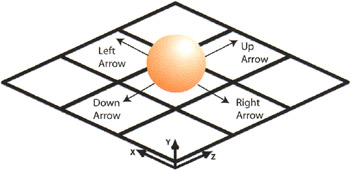
In the onKeyDown handler, you have separate checks to see which of the arrow keys are currently down. You respond to each accordingly by first checking if the sphere has reached a boundary in the direction it wants to move and, if it hasn't, the tile that the sphere wants to travel to is a grass tile (your sphere has an aversion to walls!). If both conditions are met, you update the map location of the sphere and place it there. During placement, the z-ordering is again handled automatically by the placeSprite function. Refer to the diagram below to see how the sprite responds to the arrow keys:
Well, that's it ”you've come to the end of a long road! Test the movie (CTRL/CMD+ENTER) and use the arrow keys to move the sphere around the isometric world.
To get a solid introduction to object-oriented programming, we suggest that you start out with the excellent Flash MX Upgrade Essentials by Sham Bhangal ( friends of ED, ISBN: 1-903450-76-4), and then continue on to Object-Oriented Programming with ActionScript by Branden Hall and Samuel Wan (New Riders, ISBN: 0-7357-1183-6). To polish off your ActionScript experience, don't forget to get a copy of ActionScript for Flash MX: The Definitive Guide, Second Edition by Colin Moock (O'Reilly, ISBN: 0-596-00396-X) and Flash MX Designer's ActionScript Reference (friends of ED, ISBN: 1-903450-58-6). You'd be wise to keep these books near you at all times!