Creating an Account and Your First Ad
|
| < Day Day Up > |
|
Feel free to check out the AdWords tools before deciding whether you want to advertise. You can open an account and create ads without making a commitment. Your ads don’t go into play until you activate the account.
Get started by beginning an AdWords account:
-
Go to the following Welcome to AdWords page:
adwords.google.com
After creating your account you can continue to use this page for logging in.
-
Click the Click to begin button.
Google gets you started by creating an ad group. Nothing about this process requires money or payment information.
-
Under the Step 1 of 4 banner (see Figure 11-2), select languages and countries.
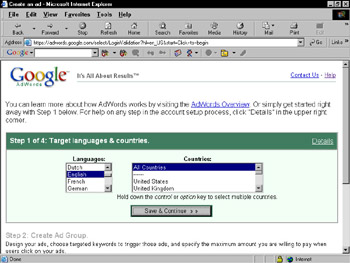
Figure 11-2: Use this page to select the language and country of people who will view your ads.This option determines who will see your ads. Users whose Preferences settings match your language selections see your ads. Google uses the computer’s IP (Internet Protocol address), which is roughly accurate, to determine a person’s location by country (. The default selections here are All Languages and All Countries. If you don’t want to waste your ad displays on people who don’t speak English (or whatever language your ad uses), select English from the language column. You may select more than one language and country by making selections with the Ctrl key pressed.
-
Click the Save & Continue button.
-
Under the Step 2 of 4 banner (see Figure 11-3), create an ad.
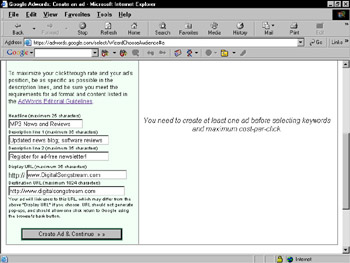
Figure 11-3: Write your heading, description, and URL in these fields. The display URL may be different than your target URL.This is where you write a headline, description, and target page URL. Take some time here. Google has strict editorial guidelines that must be followed; click the AdWords Editorial Guidelines link to understand them. The limited description space requires you to be extremely concise, and I can tell you from personal experience that pithiness is a lot harder than wordiness. Take the time to make every word count.
-
Click the Create Ad & Continue button.
-
On the next page, choose your keywords.
People searching on the keywords you place here will see your ad. Type one keyword or phrase per line; press the Enter key to add each subsequent keyword. Later, you’ll be able to adjust your keyword selections based on Google’s estimate of how much your choices will cost. Assigning keywords is a crucial part of the success and budgeting of an AdWords campaign, but the words you type on this page are not etched in stone. Note: See “The Keyword Suggestion tool” section for help with the Keyword Suggestion tool and Power Posting tool, and other keyword tips. For now, throw in some keywords and move on.
-
Click the Save Keywords button.
-
On the next page, choose the monetary currency to use to pay for AdWords and choose the maximum CPC for your keywords.
You are not committing any money at this point, nor are you activating your ad. Google opens this page with a suggested CPC price; that number is a competitive price based on other advertisers using your keywords. Feel free to override the suggested price and lower it.
-
Click the Calculate Estimates button.
Google reloads the page with the CPC chart filled in with estimated costs of your ad campaign, broken down by keyword. Google estimates the number of clickthroughs based on current data from advertisers using the same keywords. In the Average Cost-Per-Click column in Figure 11-4, note that the estimates are lower than the assigned maximum cost that you set above the table — quite a bit lower. These numbers are based on competitive prices from other advertisers, and give you an opportunity to adjust you maximum accordingly. (Remember, Google will always charge you the least amount below your maximum to deliver the top spot on the page.) The cost estimates are your first indication of how you should budget your campaign.
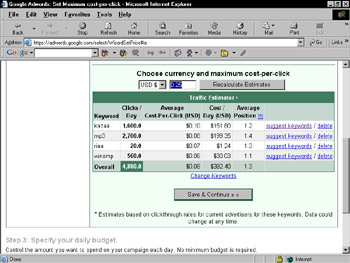
Figure 11-4: Google estimates the clickthrough rate and cost of your campaign. -
Click the Save & Continue button.
Before continuing, Google gives you a chance to create another ad, starting this process over. Feel free to do so. I’m moving on to the daily budget section.
-
Click the Continue to Step 3 button.
-
Under the Step 3 of 4 banner, enter a daily maximum you want to spend.
Creating a daily budget instead of using a longer time frame keeps your ad’s exposure fairly even throughout the month (Google’s billing period) even if you don’t want to spend much. Notice that Google displays this page with a figure already loaded, and that it’s higher than your estimated daily expense shown in Step 10 of this list. The higher amount is meant to give you some breathing room and ensure that your ads appear maximally. Feel free to lower the number.
-
Click the Save & Continue button.
-
On the next page, scroll down to the Step 4 of 4 banner and fill in the fields below it.
Start by reading the terms and conditions — this is one time when a summary isn’t sufficient, so I won’t attempt one. (If you activate your ads, you are entering into a business relationship with Google, and you should know the terms and conditions firsthand.) Then fill in an e-mail address and password. Nothing on this page, including clicking the button in the following step, commit you to running your ads. This page creates the account that holds the ads you just created, which may remain inactive for as long as you want.
-
Click the I agree — Create my AdWords account button.
Google send a verification letter to your e-mail address. It should arrive within seconds.
-
In the e-mail you receive from Google, click the provided link.
The next page appears either in the browser window you were using or a new one, depending on your browser and e-mail settings.
You’re set. From this point on, log in to your control center by going to the AdWords login page:
adwords.google.com
There, type your e-mail address and password. Figure 11-5 illustrates the control center before the account has been activated.
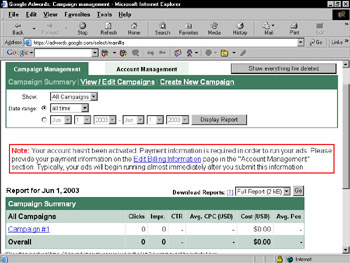
Figure 11-5: The control center, after one campaign has been defined but before the account has been activated.
|
| < Day Day Up > |
|
EAN: 2147483647
Pages: 188