Google Toolbar 2.0 (Beta)
|
| < Day Day Up > |
|
Shortly before this book went to print, Google released a new version of the Toolbar. At the time of this writing, the new Toolbar was still in beta, meaning that it was an unofficial release, available to everyone. Users were welcome to submit feedback, praising or damning, to Google. No schedule was published for its graduation to an official product, and the older version 1.xx was still the default download from the Toolbar page in Google. Google generally keeps new products in beta for a very long time — Google News, for example, was still in beta when this book was completed, despite its long-won acceptance as the preeminent online newsstand.
Accordingly, this chapter covers both the older version and the 2.0 version of the Toolbar, side by side. Version 2.0 might still be experimental when this book is published, and you might still have a choice of the two. I immediately switched over to Toolbar 2.0, and in the short time in which I used it before this manuscript was yanked away from me, I had not the slightest reason to switch back. To the contrary, the new Toolbar is a fantastic product — much improved over the older one, which also is terrific.
Toolbar 2.0 is a mature, stable product, despite its beta status. The upgrade to an entire new product series (1.xx to 2.0) indicates the substantial change in the feature set of the new Toolbar, yet most of the traditional features still exist. Toolbar 2.0 is enhanced and streamlined. Most of its new features have nothing to do with searching, oddly, yet have everything to do with your online lifestyle and management of the Toolbar.
Toolbar 2.0 exhibits five major additions:
-
Options panel: Toolbar options, in both the old and new Toolbars, are stored on your computer. In the 1.xx Toolbar, those option pages open up in the browser window, making it appear that you’re using an interactive page stored on Google’s computer. In the 2.0 Toolbar, the situation is clarified in the new Toolbar Options panel, which opens on top of the browser window. This panel is more concise and easier to manage than the previous version.
-
Blog This!: This button is for users of Blogger.com, Google’s recently acquired Weblog service. Clicking the Blog This! button enables users to post an entry to their Weblog that automatically refers to the Web page currently displayed.
-
AutoFill: This feature fills in online forms with one click — a tremendous time-saver.
-
Pop-up Blocker: Perhaps the most surprising addition to the Toolbar, the pop-up blocker prevents free-floating ads from sprouting atop and behind your browser. In certain conditions, this blocker doesn’t touch the ads streamed directly to the desktop in Windows XP. The feature does block ads associated with Web sites, which spoils the sites in many cases. Pop-up ads previously lurk in the sole provenance of X-rated adult sites and were considered the depth of sleaze when the Web was younger. Now they’re commonplace at most mainstream sites.
-
Search Country: This button becomes active when you set the Toolbar’s Web searches to a domain other than www.google.com. (To change the domain, use the Search using option, shown in Figure 9-3.) Clicking this button restricts your search to the country of your selected server. When you select an alternative server, every search transpires through that server even when you don’t click the Search Country button. When you do click the Search Country button, the search is repeated (in a new browser window if you have that setting activated) through that server, finding sites that reside in that server’s country. In other words, the country server finds sites located everywhere, and the Search Country button finds sites located in certain countries. The truth is, the different servers present the same results for the most part. Using a server in your country delivers faster results.
These new features deserve — and will shortly have — a more detailed discussion. First, though, follow these steps to download the new Toolbar:
-
Go to the special download page for the beta version of Toolbar 2.0:
toolbar.google.com/install-beta
-
Close all other browser windows.
-
Click the I AGREE TO THE TERMS OF USE — INSTALL THE GOOGLE TOOLBAR button.
These terms of use are pretty much the same as those related to previous Toolbars.
-
In the Choose Your Google Toolbar Configuration window, select a version of the Toolbar with or without advanced features.
The advanced feature that many people complain about involves displaying the PageRank of any displayed site on the Toolbar. Google tracks your movements on the Web, and uses that information to fine-tune its page ranks. The information sent from your computer to Google’s computer is anonymous in nearly all cases; it would take a court order for Google to divulge the identity of a Toolbar user. I run the Google Toolbar with Advanced Features turned on.
Wait a few seconds for the Toolbar to download and install in your browser. At this writing, the new Toolbar is available only for Windows Internet Explorer versions 5.xx and 6.xx, just like the previous Toolbar. Figure 9-10 shows the 2.0 Toolbar immediately after installation, with one of its drop-down menus unfolded.
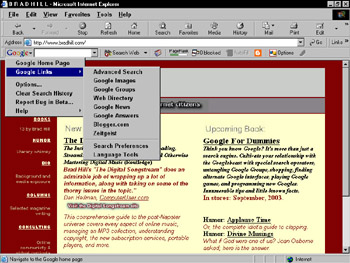
Figure 9-10: Google Toolbar 2.0, immediately after installation, before any pop-ups have been blocked and without the Search Country button.
The Toolbar Options dialog box
Click the Options button to display the Toolbar Options dialog box, shown in Figure 9-11. The first two tabs (Options and More) contain settings for adding and removing Toolbar buttons and controlling how Google and your browser respond to Toolbar searches. Most of these features are identical to those controlling the first version of the Toolbar.
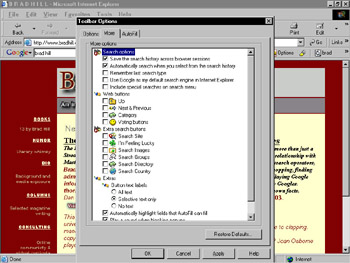
Figure 9-11: The Toolbar Options dialog box in the new Toolbar.
New features and tweaks include these:
-
You can now make Google the default search engine in Internet Explorer from the Search options section of the More tab. This one-click setting is a big improvement over the complicated procedure necessary before Toolbar 2.0. I describe how to do it the old way, later in this chapter, for those who don’t care to use Toolbar 2.0 or who are running Internet Explorer version 4, which can take Google as the default search engine, but can’t take either version of the Toolbar.
-
Also in the More tab, you can tell Google to highlight Web-site form fields that AutoFill can fill in for you. AutoFill can’t fill in username field, password fields, and a few other fields. (More on AutoFill a bit later.)
-
Select or unselect the feature that plays a sound when a pop-up ad is blocked. I take satisfaction in knowing when pop-ups have been strangled, but miscellaneous noises drive some people crazy.
-
The AutoFill tab contains form-field settings used by the 2.0 Toolbar at site registrations and online shopping carts.
Any changes that you make in the More tab are implemented immediately on the Toolbar when you click the Apply button (which leaves the More tab visible) or the OK button (which closes the tab).
The Search Country button
| Tip | Gratifyingly, the Search Country feature works on news headlines that appear at the top of the search results page. So, if you select Google’s server in the United Kingdom (www.google.co.uk) and search for newsy keywords (george bush, for example) the resulting headlines are all from U.K. publications. Furthermore, each new browser window that you open by clicking the Search Country button (assuming you have the “Open a new window to display results each time you search” feature activated in the Options panel) remains dedicated to that country’s Web sites for as long as you keep searching in that window. This means you can operate parallel browser windows, each searching a different country — the U.S., the U.K., France, and so forth. It’s a great way to perform targeted news comparisons in different countries. This feature is so important and so cool that I want to spell out how it works in one possible scenario. Use this set of steps as a template for your own experiments: |
-
Display the Toolbar Options dialog box.
To do so, click the Options button on the Google Toolbar.
-
On the Options tab, select the United Kingdom server from the Search using drop-down menu.
It helps to know national domain extensions. A few are: .uk (United Kingdom), .fr (France), .jp (Japan), .de (Germany), and .it (Italy).
-
Click to select the option titled “Open a new window to display results each time you search.”
-
Click the More tab and then click the Search Country option.
The option is available only if you selected a different country’s index in Step 2. Selecting this option adds the Search Country button to the Toolbar, if it is not there already.
-
Click the OK button.
-
In the Toolbar’s search box, type the keywords george bush and then click the Search Country button.
A new browser window opens to display your search results. The headlines above your search results are all links to U.K. publications.
-
Open the Options tab, switch to the French server (www.google.fr), and then click the OK button. Click the Search Country button.
Your keywords (george bush) are already displayed in the keyword box. Clicking the Search Country button launches a new search in a new browser window dedicated to French sites. French-publication headlines appear atop the search results.
-
Repeat Step 6 if you want, choosing different country servers and opening new windows.
-
In any window, type new search terms to look for headlines and sites in that country.
Remember to launch new country-specific searches from Google’s keyword box, not the Toolbar’s keyword box. You have enough windows open without starting new ones.
The Blog This! button
If you run a Weblog at Blogger.com, the Blog This! button puts one-click blog posting on Toolbar 2.0. The feature is not new to Blogger, which has offered Blog This! as a dedicated browser button for about two years. Putting the button on Toolbar 2.0 is the first sign of Google integrating Blogger, a prize acquisition, into the Google experience.
Chapter 13 covers Blogger.com, including how to set up a free account and begin publishing a blog. After you’ve got the ball rolling, the Blog This! button capitalizes on the fact that most blog entries are tied to a Web page of some sort — often a news article. If you come across an article about which you’d like to post a comment in your Weblog, here’s what you do:
-
Click the Blog This! button.
-
In the pop-up window, sign in to your Blogger account (if you’re not already signed in).
This is one window the pop-up blocker doesn’t block.
-
Use the drop-down menu to select which blog you’re posting to.
This step applies if you run more than one Weblog at Blogger.com. Figure 9-12 illustrates the target site, Blogger’s pop-up window, and the drop-down menu listing multiple blogs.
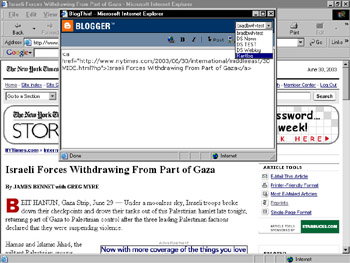
Figure 9-12: Blog This! in action, ready to post an entry directly from a Web page. -
Write your blog post around the provided code that will become a Web link to your target page.
-
Click the Post button.
The blog entry is added to your entry index, ready for editing and publishing, as described in Chapter 13.
AutoFill
If you register at as many sites as I do and shop online as much as I do, filling out online forms is a tedious hassle. The AutoFill function in Toolbar 2.0 invites you to fill in your crucial information just once, and then let the Toolbar handle any forms you encounter.
Use the AutoFill tab of the Toolbar Options dialog box to enter your information. (See Figure 9-13.) You may add your name, e-mail address, phone number, two mailing addresses, and one credit card. (AutoFill would become much more useful if it accepted multiple credit cards.) Credit card information is protected by a password — and remember, all Toolbar information, including AutoFill, is stored on your computer, not on an Internet computer.
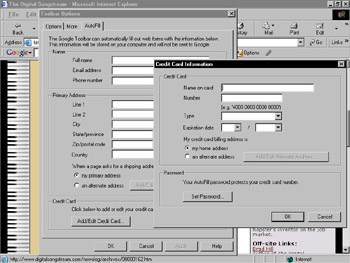
Figure 9-13: AutoFill accepts your personal information and then supplies it to site registrations, shopping carts, and other online forms.
Conveniently, the Toolbar highlights the portions of an online form that it’s capable of filling in. You may proceed to fill them in manually if you choose, or just click the AutoFill button on the Toolbar to complete those fields all at once. AutoFill never fills in username and password fields, which can change from site to site. Not so conveniently, AutoFill takes the extra step of telling you what it’s about to do, instead of just doing it. That confirmation window (see Figure 9-14) gives you a chance to review your information in a concise format, but also gets annoying after a while.
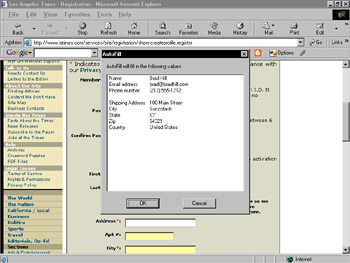
Figure 9-14: AutoFill confirms your information before applying it to an online form.
Pop-up blocker
Google’s new ad-blocker Toolbar add-on is stable, effective, and flexible — an outstanding little utility.
After you add the pop-up blocker to the Toolbar (you can remove and add it at will through the Toolbar Options dialog box), the blocker destroys pop-up browser advertisements before they hit your screen, makes a proud little noise for each blocked ad, and keeps track of the total number of killed pop-ups.
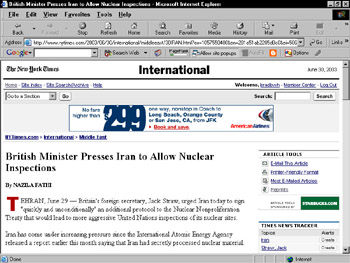
| Remember | If you want to allow pop-ups from a certain site, simply click the Pop-up Blocker button after you arrive at that site. Google reloads the page, this time allowing the ads to pop up. The button changes appearance (see Figure 9-15) to notify you that pop-ups are enabled for that site and keeps track of your selection. Any time you return to that site, pop-ups are allowed and the button tells you so. The liberation of pop-ups pertains to the entire site. For example, Figure 9-15 shows the changed button on an article page of the New York Times site. The button was changed there, and pop-ups were then allowed throughout the nytimes.com site. When you surf away from the liberated site, the button reverts to its original appearance and ads are blocked as normal. |
|
| < Day Day Up > |
|
EAN: 2147483647
Pages: 188