Ubuntu and Multimedia
| In recent years, multimedia has become an essential part of computing. Watching DVDs and videos and listening to CDs and music have become part and parcel of the modern desktop computer experience. These multimedia capabilities have been further bolstered by the huge popularity of legal music downloading. With a range of online stores for a variety of different types of music, it is not uncommon to listen to the majority of your music without ever seeing a little shiny silver disk. Installing CodecsMultimedia files and disks come in a variety of different types, and each type uses a special Codec to compress the content to a smaller size while retaining a particular level of quality. To play this media, you need to ensure that you have the relevant Codecs installed. Unfortunately, Codecs have traditionally been something of a problem with Open Source software due to the legal restrictions placed upon them. The problem is that many Codecs (including MP3, Windows Media Format, QuickTime, and Realmedia) are proprietary and have restrictions placed on their use, distribution, and licensing. Although developers in the Open Source community have gone away and created free implementations of these Codecs, the licensing that surrounds them conflicts with the legal and philosophical position that Ubuntu has set. Not only are these Codecs not included because they are legally iffy, but because they disagree with Ubuntu's ethic of creating a distribution that is entirely comprised of free software in the freest sense of the word. Quick Tip If you want to find out more about installing these Codecs, see https://wiki.ubuntu.com/RestrictedFormats. To work toward resolving these problems, a number of developers are working on free Codecs such as Ogg Vorbis and Ogg Theora that provide high-quality results and open licensing. The Ogg Vorbis Codec is used on audio and can provide better results than MP3 at a smaller file size. The Ogg Theora Codec is used for video and competes with the MPEG-4 Codec. Ubuntu includes the Ogg Vorbis and Ogg Theora Codecs, and you can encode and play back any media that uses those Codecs. Although the world would be a better place if all Codecs were free, the reality is different, and many Ubuntu users still want to play their media on their new desktops. Table 3-3 shows the most typical Codecs used to encode and play back media, and lists their support in Ubuntu.
Listening to Audio FilesUbuntu includes a powerful music player called Rhythmbox to organize and play your music file collection. Before you fire up Rhythmbox though, you need to create a folder to store your music files in. This folder can be anywhere, but putting it on the desktop makes sense, since it will then be easily accessible when you want to add new songs to it. Right-click your desktop, and select Create Folder. A new folder is created, and you should enter a name for it. Call it "Music" for now. Within this directory, organize your music in a way that makes sense to you. A good system that many people use is to first give each artist/band a folder and then inside each folder have a subfolder for each album that contains the songs. So, as an example, inside the Music folder you would have an Overkill folder inside of which there would be a Horrorscope folder that contains the individual songs. You don't need to use this system if you don't want to, but as your music collection builds it makes sense to organize it this way. Many CD rippers also store songs in this way, so you should not need to reconfigure your CD ripper later. Quick Tip Why not add your new music folder as a bookmark so it appears in the file chooser, Places menu, and elsewhere? Using RhythmboxLoad Rhythmbox (See Figure 3-41) by clicking on Applications > Sound & Video > Rhythmbox Music Player. When Rhythmbox first starts it asks you to select the directory where your music is stored, so select your Music folder. To import your music, right-click the Library entry in the left panel and select Import Folder. Your songs are added to your music collection. Figure 3-41. Rhythmbox is a great place to look after your music collection.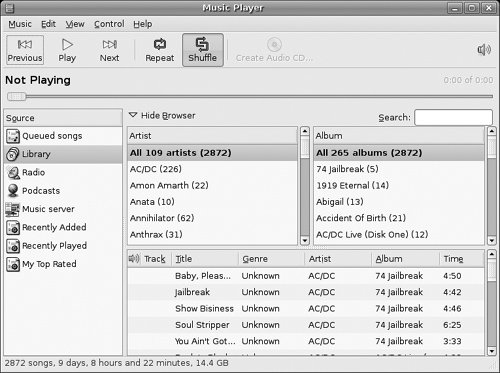 The Rhythmbox window is split into a number of different panes, each displaying different details about your music collection. The left pane (Source) lets you select the source of the music such as your media library, podcasts, and Internet radio. Each of these options has a browser pane available to display the source of the content. As an example, when you use the Library, a pane displaying the artists and one displaying the albums are displayed. You can use this to navigate your music. Listening to PodcastsPodcasts are audio shows that you can subscribe to, and they are increasingly becoming the new way to listen to audio and music. When you subscribe to a podcast, each new release is automatically downloaded for you. This makes it extremely convenient to regularly listen to audio shows. If you are new to podcasting you should go and grab yourself a podcast feed of something you like. A site such as www.podcast.net is a good place to start. Go to the site in Firefox, and when you see a link saying podcast feed or RSS feed, right-click it, and select Copy Link Location. Rhythmbox has good support for Podcast feeds, and subscribing to a feed is simple. In the sidebar, right-click the Podcast entry and click New Podcast Feed. Paste in the feed by right-clicking the box and selecting Paste. The files are automatically downloaded, and you can listen to them by double-clicking on them. Each time you start Rhythmbox a check is made to see if any new episodes exist, and if so, they are downloaded. Note: Rhythmbox and iPods Rhythmbox can also read songs from your iPodjust plug it in and it will display in Rhythmbox. Unfortunately Rhythmbox can only read from the iPod at the moment and not write to it. Playing and Ripping CDsWhen you pop a CD into your CD drive, an application called Sound Juicer automatically loads to play your CD. If you are connected to the Internet, the CD is looked up on the Internet, and the album details and song titles are displayed. Ripping Songs as OggsSound Juicer is not just a CD player, but a ripper too. Using a ripper you can convert the songs on the CD into files that you can play on your computer. By default, Sound Juicer rips the files in the Ogg format, which provides better sound quality than MP3 at a smaller size. Before you rip the CD, click Edit > Preferences, and use the Music Folder combo box to select the Music folder that you created earlier to store your music files. If you have not set this folder to be a bookmark, you will need to click the combo box and then click Other to bring up the file chooser. By default the ripped files are stored in the format discussed earlier with each artist as a folder and then albums as subfolders. To rip the songs just select the checkboxes of the songs you want ripped (by default all songs are selected), and then click Extract. Each song is then stored in your Music folder, and the song titles are used as the names of the files. Ripping Songs as MP3sAlthough the default Ogg support is recommended in most situations, you may prefer to rip MP3 files if you have a digital audio player that does not support Ogg files. To do this you need to configure Sound Juicer to enable MP3 support. You should first install the gstreamer-10-ugly-multiverse package (from the Multiverse repository). Next, in Sound Juicer click Edit > Preferences and click the Edit Profiles button. In the dialog box that pops up, click New, call the profile MP3, and then select it from the list and click Edit. Now fill in the settings with the following information:
Check the Active box, and click OK. Now close the Profiles dialog box, and click Close to close the Preferences box. Restart Sound Juicer, and you can now select MP3 from the Format combo box in the Preferences box. Tip: A Word of Caution Always, always remember that ripping CDs that are not yours is piracy. It's not fair, so don't do it! Watching VideosTo watch videos in Ubuntu you need to ensure that you have the correct Codecs installed. As discussed earlier, some of these Codecs are available separately due to the legal implications of including them with the Ubuntu system. Refer to the Ubuntu wiki at http://wiki.ubuntu.com/ for details of how to install them. Using TotemTo watch videos in Ubuntu, you use the Totem media player (see Figure 3-42). Load it by clicking Applications > Sound & Video > Totem Media Player. Figure 3-42. Totem is a simple and flexible media player.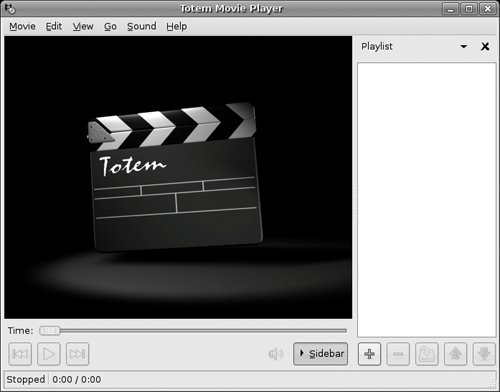 To watch a video on your hard disk, click Movie > Open and select the file from the disk. Tip: Another Way to Load Files into Totem You can also load multimedia files into Totem by double-clicking them on your desktop or in the file manager. Totem also supports video streams. To watch a stream, click Movie > Open Location, and enter the Internet address for the stream. The video feed is then loaded and displayed. Getting DVDs to WorkUbuntu comes with DVD support for unencrypted DVDs. With the DVD industry being what it is, the majority of DVDs come encrypted, and if you want to watch them you need to ensure that a library that can decrypt these DVDs is installed. Unfortunately this library needs to be installed separately and is not included with Ubuntu. Refer to the Ubuntu wiki restricted formats page at https://wiki.ubuntu.com/RestrictedFormats for details. With the library installed, insert a disk into your computer, and Ubuntu will automatically start Totem to view the disk. Alternatively, fire up Totem, and click Movie > Play Disk to play the DVD. Totem fully supports DVD menus and you can use the mouse to select the different menu options. If you are settling down to watch a movie, there a few other settings you may want to configure. First click View > Aspect Ratio to select the correct aspect ratio for your screen, and then select View > Fullscreen to switch to full screen mode. To exit full screen, just move your mouse, and some on-screen controls will appear. Tip: Control Totem with a Remote Control Totem supports the Linux InfraRed Control (LIRC) library so you can use a remote control while watching your media. |
EAN: 2147483647
Pages: 133