Client for the New Service
|
Writing a Basic Service
A client is half the story; the plot lies in the Web service. In this section, we will look at the steps necessary to build a new Web service based on the idea of authentication. The service provides four methods:
-
createNewAccount(username, password)— Sets the username and password with the service
-
baseAuthenticate(username, password)— Returns true if the username and password match those in the service
-
secureAuthentication(username, password, certificate)— Returns true if the username, password, and provided certificate match those in the service
-
provideCertificate(username, password)— Returns a vector with a vector for the supplied username/password
Creating the Interface
Once you've defined the methods for the service, you place them in a simple interface structure. Listing 9.2 shows the interface used for the new CAService authentication service.
Listing 9.2: CAServiceAPI interface code.
package authentication; import com.caucho.hessian.server.HessianSkeleton; import java.util.Vector; public interface CAServiceAPI { public boolean createNewAccount(String username, String password); public boolean baseAuthenticate(String username, String password); public boolean secureAuthentication(String username, String password, Vector certificate); public Vector provideCertificate(String username, String password); }
Building the Interface JAR
Now that you've written the interface code, you need to build it. The command to compile the interface is as follows:
javac -d . CAServiceAPI.java
Once you've built the class file, place it in a JAR file for use by the service as well as client code. Because the code for the interface is contained in a package, you need to put the entire hierarchy for the class in the JAR file, as well. The command to built the JAR file is
jar -cf CAServiceAPI.jar authentication
As we will cover in Chapter 14, the Resin server can automatically compile source code within its directory structure. In a few paragraphs you will see where to place the service source code about to be built; but in the case of the CAServiceAPI.jar file, you need to put the file in a location where the Resin server can find it. All class library files should be placed in the directory <installation drive>/resin-ee-3.0.2/lib.
Writing the Authentication Service
With the interface built, you can write the code to handle requests made of the Web service. The code in Listing 9.3 sets up the service and builds out the methods.
Listing 9.3: CAService Web service code.
Line 1: package authentication; import com.caucho.hessian.server.HessianServlet; import java.util.Vector; import java.util.Random; public class CAService extends HessianServlet implements CAServiceAPI { Line 10: private String storedUsername = null; private String storedPassword = null; Vector vec = null; public CAService() { vec = new Vector(); Random random = new Random(); for (int i=0;i<15;++i) { vec.add(new Integer(random.nextInt(50))); Line 20: } } public boolean createNewAccount(String username, String password) { storedUsername = new String(username); storedPassword = new String(password); return true; } Line 30: public boolean baseAuthenticate(String username, String password) { if (storedUsername.equals(username) && storedPassword.equals(password)) { return true; } return false; } Line 40: public boolean secureAuthentication(String username, String password, Vector certificate) { if (storedUsername.equals(username) && storedPassword.equals(password)) { if (certificate.equals(vec)) { return true; } } return false; Line 50: } public Vector provideCertificate(String username, String password) { if (storedUsername.equals(username) && storedPassword.equals(password)) { return vec; } return null; } } The code begins by importing the HessianServlet class in line 3. This class is the foundation for the Web service and makes the Web service act as a servlet when hosted on the Resin-EE server. Lines 7 and 8 create the CAService class that implements the CAServiceAPI interface and extends HessianServlet. All Hessian Web services are required to both implement an interface and extend HessianServlet.
The rest of the class looks like any other Java class. In this case, the methods from the interface are fully coded, and you add a constructor for class initialization. When the createNewAccount() method is called, the username/password parameters are saved in the service object. Each of the remaining methods works against the saved username and password, returning a boolean value based on the code in the method.
At this point, you can make sure the code compiles correctly. An example build command is shown here:
java -d . -classpath ".\;.\CAServiceAPI.jar;.\hessian- 3.0.2.jar" CAService.java
Server Structure
Within the Resin-EE directory structure, all Web applications are placed in the /doc directory as discussed booking Chapter 6, "Object-Relational Mapping with CMP." To launch the Web service, you need to place a new directory in /doc. This example uses the directory hessian. Within this new directory, the server expects a directory called WEB-INF Within the WEB-INF directory, you need to create another directory called classes. Because the code was built with a Java package hierarchy, it must be duplicated within the classes directory; this means adding a new directory called authentication. Move the CAService.java code from above into the directory called authentication. When you're finished, you should have the directory structure shown in Figure 9.1.
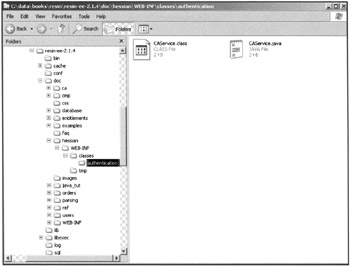
Figure 9.1: Authentication Web service directory hierarchy.
Changing Resin.conf
The next step in getting the Web service up and running is to let the Resin server know about the existence of the new service. You do so by modifying the resin.conf file located in the /conf directory of the Resin-EE installation.
Add the following line in the <host> element of the configuration file:
<web-app id='hessian'/>
Changing web.xml
The <web-app> element added to the configuration file doesn't have any subelements attached to it. As you've learned previously, this means the server expects to find an xml.conf file in the WEB-INF directory. The web.xml file defines the specifics of your new Web service.
Create a text file called xml.conf in the WEB-INF directory and put in the file the XML from Listing 9.4.
Listing 9.4: Xml.conf file contents.
<web-app> <servlet servlet-name='certService' servlet-class='authentication.CAService'> </servlet> <servlet-mapping> <url-pattern>/authentication/CAService</url-pattern> <servlet-name>certService</servlet-name> </servlet-mapping> </web-app>
This XML tells the Resin server to check whether the URL ends with /hessian/authentication/CAService. If it does, then the system should execute the servlet found in the authentication. CAService class.
Starting the Server
The last step in getting the new service up and running is to start the Resin-EE server. The console window will show any errors produced when the server recognizes the new service.
|
EAN: 2147483647
Pages: 180