Authentication API
|
Authentication
Authentication is defined as the process of determining the identify of a user. Typically, the user is trying to access a password-protected part of an application or site; for example, they may be logging in to a site that has personalized content. In this section we will look at three Resin techniques you can use instead of writing your own authentication code.
Providing Basic Authentication with XmlAuthenticator
If you are interested in password protecting part of your site or application, the XmlAuthenticator will do the work for you. The XmlAuthenticator code pulls username/password combinations from the user and matches them against combinations listed in the Resin configuration file. Let's look at the configuration code first:
<authenticator type="com.caucho.server.security.XmlAuthenticator"> <init> <user>usergroup:group54:user</user> <password-digest>none</password-digest> </init> </authenticator> <login-config auth-method="basic"/> <security-constraint> <url-pattern>/users-only/*</url-pattern> <role-name>user</role-name> </security-constraint>
This configuration information is added to a <web-app> element to control access to the application files in the Web application. In the default Resin configuration file, you file a <web-app> for the tutorials defined as <web-app \>. By putting the previous configuration in the <web-app> element, the users-only directory is protected and a username/password is required for access. When you attempt to browse to one of the example template files in the java_tut/users-only directory, a username/password dialog appears on the screen, as shown in Figure 13.1.
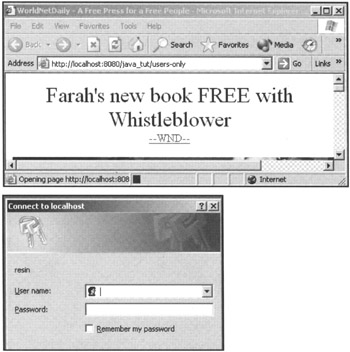
Figure 13.1: Basic authentication using XmlAuthenticator.
Let's look at the configuration to determine what it's doing. The <login-config> element is the primary root for the configuration information. This element has an attribute called auth-method; in this example, it is set to basic. The basic value tells the system to pop up a username/password dialog. (In a moment you will see two other values that can be used.) Next, the configuration uses an <authenticator> element to choose the type of Resin authenticator class to use. (You will see other choices later in the chapter and look at the API to write your own authenticator class.) The <init> element lists the username:password:role values for the authentication. Notice that all the information is plain text. After the authenticator is chosen, the <security-constraint> element picks the directory where protected code resides and the role necessary to gain access to the code.
When you browse to your Web application and use a path with the user-only text in it, the system prompts for a username/password. Keep in mind that the username and password are passed over the network as plain text and can be easily hacked.
Note that the username/password/role information can also appear in the web.xml files located in each of the Web application's directories.
Digest Authentication
We've mentioned that the password in the basic authentication scheme is kept in a clear-text format in the Resin configuration file or the web.xml file. Resin provides the ability to encrypt the passwords stored in the various files. Consider the following authentication configuration:
<authenticator type="com.caucho.server.security.XmlAuthenticator"> <init> <user>segroup:8b7dchPDKI261QvH9Cw:user</user> <password-digest>MD5-base64</password-digest> <password-digest-realm>resin</password-digest-realm> </init> </authenticator> <login-config auth-method="digest"> <realm-name>resin</realm-name> </login-config>
In this configuration, the auth-method attribute has been changed from basic to digest. In the <authenticator> element, a new <init-param> element has been added, using the password-digest attribute and a value of MD5-base64. This element tells the system that the authenticator is using the MD5 algorithm for the encryption/decryption of stored passwords. In the <init-param> for a user, you will see that the password is no longer plain text but instead is encrypted. To determine what the password should be, you can use the following application:
import com.caucho.http.security.PasswordDigest; import java.io; public class CreatePassword { public static void main(String[] args) { PasswordDigest digest = new PasswordDigest(); digest.setAlgorithm("MD5"); digest.setFormat("base64"); digest.setRealm("resin"); System.out.println(digest.getPasswordDigest(args[0], args[1])); } } The application takes two command-line arguments: the username and the password. The result is output to the console. Unfortunately, you must execute this program manually each time you want to add a username and password combination to the password file. This process isn't very productive for new users to your site or application. As you will see later in the chapter, you can also use the database to store passwords.
Form Authentication
Both basic and digest authentication use the popup dialog shown in Figure 13.1 to obtain the username and password from the user. Many times, you'll want to obtain the username and password using a form with associated graphics on the page. Resin lets you use an authenticator class, as in the basic and digest mechanisms, but also a form. First consider the configuration:
<authenticator type="com.caucho.server.security.XmlAuthenticator"> <init> <user>usergroup:group54:user</user> <password-digest>none</password-digest> </init> </authenticator> <login-config auth-method="digest"> <realm-name>resin</realm-name> </login-config>
Here the configuration is changed to use an auth-method of form as well as a password-digest through the user= parameter. The real works takes place in a form placed on a Web page. The form must contain several specific values in order to work correctly.
You can add an additional element to the configuration to help define the form values to be used when a user wants access to a secured page. The <form-login-config> element contains a number of attributes for defining which page to display when a password is needed (form-login-page) and the page to display if the user is denied access to the page (form-error-page).
Here are the page and form to use as an example:
<HTML> <BODY> <FORM action='j_security_check' method='POST'> <TABLE> <TR><TD>User:<td><input name='j_username'></TD></TR> <TR><TD>Password:<td><input name='j_password'></TD></TR> <TR><TD><input type=submit> </TABLE> </FORM> </BODY> </HTML>
An HTML form needs to use a number of elements specific to Resin and the form authentication. The action value for the form must be the string j_security_check. When the form is submitted to the Resin server, the code defined as j_security_check executes. The code looks for a username defined by the name j_username and a password defined as j_password. These two values are compared against the defined username/password combinations stored in the configuration file.
If the username/password combination is found in the configuration file, the user is directed to the page they originally tried to access; otherwise, the user will see the error page. You have the option of embedding the name of the page where the user should be directed when they enter the correct username/password, by adding the following <input> tag and supplying the correct values:
<input name='j_uri' type='hidden' value='index.jsp'>
Specifying a Password File
When you're using the XmlAuthenticator class and configuration, you can specify a password file. For example:
<authenticator type="com.caucho.server.security.XmlAuthenticator"> <init> <path>init/password.xml</path> <password-digest>MD5-base64</password-digest> </init> </authenticator> <login-config auth-method="digest"> <realm-name>resin</realm-name> </login-config>
In this configuration file, the path attribute is used in an <init-param> tag to indicate the exact location and filename where passwords can be found. The format of the file is as follows:
<authenticator> <user name='segroup' password='8b7dhcPDKI261QvH9Cw' role='user'/> </authenticator>
Session Timeouts
At some point, you have probably experienced an interruption while shopping online. When you return to your shopping, one click on the site causes the system to ask you to log in again. This is called a session timeout. You don't want users to be continually logged in to the system, regardless of the idle time for the session. Resin lets you set configurations where the user is automatically logged out when the session times out.
Consider the following configuration:
<authenticator type="com.caucho.server.security.XmlAuthenticator"> <init-param> <path>init/password.xml</path> <password-digest>MD5-base64</password-digest> <logout-on-session-timeout>true</logout-on-session-timeout> <user>segroup:8b7dhcPDKI261QvH9Cw:user</user> </init-param> </authenticator> <login-config auth-method="digest"> <realm-name>resin</realm-name> </login-config>
The new line in the configuration is the <init-param> element that has a logout-on-session-timeout attribute with a value of True. This attribute causes the system to log out the user for this specific Web application.
Storing Passwords in a Database with JdbcAuthenticator
As we've noted several times, the username/password combinations are stored in the various configuration files or another file on the server. Although this setup works, it doesn't handle adding new combinations easily. Resin provides another option: You can use a backend database to store the password information. Just about any database can be used, as long as it can be connected to by a JDBC driver.
Consider the following configuration:
<authenticator type="com.caucho.server.security.JdbcAuthenticator"> <init> <data-source>jdbc/logins</data-source> <password-query> SELECT password FROM PASSWORD WHERE username=? </password-query> <cookie-auth-query> SELECT username FROM PASSWORD WHERE cookie=? </cookie-auth-query> <cookie-auth-update> UPDATE PASSWORD SET cookie=? WHERE username=? </cookie-auth-update> <role-query> SELECT role FROM PASSWORD WHERE username=? </role-query> <logout-on-session-timeout>true</logout-on-session-timeout> </init> </authenticator> <login-config auth-method="digest"> <realm-name>resin</realm-name> </login-config>
You can use the JdbcAuthenticator class to obtain a password from a JDBC-compliant database. As you can see in the previous configuration, access to a restricted page causes a form to be displayed to the user; this form is found in the login.html Web page. The form's HTML is as follows:
<HTML> <BODY> <FORM action='j_security_check' method='POST'> <TABLE> <TR><TD>User:<td><input name='username'></TD></TR> <TR><TD>Password:<td><input name='password'></TD></TR> <TR><TD><input type=submit> </TABLE> </FORM> </BODY> </HTML>
As required, the action on the form is j_security_check; but the names of the input values have been changed since you first saw the form authentication of username and password. When the user clicks the Submit button, the values are passed to the JdbcAuthenticator for use in various SQL statements. The statements are listed in the previous configuration.
The first element for defining access to a database where passwords are stored is <pool-name>. This element defines the datasource to be used for access to the password database. In this example, the datasource value is jdbc/logins. This value relates to a <resource-ref> element in the configuration file. Here's an example <resource-ref> element used as a test:
<database> <jndi-name>jdbc/logins</jndi-name> <driver type="org.gjt.mm.mysql.Driver"> <url>jdbc:mysql://localhost:3306/users</url> <user></user> <password></password> </driver> <max-connections>20</max-connections> <max-idle-time>30s</max-idle-time> </database>
Once the authenticator has access to a database, it expects to find a database and table with the password information. The schema defined in the JdbcAuthenticator code is as follows:
CREATE TABLE password ( username VARCHAR(250) NOT NULL, password VARCHAR(250), cookie VARCHAR(250), role VARCHAR(250), PRIMARY_KEY(username) )
Once access has been established with the appropriate database, SQL is executed to obtain the correct information for the provided username and password. There are four SQL definitions:
-
<password-query>— Requires a SQL statement that returns the password for a provided username.
-
<cookie-auth-query>— Provides the username for a specific cookie value.
-
<cookie-auth-update>— Allows the system to update the cookie for a specific username.
-
<role-query>— A SQL statement that returns a role value for a specific username.
The specific SQL statements should use the <input> tag names from the HTML form used to obtain the username and password.
If the username and password aren't found in the database, the error.html page is executed. In a production system, the error page will probably add the user to the database as appropriate.
|
EAN: 2147483647
Pages: 180