Chapter 5. Organizing Your Code
| | CONTENTS | |
- Evolution of a Programmer
- Code Blocks and Namespaces
- Modules
- Functions and Methods
- Putting Things Together
- Classes
- Packages
- Globals and the Global Statement
- Summary
Terms in This Chapter
|
|
In this chapter, we'll cover how and why you should organize your code. You'll learn about namespaces and code blocks and about modules, functions, classes, and methods.
Evolution of a Programmer
As your programs grow, or as you increase your understanding of Python, you'll use more of Python's organization features. For example:
-
You want to learn how to do a task, so you use the interactive interpreter to learn Python.
-
You want to automate a task, so you write a script. (See Appendix C on scripts.)
-
You want to reuse script functionality, so you organize scripts into different modules.
-
You want to use generalization and abstraction to reuse code common to many scripts, so you organize scripts into classes.
-
You want to share modules with co-workers or a development team, so you organize your modules into packages.
-
You want to use packages of modules from other sources and share your modules with others, so you organize your packages into other packages and into subpackages.
Even as your needs change, you'll still seek out the least sophisticated approach, even for more complicated tasks. For instance, you might write a script to do testing, or you might use interactive mode to learn a new module or to debug one you've already written.
Organizing Your Code
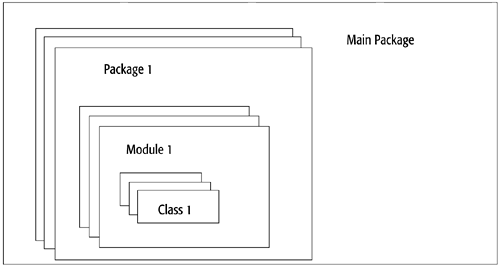
No matter how far you progress as a programmer, you'll need to know how to organize your code. In Python, you can organize your statements into functions and methods; your methods and data into classes; your classes, functions, and statements into modules; your modules into packages; and, lastly, your packages into other packages. Figure 5-1 illustrates this organization. The following sections show you how to achieve it.
Figure 5-1. Program Organization
NestingClasses can have other classes nested within them. Functions and methods can have nested classes as well as nested functions. Typically, the inner classes and functions in a method are small and serve a purpose only in the context of the class in which they nest. For example, in the following class definition, the class topclass has a member method, method(), which has an inner function, function(), which has an inner class, innerclass1. Notice that topclass has a second inner class, innerclass2. >>> class topclass: ... def method(): ... def function(): ... class innerclass1: ... pass ... class innerclass2: ... pass ... |
Code Blocks and Namespaces
Code blocks are pieces of executable Python code that you can think of as collections of statements. Modules, classes, and functions are all examples.
Modules may be scripts that execute only once. Since Python is unlike other languages in its lack of a main method, it starts executing code (program text) from the top of the module. To re-execute the module, you have to reload it.
Modules can contain classes and functions (both code blocks), which may be executed many times. Also, functions can contain classes as well as other functions, and classes can contain methods as well as other classes. Variables defined in a code block are associated with that code block's namespace.
The Main BlockPython may not have a main method, but it does have something similar, the main block, which looks like this: if __name__ == "__main__" #Put main code here Modules have a __name__ attribute, which contains the module name (e.g., sys, string, mymodule). The main block is called __main__ and is executed from the command line. Since a module is a code block, anything in it will be executed when it is run from the command line or imported from another module. __name__ thus limits execution to the main module. |
A namespace is a way to organize variables in a large program. It provides separate contexts for individual variables so that two with the same name can be used without one adversely affecting the other. Think of namespaces as directories on your hard drive. If there are two directories, user1 and user2, and both have a file named readme.txt, you can be sure that these are two different files one you access as \user1\readme and the other as \user2\readme.
Packages provide namespaces for modules and other packages. Say you create a module called sys but sys is also the name of a standard module. This can cause problems. However, if you put your sys module in a package called mycompany, you can access it via mycompany.sys without interfering with the standard sys module. Packages also provide namespaces for other packages, just as file directories provide namespaces for each other.
Modules provide namespaces for variables, classes, and functions. You might have a class called stats and download a class from the Web also called stats. You can use both classes in the same program because they're in their own modules my_module.stats and their_module.stats.
Similarly, classes provide namespaces for variables and methods. For example, a method called getMean() in a class called stat won't interfere with a function called getMean() in the same module.
We'll discuss namespaces and variable scope more later. The key point here is that Python allows you a lot of flexibility in program organization. It also gives you more control over how you manipulate and introspect your namespace.
Modules
Without defining them, we've been using modules since Chapter 1. These are files that contain Python statements and definitions (classes and functions) and can be imported into other modules or into the main module. Module files are identified by the suffix .py.
If you're a programmer coming from a Java background, you may think that a module is similar to a package. Once you work with Python modules for a while, you may think of them more as a cross between a package and a final public class (with all static variables and a private constructor).
Import
The import statement allows you to import classes, functions, and variables from one module into the current module's namespace. Table 5-1 describes its forms. Here is an example module, module1.py, which we'll use throughout this section to illustrate import.
def class1: def method1(self):
| Form | Description |
|---|---|
| import module_name Example: import module1 | Imports the module into the current module. Items can be accessed as module1.class1, module1.function1, module2.function2. Imports a definition from the current module but not the module itself. |
from module_name import class_name, func_name Example: from module1 import class1, function1 | Items can be accessed without the module name e as class1, function1; but module1.function2 needs the module name to be accessed. |
| from module_name import * Example: from module1 import * | Imports all of the definitions in the module but not the module itself. All items can be accessed without the module name as class1, function1, function2. |
def method2(self, arg1, rg2): self.attribute1 = arg1 self.attribute2 = arg2 def function1(): pass def function2(): pass def class1: def method1(self): pass def method2(self, arg1, arg2): self.attribute1 = arg1 self.attribute2 = arg2 def function1(): pass def function2(): pass
Breaking things down, we first go to the directory that holds module1.py. Then we start up a new Jython session at the command line.
C:\Pythonbook\samples\chap5>jython Jython 1.0.3 on java1.2fcs Copyright 1997-1998 Corporation for National Research Initiatives
On our first attempt, we use function1(), but that results in a NameError, which means that Python didn't find that function in the current namespace.
Next we try function1() with the module name, but again that produces a name error because module1 is not in the current namespace.
>>> module1.function1() Traceback (innermost last): File "<stdin>", line 1, in ? NameError: module1
So we import module1 into the current namespace and use function1() as follows:
>>> import module1 >>> module1.function1()
After we import module1, we can call function1() using the module1.function1() form.
>>> function1 Traceback (innermost last): File "<stdin>", line 1, in ? NameError: function1
Yet again, a name error. The problem is that to use function1() without the module name we have to import function1() from module1.
>>> from module1 import function1 >>> function1 <function function1 at -1811886282>
Finally, we use the from module import* form with module1 and then dir() to see the contents of the current namespace. Notice that all of the items in the module have been imported, even the variables string1 and number1.
>>> from module1 import * >>> dir () ['__name__', 'class1', 'function1', 'function2', 'module1', 'number1', 'string1']
ImmutabilityAlthough string1 and number1 are in the current namespace, they're not the same as the variables in module1. At first, they refer to the same object. >>> import module1 >>> module1.number1 is number1 1 returns 1 which means true However, they no longer both refer to that object once their values change. That's because they are immutable. Here's an example of number1: >>> module1.number1 = 600 >>> module1.number1 600 >>> number1 1 >>> module1.number1 is number1 0 >>> #returns 0 which means false Here's the same example using string1: >>> module1.string1 is string1 1 >>> string1 = "hi" >>> module1.string1 is string1 0 >>> module1.string1 == string1 0 >>> module1.string1 'Hello, how are you?' |
Module Search Path
So far, we've been importing modules from one place to another within the same directory they were written in. However, as you write more and more modules, you'll want to organize them across directories. You can do this as long as the modules are in your module search path the equivalent of the DOS PATH environment which tells Python where to look for Python modules.
For CPython, you set the module search path by declaring the PYTHONPATH environment variable. You can't do this in Jython because you can't access environment variables in Java. Instead, you access the search path in the registry file, which is similar to *.ini files in Windows or to the Windows registry.
You can edit the registry (C:\Jython\Registry) with your favorite text editor. The module search path is stored in a registry setting called python.path.
#Python Registry python.path=.; ... ...
In the example above, the registry setting points to the current directory only. If we want Jython to always search a directory called C:\Python\modules, we set python.path as follows (note the semicolons to delimit directories, as for the DOS PATH environment variable):
python.path=.;c:\\python\\modules;
This means that the current directory is searched first, then the C:\JythonLib directory.
sysThe sys module holds the current value of the module search path in the path variable. >>> sys.path ['.', 'C:\\Jython\\Lib'] |
Let's edit the python.path module to include C:\Python\modules. Open the registry file in your favorite editor, and set python.path to .;C:\\Python\\modules. Then start up an interactive session, and query the value of python.path.
>>> import sys >>> sys.path ['.', 'C:\\Python\\modules', 'C:\\Jython-1.0\\Lib']
To test if this is working, create the directory C:\Python\modules, and create a module called path.py.
def youfoundme(): print "You found me"
Put path.py in C:\Python\modules. Now go anywhere else in the directory. Start up the Jython interpreter, and try to import path.py.
C:\>jython Jython 1.0.3 on java1.2fcs Copyright 1997-1998 Corporation for National Research Initiatives >>> import path >>> path.youFoundMe() You found me
Because sys.path is a list, you can add paths at runtime.
WarningWhen Python is trying to import a module, it loads the first one it finds on python.path. That means that, if you have a module called path in your current directory that has the following listing: path.py listing of path in current path: print "Wrong one dummy" and you try to import it from that directory, you will get the wrong one. This can be a difficult problem to debug, especially if the first module in the path is an older version of the one you're trying to load. >>> import path Wrong one dummy |
Functions and Methods
Remember that a function is a code block and that code blocks are collections of statements. Methods are similar to functions, and you define them the same way. The only difference is that, unlike functions, methods are associated with classes and are defined within them. Because of the similarities, the terms function and method will be used interchangeably in this section.
Step by Step: Defining and Calling a Method
To define, or declare, a function or method, you enter the keyword def followed by the function name, a list of arguments enclosed in parentheses, and finally a colon. Next come the statements, which make up the body of the function. They start on a new line and, like all code blocks, are indented (if you don't indent, you'll get an error). The statements are where the action is.
Here's an example of a simple function, sayHello():
>>> def sayHello (strName): ... strHello = "Hello " + strName ... print (strHello) ... >>> sayHello("Mom") Hello Mom >>> sayHello("Dad") Hello Dad Here's the breakdown.
First we define a method called sayHello() with the argument strName.
>>> def sayHello (strName):
Then we add two statements. The first takes the string literal "Hello" and the function argument strName and concatenates them. It then assigns their value to the strHello variable.
... strHello = "Hello " + strName
The second statement prints out the value of strHello to the console.
... print (strHello)
Next we invoke this function a couple of times, each time substituting a value for strHello. Notice that we invoke this function the same way we invoke the built-in functions.
>>> sayHello("Mom") Hello Mom >>> sayHello("Dad") Hello Dad The sayHello() function doesn't return a value. In fact, all functions return None by default.
Now we'll create a function, sumNumbers(), that does return a value; it sums two numbers and returns the total.
>>> def sumNumbers(x, y): ... return x + y ... >>> sumNumbers(5, 10) 15
Of course, most functions are more useful, and more complex, than these examples. They can have any number of arguments and can be stored for later use by more than one program.
Calling Methods and Defining Arguments
There are three ways to call a method: by positional arguments, by keyword arguments, and by a combination of the two. There are three ways to define a method: with default values, with a variable number of positional arguments, and with a variable number of keyword arguments.
Consider the following method:
>>> def sayHello(name, title, message): ... print ("Hello " + title + " " + name + " " + message) ... It can be called using positional arguments:
>>> sayHello("Hightower", "Mr.", "How are you") Hello Mr. Hightower How are you or using keyword arguments (keyword=value):
>>> sayHello(name="Hightower", title="Mr.", message="How are you") Hello Mr. Hightower How are you
Keywords equate to argument names. You can use them in any order, which means that in the last example we could have put the message keyword in the first position.
>>> sayHello(message="How are you?", name="Hightower", title="Mr.") Hello Mr. Hightower How are you?
In the combined form, you can use one positional argument and two keywords.
>>> sayHello("Hightower", message="How are you?", title="Mr.") Hello Mr. Hightower How are you? Calling methods with keywords doesn't seem very useful; so far it just adds more typing. The payoff comes when you use keywords with default arguments.
Continuing the previous example, if we want default values for title and name, we first define our function with two default arguments.
>>> def sayHello(name, title="Mr.", message="Hello %s %s, how are you?"): ... print message % (title, name) ...
Now we can use the function with only one positional argument.
>>> sayHello("James Estrada") Hello Mr. James Estrada, how are you? If we need to, we can override the default values.
>>> sayHello("Mark Green", "Dr.") Hello Dr. Mark Green, how are you? >>> sayHello("Ally McBeal", "Ms.") Hello Ms. Ally McBeal, how are you? Notice that both of these functions use positional arguments.
Another way to override default arguments is with keywords. Let's say that we want to override the last argument from above.
>>> sayHello("Al McMeal", message="Hello %s %s, are you hungry, would you like to go to lunch?") Hello Mr. Al McMeal, are you hungry, would you like to go to lunch? This comes in handy when there are ten arguments with default arguments and you want to override only the tenth one.
This example won't work because name has no default value.
>>> sayHello(title="Mrs.", message="Hi %s %s, how are you doing? How is your husband?") Traceback (innermost last): File "<stdin>", line 1, in ? TypeError: sayHello() not enough arguments; expected
Putting Things Together
Recall from Chapter 4 that we wrote a function called getMean() that figured the average of a set of house prices. Well, we can change it to accept two default arguments. The first argument, sample, is a flag that tells getMean() if the set of numbers passed to it is from a sample of a population or the population as a whole. (The mean and the average of a sample are calculated differently.) The second argument, display, is a flag that tells getMean() to optionally display the results to the monitor.
getMean()
Here's getMean()() defined:
def getMean (nums, sample=0, display=0): for x in nums: sum = sum + x if(sample): average = sum / (len(nums)-1) else: average = sum / len(nums) if(display): print ("mean = " + 'average') return average Here are some examples:
#Define example sample and population numbers sample =(1,2,3,3,2,1,1,1,2,2,3,3,2,2,2,2,2,2,2,2,2,2,2,2) population=(1,2,3,3,2,1,1,1,2,2,3,3,2,2,2,2,2,2,2,2,2,2,2,2) #call with positional arguments populationMean = getMean(population, 0) #call using default arguments #call using default arguments sampleMean = getMean(sample) print ("population mean " + 'populationMean') print ("sample mean " + 'sampleMean') #call with positional arguments and print populationMean = getMean(population, 0, 1) #call using keyword arguments sampleMean = getMean(sample, display=1) The script (in the samples/chap5 directory) essentially demonstrates the use of keywords to include default and keyword arguments.
The following definition says in English, "Define a method called getMean() with three arguments":
def getMean (nums, sample=1, display=0):
The first argument, nums, holds the input numbers; the second, sample=1, tells getMean() whether or not this is a sample or a population; and the third, display=0, tells getMean() whether or not it should display the mean to the console. Remember that Python doesn't have a Boolean (true/false) type, so any nonzero value (1 above) equals true and a zero value (0 above) equals false.
if(sample): average = sum / (len(nums)-1) else: average = sum / len(nums)
Once again, in English this says, "If sample is equal to true, do the first equation to figure the mean; else, do the second equation." When this method is invoked without sample specified, the default is true. In that case, average = sum/(len(nums)-1 is invoked. If sample is false, average = sum/len(nums) is invoked.
The display argument works like the sample argument.
if(display): print ("mean = " + 'average') That is, "If display is true, print the mean to the console."
Variable Number of Arguments
Here we use the asterisk symbol (*) to define a variable number of nums arguments:
>>> def sum(*nums): ... total = 0 ... for num in nums: ... total = total + num ... return total ...
nums is a sequence, so it works with the for statement. The sum() function iterates through each num in the variable argument list.
At first it may look as though we could have used any sequence, but see how we call sum().
>>> sum(19,20,21) 60
Note that the variable number of argument declarations is of type Tuple.
>>> def func(*args): ... print type(args) ... >>> func() <jclass org.python.core.PyTuple at -801600693>
You can mix and match multiple arguments with the positional arguments, as in this nostalgic printf() example:
>>> def printf(format, *args): ... print format % args ...
Here are some other examples:
>>> printf ("Hi %s, how is %s?", "Martha", "Miguel") Hi Martha, how is Miguel? >>> printf ("Martha is %i, Miguel is %i", 30, 29) Martha is 30, Miguel is 29 Programmers, if you're familiar with C, you can see that C's printf() and Python's are similar. With the way we've defined printf(), you need at least one argument and can have as many as you like.
Variable Number of Keyword Arguments (with Dictionary)
Another way to declare multiple keyword arguments is with the double asterisk symbol (**).
>>> def printKeywords(**keywords): ... for item in keywords.items(): ... print item ...
You can use this function with any number of keyword arguments.
>>> printKeywords(name="Whit", eyes="blue", weight="28", age="2") ('age', '2') ('weight', '28') ('eyes', 'blue') ('name', 'Whit') The variable (i.e., changeable) keyword argument is a dictionary, which we can prove.
>>> def func(**args): ... print type (args) ... >>> func (arg=1, arg2=2, arg3=3) <jclass org.python.core.PyDictionary at -1146189863>
Variable keyword arguments (**) can be mixed and matched with variable positional arguments (*) and regular arguments to improve the workings of a function. Here's an example using printf():
>>> def printf(format, *args, **kargs): ... if(len(args)): ... print (format % args) ... elif(len(kargs)): ... print (format % kargs) ... else: ... print format ...
Now printf() can accept any number of keyword or positional arguments.
>>> printf("Hi %s", "Missy") Hi Missy >>> printf("Hi %(name)s", name="Missy") Hi Missy >>> printf("Hi Missy") Hi Missy Step by Step
Define a function, printf(), with one positional argument, format; one variable argument, args; and one variable keyword argument, kargs.
>>> def printf(format *args, **kargs):
Check if the args tuple has items in it.
... if(len(args)):
If so, use it in the format % args expression as the tuple in a string format operation. Print the expression.
... print (format % args)
If args is empty, check if the kargs dictionary has items in it. Print the resulting format % kargs expression.
... elif(len(kargs)): ... print (format % kargs)
If both args and kargs are empty, print the format string by itself.
... else: ... print format ...
if(args)In the printf() example, we used the statement if(len(args)): to determine whether the variable number of positional arguments was equal to zero. Instead, we could have used if(args) to see if the list has items in it, rewriting printf() as def printf(format, *args, **kargs): if(args): print (format % args) elif(kargs): print (format % kargs) else: print format Remember that an empty dictionary is equivalent to false in a Boolean test. Of course, you can also rewrite printf() to be very readable. def printf(format, *args, **kargs): if(len(args) > 0): print (format % args) elif(len(kargs) > 0): print (format % kargs) else: print format This approach makes the code a little verbose, but readability should win out. In six months when you need to read the code you wrote (to figure out what it's doing so you can change it), you'll be happy. |
Remember, functions are code blocks and code blocks are collections of statements. Default function argument values save time.
Classes
A class consists of data and the functions that act on that data. In classes, functions are referred to as methods. A way to understand classes is to think of them as functions with multiple entry points. In this way they provide data encapsulation.
You define a class with the class keyword.
class class_name: class_attributes
Classes can have many attributes. These attributes can be variables or definitions of either functions or other classes. For example, the definition of the class chapter has three variable attributes: number_of_pages, title, and toc.
class chapter: number_of_pages = 20 title = "Organizing your program" toc = ["Introduction", "Modules", "Functions", "Packages", "Classes"]
Notice that the class attributes are indented, just as the subordinate statements in an if statement are indented.
Class attributes can be accessed with the form class_name.attribute.
chapter.number_of_pages = 30 print `chapter.number_of_pages` toc.append("Scope and Namespaces") Classes can also have function definitions (book.py).
class chapter: """ Document String for chapter class """ number_of_pages = 20 title = "Organizing your program" toc = ["Introduction", "Modules", \ "Functions", "Packages", \ "Classes"] def print_me(self): print chapter.title + " " +`chapter.number_of_pages` for section in chapter.toc: print " " + section
Note here that the function definitions are indented to show that they're members of the class and that their subordinate statements are further indented to show that they belong to the functions. The point to remember is that indentation shows ownership or membership.
For Programmers: selfThe self argument to the print-me() method in the chapter class holds the reference to the class instance. It's similar to the this reference in Java or the Me reference in Visual Basic. |
Exploring a Defined Class
For this section, follow along in the interactive session by loading class chapter using the -i option in Jython. You'll find chapter in module book.py in directory chap5. Here's the prompt:
C:\python\book\chap5>jython -i book.py
Now enter
>>> dir() ['__name__', 'chapter']
The dir() built-in function with no arguments gives you the names in the current namespace. If we supply it with the argument chapter, it gives us chapter's attributes.
>>> dir(chapter) ['__doc__', '__module__', 'number_of_pages', 'print_me', 'title', 'toc']
The __doc__ attribute holds the class's document string; the __module__ attribute holds its associated module. The rest of the attributes are ones we defined for chapter. Note that print_me() is listed as an attribute.
We call a method of a class with the form class_name.method_name().
>>> chapter.print_me(None) Organizing your program 20 Introduction Modules Functions Packages Classes
This is similar to calling a regular function, the only difference being that the function name must be prepended with the class name. The syntax looks a lot like the syntax for calling a function in a module.
If we had imported the book.py module (instead of loading it at the command line with Jython), we would have had to use the module name to call print_me().
module_name.class_name.function_name. >>> import book >>> book.chapter.print_me(None) Organizing your program 20 Introduction Modules Functions Packages Classes
First Class ObjectIn the print_me() example, we passed the argument None. The first argument in a method usually refers to an instance of a class, but not here. Instead we're using the class itself because, in Python, the class is a first class object. |
To access the member variables in chapter we use the form class_name.variable_name. Again, the syntax is like that for accessing variables in a module.
>>> chapter.number_of_pages, chapter.title (20, 'Organizing your program') >>> chapter.toc ['Introduction', 'Modules', 'Functions', 'Packages', 'Classes']
Here we accessed both number_of_pages and title (the tuple format). Python returned a tuple containing the values of number_of_pages and title, respectively. Then we accessed the values in the member list called toc.
We can also change the attributes of a class.
>>> chapter.toc.append("Scope and Namespaces") >>> chapter.title="Organizing your code" >>> chapter.number_of_pages = 30 To confirm the changes, we run the print_me() function.
>>> chapter.print_me(None) Organizing your Python code into packages, modules, classes and functions 30 Introduction Modules Functions Packages Classes Scope and Namespaces
Class Instances
Say we want to create 20 chapter classes. To do this with what we've learned so far, we'd have to redefine chapter 20 times.
class chapter1: number_of_pages = 1 ... class chapter2: number_of_pages = 2 ... class chapter3: number_of_pages = 3 ...
Time consuming, isn't it? With what we're about to learn, we can instead create an instance of chapter for each chapter in our book.
Think of a class as a cookie cutter and an instance as an actual cookie. You use the cookie cutter to stamp the cookie out. With classes, stamping out the class instances is called instantiation.
When a class is instantiated, the instance shares all of its attributes. The attributes of both initially refer to the same objects, but the instance can also define its own attributes (just as you can decorate each cookie a different way). You access the instance attributes with the form instance_name.attribute. This form refers to the class attributes if the instance hasn't defined its own, or to its own if it has.
This concept is easier to show than to explain, so we'll instantiate our chapter class to illustrate. For the next interactive session, load module book.py using the jython -i option.
First we assign chap1 to the results of the class constructor expression, which is an instance of class chapter.
>>> chap1 = chapter()
For Programmers: No new KeywordThere's no new keyword in Python as there is in Java, C++, and Visual Basic. Therefore, the example >>> chap1 = chapter() is equivalent to the following in Java, C++, and Visual Basic, respectively: chapter chap1 = new chapter(); chapter *chap1 = new chapter(); Dim chap1 As New chapter or Dim chap1 As chapter Set chap1 = New chapter |
Here's how we access the members of chap1:
>>> chap1.title 'Organizing your program' >>> chap1.toc ['Introduction', 'Modules', 'Functions', 'Packages', 'Classes'] >>> chap1.number_of_pages 20
Note that all of these attributes are the same as those of the chapter class. So, is the instance of chapter the same as chapter itself? Let's see using the is identity operator.
>>> chap1 is chapter 0
Okay, chap1 is not the same as chapter, even though it has the same attributes. Or does it? We know that dir() lists the attributes of a module and a class. It also lists the attributes of an instance, so let's use it to solve this mystery.
>>> dir (chap1) [] >>> dir (chapter) ['__doc__', '__module__', 'number_of_pages', 'print_me', 'title', 'toc']
It looks like chap1 has no attributes at all, yet when we accessed its attributes we got back the values for chapter. What happens if we try to change a chap1 attribute? Does the class attribute change?
First let's change chap1.title and see what the title is.
>>> chap1.title = "Getting Started" >>> chap1.title 'Getting Started'
Next let's check the value of the chapter class's title.
>>> chapter.title 'Organizing your program'
chapter.title and chap1.title are no longer the same value. Initially, Python uses the class attributes for chap1. However, if we change an instance attribute, Python creates an attribute only for the instance, so we should now have a new attribute in chap1's namespace called title. Let's check this with the dir() function.
>>> dir (chap1) ['title']
As you can see, there's a new variable called title in chap1's namespace. Just as we thought. However, this technique works only for assigning new values. For example, if we append a string to the toc list, the instance doesn't get a new attribute.
>>> chap1.toc.append("Welcome to Python") >>> chap1.toc is chapter.toc 1 Notice that, even after we append a string to toc, chap1.toc and chapter.toc point to the same object. But what about this:
>>> chap1.toc = ["Do not fear", "What is Python", "Why Python"] >>> chap1.toc is chapter.toc 0
It shows that assignments change what an instance's member variables refer to.
Let's wrap up this interactive session.
>>> chapter.number_of_pages is chap1.number_of_pages 1 >>> dir (chap1) ['title', 'toc']
This shows that, since number_of_pages was never assigned a value in chap1, the chapter and chap1 attributes for it point to the same object (they're actually the same reference). It also shows that chap1 has the title and toc attributes in its namespace but not number_of_pages.
Constructor (__init__)
The __init__ method, if present, is called when an instance is first created or constructed. It's the constructor, and its arguments are the same ones passed to the class constructor expression. __init__ is usually used to define (i.e., initialize) instance variables.
For example, this class constructor expression passes the title argument to __init__:
chap1 = chapter(title="Introduction")
Let's define our chapter class with a constructor that takes three arguments for each instance variable. Notice that we've removed the class variables and are using only instance variables. (Compare this example, book1.py, to our earlier example, book.py.)
class chapter: """ Document String for chapter class """ def __init__(self, title="", numPages=0, toc=[]): self.numPages = numPages self.title = title self.toc = toc def print_me(self): print self.title + " " + `self.numPages` for section in self.toc: print " " + section
Here we've defined a constructor that initializes all of an instance's attributes. Note that chapter's constructor uses default arguments to initialize the member variables. Remember that the self argument refers to the current instance.
Below we create an instance of chapter and set its title to Getting started. When calling a constructor, you don't pass a value for the positional self argument.
>>> chap1 = chapter("Getting started") >>> chap1.print_me() Getting started 0 Next we create an instance of chapter and set its title to Fundamentals, its number of pages to 20, and its table of contents to Literals, Types, and Lists.
>>> chap2 = chapter("Fundamentals", 20, ["Literals", "Types", "Lists"]) >>> chap2.print_me() Fundamentals 20 Literals Types Lists Now we create an instance of chapter with the title Operators and set the table of contents to String operators and Arithmetic.
>>> chap3 = chapter(toc=["String operators", "Arithmetic"],title="Operators") >>> chap3.print_me() Operators 0 String operators Arithmetic
Destructor (__del__)
The __del__ method is the destructor, which is called when the class instance is about to be destroyed.
class chapter: """ Document String for chapter class """ def __init__(self, title="", numPages=0, toc=[]): self.numPages = numPages self.title = title self.toc = toc def __del__(self): print "Leaving" def print_me(self): print self.title + " " + `self.numPages` for section in self.toc: print " " + section chap = chapter() chap.print_me() del chap
Encapsulation with Private Variables
One of the things that separate classes from records or structures in other languages is the concept of encapsulation. Encapsulation hides the implementation details of your class and in doing so reduces code coupling. Coupling is bad.
Let's say, for example, that you create a simple address book class that downloads all of the addresses from a corporate database and stores them in a list called names. Other programmers who use your class simply access this names list.
Well, imagine that the company you work for has just landed some major accounts and is hiring more employees. Now you want to change your address book class to work with a middleware server that connects to the database and helps you cache addresses based on usage and changes. You also want to provide a dictionary-like object to work with the names list. You do all this, but when you change the names over to the dictionary object, all the other company programmers' code stops working. This is coupling, and you can see why it's bad.
To reduce coupling you want to hide the implementation details of your class and provide a well-defined interface to outside users. Private variables and private methods allow you to do this because they aren't visible outside the class in which they're defined.
A well-defined interface to your class is a collection of public methods for class access, but it prohibits access to the private variables to limit the number of things that can go wrong. Consider if everyone had access to every variable in your class the number of potential problems would be staggering. By limiting variable access to well-defined methods, you better control the internal state of your class and minimize such problems. If something does go wrong, you're more likely to know which method to fix.
What all this comes down to is good code organization. Packages allow you to organize your modules, on the basis of functionality or services, so that you don't run into naming conflicts with other programmers.
There's no keyword to declare a variable or method as private. Rather, you prepend a double underscore to the variable or method name. Here's an example (module book2.py):
class chapter: """ Document String for chapter class """ def __init__(self, title="", numPages=0, toc=[]): self.__numPages = numPages self.__title = title self.__toc = toc def print_me(self): print self.__title + " " + `self.__numPages` for section in self.__toc: print " " + section
Below we define the three instance variables as private, which means that they can't be viewed with the dir() function.
>>> from book1 import chapter >>> dir (chapter) ['__doc__', '__module__', 'print_me']
Packages
Packages are a way of organizing Python modules and a way to prevent one programmer from stomping on the module of another. You assign a module to a package with the form Package_Name.Module_Name. Thus, the module name mystuff.sys indicates a module named sys in a package named mystuff.
Packages are essentially directories that contain a special __init__.py file to indicate to Python that the directory it's dealing with is a package. This file is used when the package is first loaded. Let's create our own package and call it package1/__init__.py.
First we create a directory called package1. Then we create a file named __init __.py with one Python statement that prints "Hello from package1", and save it to the package1 directory. Next we create a module called module1 in package1 and put in it a Python statement that prints "hello from module1 in package1". In module1, we define one do-nothing function and one do-nothing class named class1 that contains a do-nothing method named method1.
Here's package1/__init__.py.
print "Hello from package1"
Here's package1/module1.py:
print "hello from module1 in package1" def function1(): pass class class1: def method1(): pass
Make sure that the package1 directory is in the module search path. Then move out of package1 and fire up the Jython interpreter.
>>> from package1.module1 import class1 Hello from package1 hello from module1 in package1 >>> dir() ['__name__', 'class1']
Here we see that the code in __init__.py and module1 is executed when we load class1.
Now exit and restart the Jython interpreter and try this:
>>> import package1 Hello from package1 >>> dir() ['__name__', 'package1'] >>> dir(package1) ['__file__', '__name__', '__path__'] >>> vars(package1) {'__file__': 'C:\\python\\book\\chap5\\.\\package1\\__init__.py' , '__path__': ['.\\package1'], '__name__': 'package1'} Notice that, when we import the package, its __init__.py module is executed. Look at the package's namespace. (Remember that the vars command is like the dir command except that it lists the namespace's names and values.)
Within __init__.py you can define a list called __all__, which is used with package import* to tell Python to import all modules in this package. Actually, Python imports all modules listed in the package's __all__ list, so if you want to import a module with the * command, you have to put it in __all__.
Packages can have subpackages. These are subdirectories under the package with __init__.py modules. Since __init__.py is part of the package, the package can contain anything that you find in a regular module, such as classes and functions.
Globals and the Global Statement
The word "global" strikes fear in the hearts of object-oriented programmers (and structured programmers, for that matter). That's because global variables variables that are in a global namespace (one that's available to all modules, functions, and classes) are usually a bad thing and should be avoided.
In fact, there aren't any real global variables in Python. All variables have to be in the context of a module, class, or function. However, Python does have a global statement, which allows you to share variables between functions in the same module.
Here's an example that has two functions and a module-level variable:
var = "hi" #module level variable def sayHi1(): print var def sayHi2(): print var def sayHiMom(): var = var + " Mom" print var
Both sayHi1 and sayHi2 work, but sayHiMom doesn't. To make it work you have to import the var variable into the functions' local namespaces, using the global command like this:
var = "hi" #module level variable ... ... def sayHiMom(): global var var = var + " Mom" print var
There's nothing wrong with using the global statement to import module-level variables into a function's namespace.
Summary
In this chapter, we learned about the benefits and methods of organizing your code. We explained namespaces, code blocks, and working with namespaces for modules, functions, classes, and methods. We also discussed the import statement, which allows you to import objects from one module to another, and the global statement, which allows you to import module-level variables into a local namespace.
| | CONTENTS | |
EAN: 2147483647
Pages: 25