Odds and Ends
|
| < Day Day Up > |
|
Now we come to a short collection of essentially unrelated items that did not make it into the book elsewhere, either because I hadn’t yet introduced the necessary skills when the relevant topic came up, or because this was the most appropriate place for it. In any case, all of the topics here, though unrelated to one another, are worth a mention.
Running Java Applets
While the Mozilla browser is capable of dealing with Java commands, it is not capable of running Java applications, or applets, as is. Such applets come in many forms. Most browser-based online games, for example, are Java applets. If you’ve ever looked for a house online and took a virtual tour of one the listings so as to have a look around the place, you also were most likely using a Java applet.
In order to use Java applets in Fedora Core, you need to install two components: the Java Runtime Environment (JRE), and a plugin so that Mozilla knows where and how to access the JRE. In the past, gettting the JRE successfully up and running in Linux was quite the pain, and the many “how do I. . .” questions on the various online Linux forums is testimony to that fact. Fortunately, the DAG respository now has both the JRE and Mozilla JRE plugins available as RPMs, thus making everything clean and easy.
To get both files, go to http://dag.wieers.com/packages/j2re and download the most recent JRE file. The JRE file is quite big at 18.8MB, so be prepared for a somewhat lengthy download. The Mozilla plugin will prove a much quicker download, as it is only a 198KB file. It is available on the same page as the JRE, but closer to the bottom.
Once you have downloaded both files, it is easy enough to install them via the double-click method you learned in Chapter 8. As the Mozilla-j2re RPM is dependent upon the j2re RPM, you will have to install the j2re RPM first. After you are done, you will probably want to test things out to make sure that all went according to plan. For a quick, easy, and totally off-the-wall example of a simple Java appet at work, go to http://java.sun.com/applets/other/BouncingHeads. Once you get there, be a bit patient because, depending on the speed of your Internet connection, it will take the applet a bit of time to load and then start running.
Checking ISOs with md5sum
Now that you are a Linux user, you will no doubt download future versions of Fedora Core in the form of ISOs from the Internet. Most download sites also provide what is called a checksum, or md5sum, file that you can use to check the integrity of the downloaded ISOs. The question most newbies have, however, is how to check the integrity of their newly downloaded ISOs with that file.
Here’s how to do it.
Place the ISOs and the md5sum file in the same folder. It doesn’t matter if there are other files, or even different ISOs, in that folder or not — just make sure there are no other md5sum files in that folder. Next, open a Terminal window and type this command:
md5sum -c MD5SUM
If your md5sum filename uses lowercase letters replace MD5SUM with md5sum. Then press ENTER. The output in your Terminal window should look something like that in Figure 19-8.
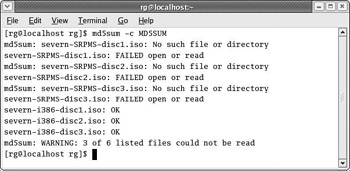
Figure 19-8: md5sum results in the Terminal window
As you can see in the example, the md5sum of the Fedora Core beta (codenamed Severn) checks not only for the main installation ISOs, but also for the source ISOs. As I did not download the source ISOs, md5sum could not find them. It did, however, find the three installation ISOs I had downloaded, checked them, and found them to be okay.
Man Pages
As you make your way through the Linux world, you are eventually going to hear mention of man pages. Man (manual) pages are basically the original Linux online documentation system, and you will discover that there is a man page for almost every application and command on your system.
Despite the fact that man pages are loaded with just about all the pertinent information you would ever need to have, there is a rather problematic aspect to the whole thing: Man pages are nearly impossible for newbies to understand. Fortunately, you can pretty much get by without using man pages in the beginning, as there are usually other forms of help available (README files in tarballs or GNOME and KDE documents, for example).
However, as you get more and more used to your system and you have a bit more of an understanding of the world of Linux, you might actually come to understand the contents of the man pages, little by little. Man pages are opened and viewed through your Command Terminal. To view a man page, you just type the word man followed by the name of the command, application, or utility you want to find out about. For example, to see the man page for the cp (copy) command, you would type man cp and then press ENTER.
As you can see in Figure 19-9, the man page will open up in your Terminal window. To scroll up or down through a man page, just use the up and down cursor keys; to move up or down a page at a time, use the PAGE UP and PAGE DOWN keys. Finally, when you get to the end of a man page and you want to get back to the normal Terminal window and your now-familiar user prompt, just press the Q key.
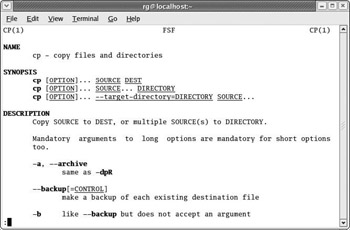
Figure 19-9: The man page for the cp command
If you would like to see a complete collection of the standard Linux man pages set in HTML format (with a clickable index), have a look at http:// linux.ctyme.com.
Checking the Ink Levels on an Epson Printer
Finally, we come to one last utility that may be of value to many readers, as Epson inkjet printers are pretty common. If you are using an Epson inkjet printer and would like to know how to check your printer’s ink levels, you can download and install the gimp-print-utils package with Synaptic/APT by typing gimp-print-utils in the Find box. This package includes the escputil program.
To use the program, first check the device location of your printer in the Hardware Browser. Start the Hardware browser by going to the Main menu and selecting System Tools > Hardware Browser, and once the browser is open, click Printers in the left pane. Your printer will probably be /dev/lp0.
Once you know your printer’s location, open a Terminal window, become root, and then type escputil -r /dev/lp0 -i (changing the device location if yours is different) and press ENTER. Once you’ve done that, your present ink levels will appear in your Terminal.
|
| < Day Day Up > |
|
EAN: 2147483647
Pages: 188