Managing a Single Standalone Server
|
In this section, we're going to walk you through a number of common management tasks. The purpose of this is mostly to familiarize you with how administration is performed. We will focus in this section on just a single, standalone application server – one that has not been federated into a cell.
Starting and Stopping the Server
In the single server configuration the application server is the only process (unless you have other application servers running at the same time – the point is each application server is independent; they don't know about each other). No other process executes in the environment that can take responsibility for starting or stopping the application server. Consequently you have to start and stop the application server manually. The easiest way of doing this in Windows is from the Start menu.
You can also start and stop the server from the command line using the startserver and stopserver commands located in the \bin directory of the \AppServer install directory. You need to specify the name of the server that you want to start and stop when using this command. The default server created for you when you first install WebSphere is called server1. This is also the server that the Start menu items for Start the Server and Stop the Server assume as well:
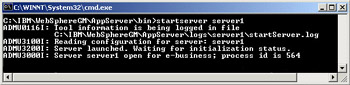
If you have defined other servers, then you will need to use the command-line approach for starting and stopping these servers, specifying the server's name on the request.
Starting the Admin Console
The admin console is presented by the Administration application. This application is installed by default in the application server created when you install the base WebSphere Application Server product. The Admin app is started automatically along with any other applications configured to run in the application server when the application server is started. So starting the admin console is really a matter of pointing your browser to the URL of the Admin application. By implication, you cannot access the admin console if the application server on which it is hosted has not been started (or if the Admin application is not in the configuration of hosted applications for the application server).
As with starting the application server, on Windows the easiest approach to starting the admin console is through the Windows Start menu.
If you start the admin console directly through your own browser instance, you typically find the admin application at: http://localhost:9090/admin/ if you're accessing it from the same computer. Note that the admin console is configured in its own virtual host and so you will have to specify the port address of that node – port 9090, by default, as opposed to 9080 for other applications hosted on that server.
Signing In and Out of the Admin Console
The first thing you will have to do upon accessing the admin console is to login. If security is disabled, you will only have to specify your user ID. This identity is not authenticated or verified against any user registry. If security is disabled, it is presumed that you are trustworthy (the absence of security implies that you don't feel the need to validate the authenticity of your users), and so the login identity is only used to differentiate the workspace that belongs to you. If another user logs-in with your user ID they will be able to see your workspace, so if this bothers you then consider enabling the security system.
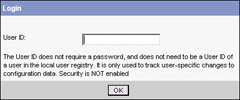
If, on the other hand, security has been enabled, you will be prompted for both a user ID and password when logging into the admin console. The user ID and password you enter will be authenticated against the user registry that is configured for the application server.
When leaving the admin console you should log-out. This can be done at any time by pressing the Logout system menu item on the admin console
If you have any outstanding changes in your workspace you will be prompted to save these changes.
Configuring Resources
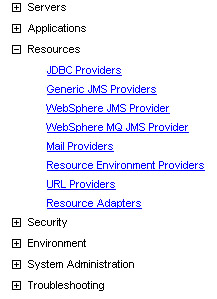
Before installing an application it is a good idea to install and configure the resources that your application will use in your hosting environment. If you have database and data sources, resource adapters (connectors), JMS implementations, mail providers, or URL or environment providers you can register these in the Resources task section of the Admin UI:
Depending on the resource type the registration and configuration process will differ slightly. As a general rule, the registration process will involve first identifying the resource manager itself, and then one or more connection facilities – data sources, connection factories, queue and topic factories, and so on. The latter are named in JNDI and then can be used later to resolve resource references in the application to these specific named connection facilities.
Follow the specific directions of the resource registration wizard to register a resource.
Configuring the Application Server
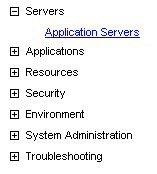
You can configure the application server by selecting the server from the Servers task section of the Admin UI:
Selecting your server, you will be presented with a notebook page listing all of the common and detailed configuration options that you can set for the server:
The general attributes of the application server are listed at the top of the page, and the additional more detailed attributes are listed separately in the topics in which they're relevant:

We won't go into all of the configuration options that are available here, but as you can see from the list of available property topics, you have a great deal of control over how the application server behaves. You should spend some time navigating the admin console and getting to know the options that are available to you. The help text for each of the properties goes into more depth, explaining the available values and consequences.
Configuring Additional Application Servers
Even if you are running in a single server configuration, you can create the definition and configuration of more than one application server. This is merely a convenient way of creating other configurations – it is at best a partial substitute for managing multiple application servers. You create additional server configurations by clicking New in the Application Servers task section.
This will then prompt you for basic information about the new server – including the server and node that you want to create the server on. If you are in a single server configuration (without working through a deployment manager), you can only create servers on the same node as the previously existing server:

You can use any of the existing servers or defined templates to set the default values of the configuration of the new server. If you create a server using another server's configuration as a starting point, then the entire configuration will be used, including any applications installed on that server – only the server's name will be changed, and any new ports that are generated if the Generate Unique HTTP Ports option is selected.
Templates are base configurations that WebSphere uses to create its own initial servers. As with existing servers, if you use one of the templates you will get whatever configuration is associated with the template.
Once you press Next you will be presented with a summary page and allowed to finalize the creation request:

Press Finish to create the new application server.
The configuration you create will be retained in the local host repository on the same computer as your current application server. You will be able to then start another application server instance with the configuration you create. You can then manage that application server's configuration from either server. The WebSphere management facility does not directly prevent one administrator from changing the configuration of the other application server instances. Consequently, if you want to create different application server configurations for multiple application servers within the same installation root and isolate them – say, dedicating each application server configuration to a different administrator, you should do so by placing different permissions on the sub-directories of the individual servers in the file system of your computer.
Installing an Application
One of the most frequent tasks that you will perform is installing an application. This is initiated in the Applications task section under the Install New Application task:
You can install an application from either the computer on which you are running your browser, or from the computer on which the application server is installed. In many cases this will be the same. The Admin application does not allow you to browse the file system on the application server in a single server configuration – you are expected to know the path and EAR file name of the application you want to install if you are installing from the computer of the application server in a single-server configuration.
You can install either a standalone web application (WAR) file or EJB application (JAR) file – either of which will be wrappered implicitly into an enterprise application (EAR) during the installation process – or you can install an enterprise application (EAR) file. If you are installing a standalone web application (WAR), then you must specify the context root for that application. Otherwise, the context root will be taken from the enterprise application for any web applications in the EAR – the context roots are formulated when you assembled the EAR.
Once you've found your application file and pressed Next, if you are installing from your browser's local file system, the application will be uploaded to the application server. You are then prompted for some general installation directions:
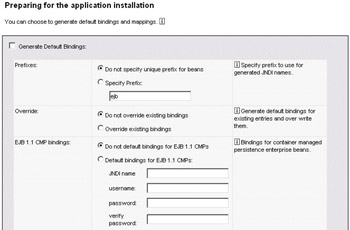
If you select the Generate Default Bindings checkbox then the installation task will fill in default bindings for any incomplete bindings in the application archive. All of the intermediate steps that let you specify the bindings for any un-bound references in the application will be bypassed if this box is checked.
If you want all JNDI names created for EJBs in your application to be prefixed with a tag that distinguishes those names then you can select the Specify Prefix radio button. If you leave the radio button on Do not specify unique prefix for beans then the JNDI names for EJBs will not be prefixed at all – they will just be given the names as specified in the EJB home for those beans.
The bindings that have already been established for the enterprise application (presumably during application assembly) will be preserved unless you select the Override existing bindings radio button. This option is primarily only relevant if you select Generate Default Bindings. If you opt not to generate default bindings then you will be given the opportunity to override any of the previously recorded bindings in the EAR during a subsequent step in the installation wizard.
Default bindings for any Enterprise beans in your application that are designated to use the EJB 1.1 CMP semantics will not normally be automatically generated – you will be prompted to supply the binding information for these beans unless you select the Default bindings for EJB 1.1 CMPs and fill in the default binding information.
Likewise, default connection factory bindings are not normally generated unless you select the Default connection factory bindings radio button and fill in the default binding information:
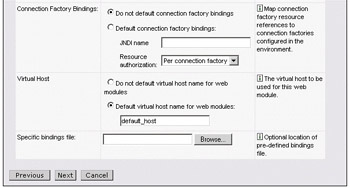
Default virtual host information is normally filled in for your web applications unless you select the Do not default virtual host name for web modules radio button. If you want a different default virtual host filled in you can change the name under the Default virtual host name for web modules radio button.
You can pre-define the bindings for any references in your application and store these in a separate bindings file. If you want installation to use this bindings file during the installation of your application then you can specify that under Specific bindings file. The installation wizard will use the information in this file in lieu of prompting for that during the installation process.
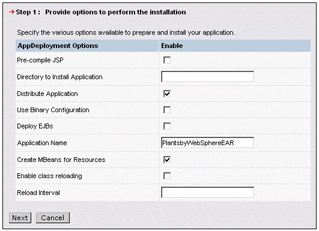
When you're ready to proceed with the installation you can press the Next button. This will take you to the first step of the installation wizard:
-
Pre-compile JSP – indicates whether any JSPs in your application should be pre-compiled during the installation process. Pre-compiling your JSPs saves having to compile them during run time.
-
Directory to Install Application – if you want your application installed to a specific directory you can fill that directory path in here. You can specify a relative directory path – the directory path will be created relative to the installation root of the application server. Obviously, you need to be careful not to specify a path that would interfere with other directories used by the WebSphere runtime. Or you can specify an absolute directory path to anywhere in the scope of the computer of the application server. If you don't specify a directory, WebSphere installs the application in the \installedApps directory under the WebSphere installation root.
-
Distribute Application – tells the Deployment Manager whether to distribute your application binaries to the application server as part of the repository synchronization process. This option is not relevant in a single server configuration.
-
Use Binary Configuration – configuration information specific to the application and created during application assembly is kept in two places: in the configuration repository and in the application EAR itself. Setting this option to true instructs the application server runtime to get the configuration information directly from the EAR. This has the advantage that you can re-deploy the application (with a new configuration) by simply updating the EAR file in the repository. This has advantages in a development environment where you'd like to shorten the path to re-deployment. On the other hand, WebSphere may support deploying the same EAR multiple times to different servers (each with a different configuration) in the future. To retain the differences between each deployment, the runtime will have to get this configuration information from the repository. For now, there is little difference. We recommend that you set it to true for development environments, and false for production environments.
-
Deploy EJBs – directs the installation wizard on whether to deploy (generate CMP mappings and runtime binding – tie and skeleton – files during installation). This option only affects EARs that contain EJBs that have not already been deployed during the application assembly process.
-
Application Name – the name of the application that will be displayed on any UIs representing the application.
-
Create MBeans for Resources – if checked, will create an MBean.
-
Reload Interval – specifies how often the web components of this application should be re-loaded in the memory of the application server.
The remaining steps of the installation process are optional. They are listed by step title:

-
Step 2: Provide JNDI Names for Beans
Allows you to change the default JNDI names created for each of the beans supported by your application. -
Step 3: Provide default datasource mapping for modules containing 2.0 entity beans
This is where you will specify the default data sources that will be assumed by the runtime if no other specific data sources are defined. If you will use any data source other than what's defined for the application in the EAR (during the assembly step), you must have registered the data source with WebSphere before installing this application (actually, before saving the configuration workspace produced during this installation). -
Step 4: Map data sources for all 2.0 CMP beans
Defines the specific data sources for every Entity bean that uses CMP. If a specific data source is not specified for each bean, then the default data source for the module as specified in Step 3 will be used. If you will use any data source other than what's defined for the application in the EAR (during the assembly step), you must have registered the data source with WebSphere before installing this application (actually, before saving the configuration workspace produced during this installation). -
Step 5: Map EJB references to beans
Establishes the mapping between the bean references (JNDI java:comp names) you use in your application and the actual beans that should be resolved by that name. If you will use any beans in another application, that application must have been installed before you install this application. -
Step 6: Map resource references to resources
Identifies the mapping between the resource references (JNDI java:comp names) you use in your application and the actual resources that should be resolved by that name. If you will use any resources other than what's defined within the application EAR (during the assembly step), you must have created and registered those resources before installing this application. -
Step 7: Map virtual hosts for web modules
Lets you specify the virtual hosts that you want mapped to each web module in your application. You must have specified any virtual hosts that you want to use before installing this application. -
Step 8: Map modules to application servers
Is where you identify which application server (or cluster, in the case of installing into a cell deployment manger) you want the application to be hosted on. In a single server configuration you can only configure an application to be hosted on the application server that you're managing. -
Step 9: Ensure all unprotected 2.0 methods have the correct level of protection
If any methods of your application have not been assigned a role policy during application assembly, this step can be used to assign method permissions. The installation process will not allow you to complete the installation process unless every method has a role policy – either a specific method permission that establishes the role a user must have to access the method, or a specific policy claiming the method is not protected or should not be allowed to any principal. -
Step 10: Summary
Summarizes the installation options selected for the application. When you press the Finish button on this page the configuration will be updated with the application being installed.
The actual number of steps presented to you will depend on the nature of your application – some applications require more or fewer steps to install. For example, if there were any 1.x EJBs in the application then there may be other steps for establishing how you want those beans mapped. Similarly, if there are any Web Services in your application there will be other steps for resolving the Web Service bindings to your service implementations. On the other hand, if you application does not contain any web application components, or conversely does not contain any EJBs, then those related steps will not be presented to you.
Actually, the configuration is updated in your workspace – you must subsequently save your workspace before the configuration change that represents the inclusion of your application will actually be applied to the configuration repository for the application server.
Starting and Stopping the Application
Once you've installed a new application (and saved the configuration to the local repository), the application will be in the "stopped" state. You can view the states of all applications by selecting the Enterprise Applications task within the Applications topic:
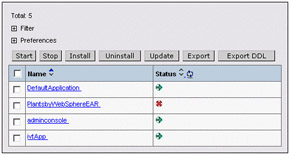
You can start any stopped applications by selecting the checkbox for the application and pressing the Start operation button. Likewise, you can stop any application by selecting the application and pressing the Stop operation button.
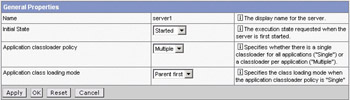
Configuring the Application
You can modify the configuration of an application by selecting the application from the Enterprise Applications tasks menu:
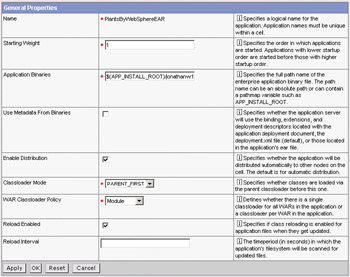
The general properties define the basic characteristics of the application:
-
Name – the display name of the application
-
Starting Weight – the starting weight is used by the application server to determine which order to start the applications in. Applications with the greatest weight are started first, and so forth. Applications with the same weight are started in an unspecified order.
-
Application Binaries – identifies where the binaries for the application are located.
-
Use Metadata From Binaries – indicates whether the application-specific configuration will be taken from the application binaries, or from the configuration repository. This has less relevance in R5.0 of WebSphere, but suggests that WebSphere will support multiple deployments of the same application in the future, and when it does each deployment will have a different set of configuration information (although that will require the configuration information be retrieved from the repository, not from the application binaries).
-
Enable Distribution – WebSphere will automatically distribute the application binaries to the node(s) on which the application is configured if this option is enabled.
-
Classloader Mode – identifies the precedence order that will be used by the class loader for this application. This only applies if the application server has been configured to use a separate class loader per application. Otherwise, the precedence order set for the server takes priority.
-
WAR Classloader Policy – specifies whether a single class loader is used for the entire application, or one per module of the application. This option is ignored if the server configuration indicates that only one class loader is to be used for all applications in the server.
In addition, other properties can be configured for the application. These are organized by topic area:
-
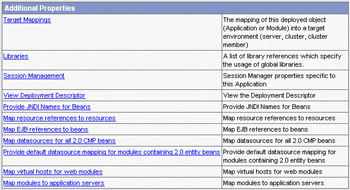
Target Mappings – Identifies the server (or cluster, in the case of ND) to which this application is configured to run. Individual modules of the application may be configured to application servers or clusters – see Map virtual hosts for web modules.
-
Libraries – shared libraries used by this application.
-
Session Management – defines how HTTP sessions are to be managed for this application.
-
View Deployment Descriptor – allows browsing of some high-level deployment information for the application, including the JARs and WARs included in the EAR, and the context roots associated with any web applications.
-
Provide JNDI Names for Beans – specifies the JNDI name for each of the beans in your application. You can change the names of your beans on your deployed application, but you have to be careful of the effect this will have on other applications that may use references to your beans.
-
Map resource references to resources – defines the JNDI name mappings for each of the resource references in your application. This can be used to change the mappings after the application has been installed.
-
Map EJB references to beans – allows you to review and update the JNDI name mappings for each of the bean references in your application. You can change the mappings after the application has been installed to make use of different bean implementations.
-
Map datasources for all 2.0 CMP beans – identifies which data source to use for each of the beans defined in your application.
-
Provide default data mapping for modules containing 2.0 entity beans – specifies the default data source for your beans. This datasource will be used if you have not specified anything more particular in the Map datasources for all 2.0 CMP beans page above.
-
Map virtual hosts for web modules – enables you to specify the virtual host for any web modules in your application.
-
Map modules to application servers – defines which server each module in your application should run on.
Configuring the Problem Determination Facilities
You can control the way the facilities for problem determination (that is, finding and analyzing problems in the WebSphere runtime) work within WebSphere. Open the Troubleshooting task section in the navigation pane. To change the logging behavior, select Logs and Trace task item, and the server that you want to configure – these options are controlled on a server-by-server basis:
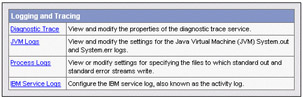
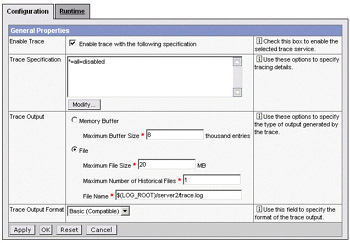
You can turn on tracing from the Diagnostic Trace page. From here you can specify what level of tracing you want and for which components by defining a series of trace filters. In addition, you can indicate whether you want trace records to be cached in an in-memory buffer, or written out directly. In either case, you specify the file that you want trace records written to – in the case where you've selected the in-memory caching option, records will first be written to the buffer, and then written out to file when the buffer is full. This runs the risk of losing some records if the server should fail, but it is otherwise more efficient as it avoids file I/O in the middle of your transactions. In either case, you should only turn tracing on with some care, as it will impact on the performance of your server.
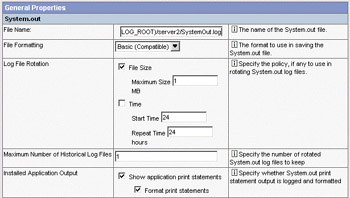
The logs can be configured by selecting JMV Logs. This allows you to configure the System.out log:
and the System.err log:
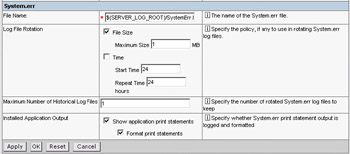
For either you can specify the name of the log file where you want message and error records to be recorded, whether you want to file to roll over at a certain size threshold or after a certain amount of time, the maximum number of files to keep as history (beyond the currently active log file), and whether you want application println() output to be piped to the same file (for both System.out.println(), and System.err.println() statements in your applications).
In addition, for (System.out) messages, you can control whether you want the resulting records to be formatted in the style used for WebSphere R4.0, or in an advanced structure that allows for deeper analysis and solution determination.
You can also view the message and error logs by selecting the Runtime page tab:
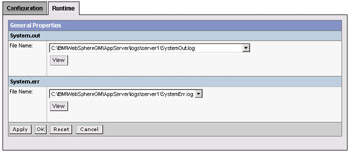
and then pressing the View button for the log that you want to view.
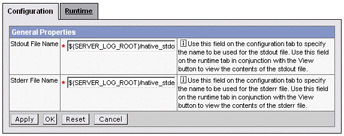
You can change the name of the Stdout and Stderr files by selecting Process Logs.
Finally, you can configure the behavior of the IBM service log (also referred to as the 'Activity Log') by selecting IBM Service Logs.
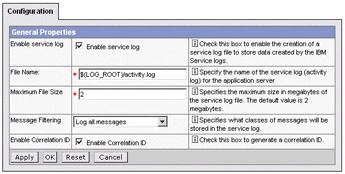
This can be used to specify whether service logging will be performed, the name of the service log, its maximum size, what level of messages will be logged, and whether to enable correlation. If you run into a problem with WebSphere that you want to report to IBM you may be asked to provide this log. The more information captured in this log, the better. However, this does represent another level of background activity that does have some, at least minimal, impact on the performance of your system even if you don't have a problem.
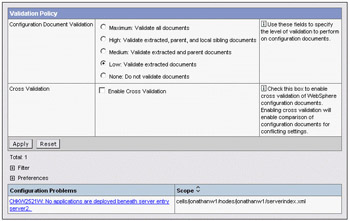
WebSphere will check the validity of your configuration documents every time you save a configuration change. You can specify the level of configuration checking that you want WebSphere do to by selecting in the Configuration Problems menu:
You can direct WebSphere to monitor request metrics (essentially response time measurements on web application and EJB requests). You can configure this by selecting the PMI Request Metrics task. These metrics will then be accumulated and can be obtained through the JMX interfaces for PMI (although they are not displayed in the Tivoli Performance Viewer tool.
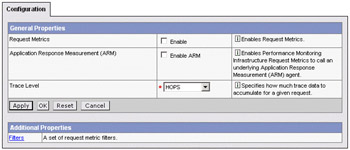
In addition, if you have an Application Response Monitoring (ARM) provider, you can enable ARM tracing. WebSphere will then issue ARM requests through the standard ARM interface.
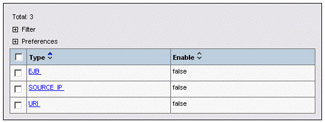
If you enable PMI Request Metrics, you can filter response time monitoring to only collect information for specific EJBs, specific IP source addresses, or to specific web application URIs.
Configuring the Admin Console
You can customize the admin console itself by selecting the Preferences system menu item. These customizations will be unique to you – based in the identity that you logged in to the console with.
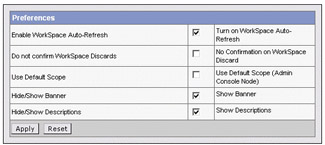
From this page you can control whether your workspace will be automatically refreshed from the master repository as changes occur there. You can suppress the prompt confirming that you want to discard configuration changes in the event that you press the Discard button on the Save Configuration dialog box. The Use Default Scope setting will instruct the admin console to presume the cell and the node on which it is running is the scope of any collections presented by the console, if enabled. You can remove the IBM WebSphere logo banner from the top of you pages, and you can direct WebSphere to either provide detailed description text or to suppress this on configuration object menus.
You can also control how the status window is controlled by opening the Preferences expansion button on the status window:
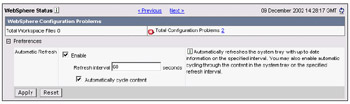
From here you can indicate whether you want the status window refreshed automatically, and how frequently, and whether to cycle between the configuration problems status and the message logs panes.
|
EAN: N/A
Pages: 135