| Tabbed layouts mimic the familiar tabs of paper file folders (or many FileMaker dialog boxes for that matter). As you switch from tab to tab, the layout shows different fieldsmaking them a great way to present lots of information in a single layout without crowding the fields. To add tabbed layouts 1. | Make sure you're in Layout mode ( in Windows, in Windows,  on the Mac), then use the pop-down menu just above the book icon to select the layout that you want to use as the starting point for your tabbed layout. on the Mac), then use the pop-down menu just above the book icon to select the layout that you want to use as the starting point for your tabbed layout.
| 2. | When the layout appears, choose Layouts > Duplicate Layout and while nothing changes onscreen, FileMaker makes a copy of the layout dubbed [originalname]+ copy. Choose Layouts > Layout Setup and when the Layout Setup dialog box appears, rename the layout copy to make its function obvious. In our example, we use Tabbed for Sales (Figure 12.20).
Figure 12.20. After duplicating the layout, give it a name that makes its function obvious. 
| 3. | You may want to select all the fields and labels ( in Windows, in Windows,  on the Mac) and drag them away from where you want to put the tabs (Figure 12.21). on the Mac) and drag them away from where you want to put the tabs (Figure 12.21).
Figure 12.21. To make room for the tabs, select all the existing fields and drag them down the page. 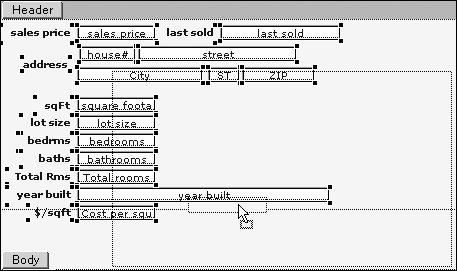
| 4. | Click the Tab Control tool, then click in the layout and drag the pointer until it reaches the general shape and size you want (Figure 12.22).
Figure 12.22. Click the Tab Control tool (A), then click in the layout and drag the pointer until it reaches the general shape and size you want (B). 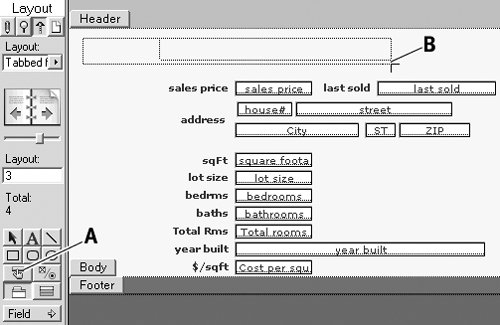
| | | 5. | Release the cursor and the Tab Control Setup dialog box appears (top, Figure 12.23).
Figure 12.23. When the Tab Control Setup dialog box appears, click in the Tab Name window to create your first tab. Once you type in a name, click Create to save it. 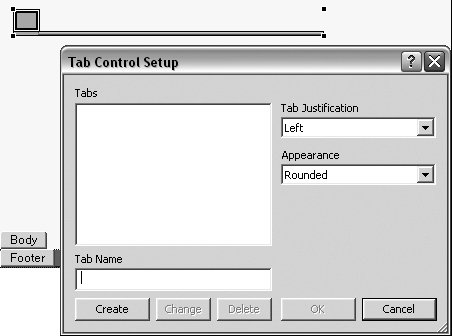
| 6. | Type the name of your first tab in the Tab Name text box and click Create (bottom, Figure 12.23).
| 7. | Repeat step 6 until you've created as many tabs as you need, then click OK to close the dialog box (Figure 12.24).
Figure 12.24. After creating your last tab, click OK to close the dialog box. 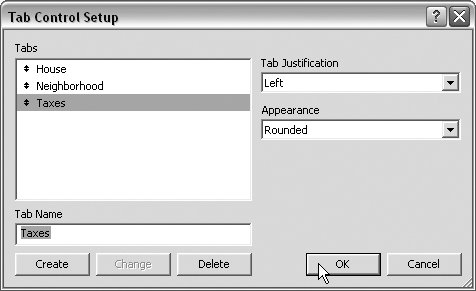
| 8. | When the tabs appear on the layout, use the corner handles to reposition and resize them as needed (Figure 12.25).
Figure 12.25. when the tabs appear on the layout, use the corner handles if you need to reposition and resize them. 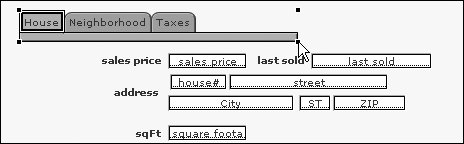
| | | 9. | If you need to change the alignment of the labels, double-click the tabs and make a new choice in the Tab Justification drop-down menu (top, Figure 12.26). Click OK to close the database and see the changes (bottom, Figure 12.26). (In our example, Full is used to stretch the tabs across the width of the field.
Figure 12.26. To run the tabs full width, double-click the layout object and choose Full in the Tab Justification drop-down menu (top). Once you close the dialog box, the tabs widens to fill the space (bottom). 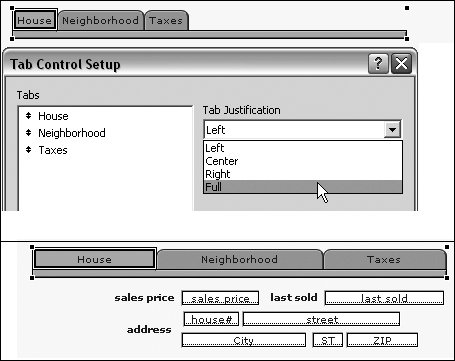
|
 Tips Tips
In step 2, you don't have to duplicate a layout before adding tabs. It's just a way to avoid messing up an existing layout as you learn how best to use tabs. Add new tabs any time by double-clicking the tabs and following steps 67. The other tabs automatically resize to make room for the new tab.
To change the tab labels 1. | Make sure you're in Layout mode ( in Windows, on the Mac). Double-click the tabs to open the Tab Control Setup dialog box.
| 2. | Select a label in the Tabs list, then type a new name for it in the Tab Name text box, and click Change and the selected label is renamed (Figure 12.27).
Figure 12.27. To change a label name, select it in the Tabs list, type in a new name, and click Change. 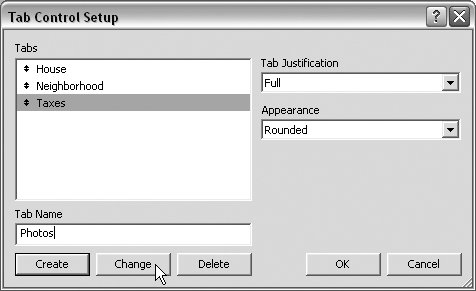
| 3. | Close the dialog box by clicking OK. The tabs reappear with the new label applied (Figure 12.28).
|
Figure 12.28. After closing the dialog box, the tab's new name appears. 
Tip You also can use the Tab Control Setup dialog box to change the shape of the Appearance of the tabs from rounded to squared. And, as you saw in step 7 on page 192, you can change the Tab Justification.
To add content to the tabs 1. | Make sure you're in Layout mode ( in Windows, on the Mac). To make room for the fields you want to add to the new tabs, click and drag a corner handle to enlarge the tabbed layout object (Figure 12.29).
Figure 12.29. To make room for the fields in the new tabs, click and drag a corner handle to enlarge the tabbed layout object. 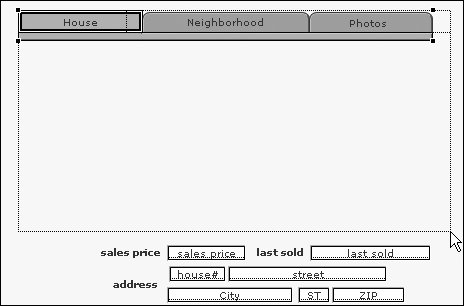
| 2. | Select the tab in which you want the fields to appear. Select any fields you want to use from the original, non-tabbed portion of your layout and drag them into the selected tab. (In our example, we're putting all of the original fields into the first tab.) But because the tabbed layout object is newer than the original fields, it sits higher in the stack order and covers up the fields (top, Figure 12.30). With the original fields still selected, click the Bring to Front button in the Arrange toolbar and the fields move to the top of the stack order where they can be seen (bottom, Figure 12.30).
Figure 12.30. Select the fields you want from the original, non-tabbed portion of your layout and drag them into the selected tab (top). Click the Bring to Front button to move the fields to the top of the stack where they can be seen (bottom). 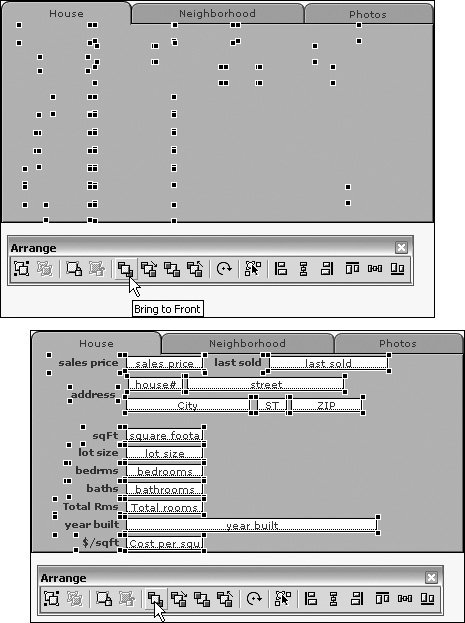
| 3. | To see how the tab looks with data in the fields instead of labels, switch to Browse mode ( in Windows, in Windows,  on the Mac) (Figure 12.31). on the Mac) (Figure 12.31).
Figure 12.31. To see how the tab looks with data in the fields instead of labels, switch to Browse mode. 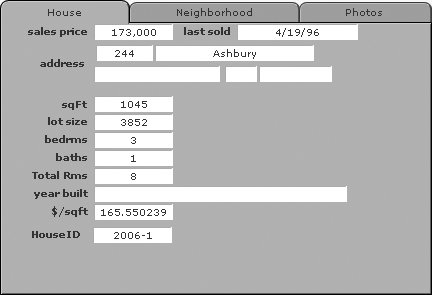
| | | 4. | Switch back to Layout mode ( in Windows, on the Mac) and click one of the empty tabs (Photos in our example) (Figure 12.32).
Figure 12.32. Switch back to Layout mode and click one of the empty tabs (Photos in our example). 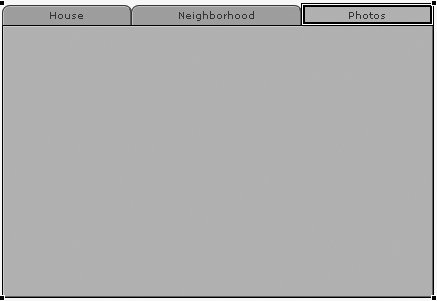
| 5. | To generate new fields in the current database for placement in the selected tab, choose File > Define > Database ( in Windows, in Windows,  on the Mac). When the Define Database dialog box appears, click the Fields tab and follow the steps to define fields as explained on page 96. on the Mac). When the Define Database dialog box appears, click the Fields tab and follow the steps to define fields as explained on page 96.
or
To add fields from another related database, choose File > Define > Database ( in Windows, on the Mac). When the Define Database dialog box appears, click the Relationships tab and follow the steps to create a relationship as explained on page 132. You then follow steps 13.
|
Tips To give yourself more room on the layout to rearrange the original fields and the new tabs, click the body part's bottom edge and drag it way down the screen. Once you finish rearranging everything, you can resize the body to a more appropriate compact size. You can even put a tabbed layout inside another tabbed layout (Figure 12.33). In our example, the photos are pulled from a separate database of house photos linked to the home prices database by a House ID# match field (Figure 12.34).
Figure 12.33. If used with caution, you can pack even more into a layout by creating tabs within tabs. 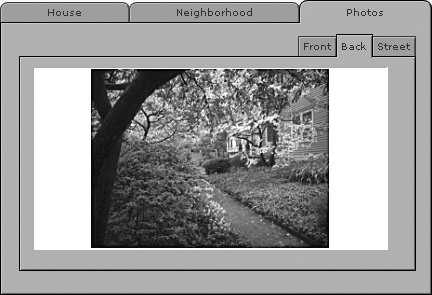
Figure 12.34. As the :: (double colon) indicates, you can display data from related files within tabs. 
|