Hack86.Create Custom Maps with MapServer
Hack 86. Create Custom Maps with MapServer
Use MapServer and PHP to build dynamic maps within your web application. There has been a recent surge in the popularity of digital mapping. Part of this has been fueled by access to open source mapping tools and free geospatial data; it also hasn't hurt to see killer applications like Google Maps and MapQuest come on the scene. These are popular incarnations of some exciting web mapping technology that you too can use. With a few pieces of mapping data, a mapping programming library, and a PHP script, almost anyone can create custom and interactive maps. Several open source mapping tools are available, from desktop applications to web-enabled mapping services. One of these is the University of Minnesota MapServer (http://ms.gis.umn.edu/). With a large user base, active community, and dedicated developers, it is a powerful product for publishing maps over the Web. MapServer is actively used as the back end to many PHP web page frontends. For example, the Chameleon (http://maptools.org/) and Mapbender (http://mapbender.org/) products both use PHP extensively. Also available is a powerful implementation of Ajax-based web mapping called ka-Map.
All of these tools allow PHP programmers to handle maps and mapping data through PHP. MapServer sits on the back end cranking out map images, and PHP controls interaction and brokers requests. MapServer is commonly used as a CGI application coordinating with a web server. To have ultimate power and flexibility, you can use the MapServer API with one of many programming languages, including PHP, Perl, Python, Ruby, Java, and C#. MapScript provides methods for interacting with mapping data, cartographic styling of map output, and the creation of final map images. 9.2.1. MapServer ConceptsMapServer's core configuration is handled through a text-based runtime configuration file. Referred to as a map file (pretty clever, huh?), this file is the core of most MapServer-based applications. The CGI program, or custom MapScript application, reads this configuration file, accesses data, draws a map, and returns a graphic ready for online viewing. The resulting map and graphic can even be run as a standalone command-line program. The examples in this hack use PHP MapScript from the command line. You can take these examples and modify them to suit your particular environment. The map file has a simple hierarchical object structure, with objects inheriting settings from their parents. This hack uses a very simple map file, intended for use with PHP MapScript. You'll also see how to create a map without having a map file, developing the configuration data totally in memory and rendering the map all within a PHP script. 9.2.2. Getting the PHP MapScript ExtensionBefore you can start using PHP MapScript, you need to download and set up the MapScript tools. The main PHP MapScript site, http://maptools.org/php_mapscript/, has download instructions, as well as an API reference document. There are several other easy ways to get binary distributions of PHP and MapScript preconfigured to work together:
9.2.3. Hacking Maps with PHPThe following hacks show how to use map files, manipulate those files, and create maps from scratch, all within a simple PHP script. 9.2.3.1. Step 1: Prepare data.Before you can start creating a map, you will need some basic map information. For these hacks, only one file is required: an image created from global satellite imagery. These images are in a GeoTIFF file format; Figure 9-1 shows an example of the global cloud image data set.
The TIFF image format might already be familiar to you, but GeoTIFF extends it further, allowing the image to have geographic coordinate information embedded in the image. This makes it possible to use a mapping datafile when you might want to look at a particular geographic area (say, a certain latitude and longitude); GeoTIFFs can quickly make the translation between pixel rows and columns and geographic X and Y coordinates.
For these examples, create a folder for your scripts, and then a subfolder called data to store your image file. Unzip the cloud_image.zip file into the data folder, and you should see two files: a .tif file (the actual image) and a .tfw file that stores geographic referencing information. 9.2.3.2. Step 2: Render a map.A simple MapServer map file and a few bits of PHP code are all you need to create a map. A basic PHP script that loads a map file and renders a map image is shown in Example 9-1. Example 9-1. A basic MapServer example <?PHP // ex1_map_basic.php // Tyler Mitchell, August 2005 // Build a map using a pre-made map file // Load MapScript extension if (!extension_loaded("MapScript")) dl('php_mapscript.'.PHP_SHLIB_SUFFIX); // Create a map object. $oMap = ms_newMapObj("map_points.map"); // Render the map into an image object $oMapImage = $oMap->draw( ); // Save the map to an image file $oMapImage->saveImage("worldmap.png"); ?> As you can see, it really takes only four lines of PHP code to go through the basic mapping steps:
The result of running the script is a single image, worldmap.png. Open the image in your favorite image viewer, and you should see a global image (as already shown in Figure 9-1). All the map settings are done in the map configuration file. Example 9-2 shows the contents of the map file. It includes a single layer of mapping data, using the global map GeoTIFF image.
Example 9-2. A simple map fileMAP NAME MAP_POINTS SIZE 600 300 EXTENT -180 -90 180 90 LAYER NAME clouds TYPE RASTER STATUS DEFAULT DATA "data/global_clouds.tif" END END 9.2.3.3. Step 3: Modify the map.Of course, the real power of mapping capabilities within a programming language such as PHP is having the ability to control things. Example 9-1 didn't change any settings or add anything to what was already in the map file. The map file is static, but there's a lot more to mapping with PHP than just reading in an existing file and spitting it back out. For example, you might want to change the geographic extent that the map covers. Instead of using the default EXTENT setting in the map file, you can create your own. All you need to do is set the map object's extent property to use your custom coordinates (via setExtent( )). The extent setting requires two pairs of coordinates: the first pair represents the southwestern corner of the map, and the second pair the northeastern corner. You need to add just one line to your script, as shown in Example 9-3. Example 9-3. Changing properties on a map <?PHP // ex3_map_change.php // Tyler Mitchell, August 2005 // Build a map using a pre-made map file // and change one property // Load MapScript extension if (!extension_loaded("MapScript")) dl('php_mapscript.'.PHP_SHLIB_SUFFIX); // Create a map object $oMap = ms_newMapObj("ex2_map_basic.map"); // Change the map object's extent property $oMap->setExtent(-130,20, -70,70); // Render the map into an image object $oMapImage = $oMap->draw( ) // Save the map to an image file $oMapImage->saveImage("worldmap.png"); ?> The resulting map image is shown in Figure 9-1 (notice how it is a tighter shot compared to Figure 9-2). Figure 9-1. Map centered on North American extents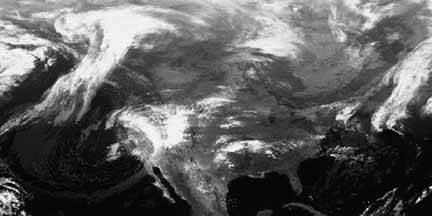 Your script can do much more if you make it interactive for the user. By linking MapScript code into your web applications, you can provide limitless opportunities for zooming in and out on the map, turning layers on and off, adding more data, changing colors, and anything else you can think of. Refer to the PHP MapScript documentation (http://maptools.org/php_mapscript/index.phtml?page=docs.html) to get an idea of other methods and properties. 9.2.3.4. Step 4: Mapping from scratch.You can also create a full PHP MapScript application from scratch without using an existing map file. This can serve two purposes: you can either use the script to create a new map file or use scripts to avoid having external map files to deal with. As you might guess, you will have to create all the objects and set all the properties using PHP code. Your scripts will accordingly be slightly larger than if you simply used a map file, but you get control over all the settings of your maps right in the PHP code. One common use of PHP MapScript applications is generating dynamic point locations on a map. There are methods for creating what are called inline features, where the coordinates of a location (points, lines, or polygonal areas) are entered into the map file. Example 9-4 shows a map file where a single point and an accompanying text label are provided. The map file also includes a symbol object; this tells MapScript how to paint the points on the map. The real work is done in the new layer object at the end. Example 9-4. Another layer on top of a mapMAP NAME MAP_POINTS SIZE 600 300 EXTENT -180 -90 180 90 SYMBOL NAME "circle" TYPE ELLIPSE FILLED TRUE POINTS 1 1 END END LAYER NAME clouds TYPE RASTER STATUS DEFAULT DATA "data/global_clouds.tif" END LAYER NAME custom_points TYPE POINT STATUS DEFAULT FEATURE # Inline feature definition POINTS -121 54 END TEXT "My Place" END CLASS COLOR 250 0 0 OUTLINECOLOR 255 255 255 SYMBOL "circle" SIZE 10 LABEL POSITION AUTO COLOR 250 0 0 OUTLINECOLOR 255 255 255 END END END END The resulting map is shown in Figure 9-2. Figure 9-2. Map with an inline point and label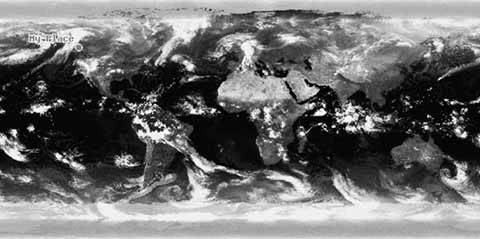
While handy, a map file is not inherently dynamic; this is where PHP comes in. Example 9-5 is an extensive example showing how to create the same map (from Figure 9-1), but then it overlays on that map a set of graphical "points." This script pulls coordinates from a text file and dynamically adds them to the map when it is rendered. To locate these points, all you need is a simple text file (points.txt) containing the longitude/latitude point coordinates and a text label delimited with commas (and with no header line).
Example 9-5. A map example using GeoTIFF <?PHP // ex5_map_points.php // Build a map using a single GeoTIFF // and a text file of coordinates/labels. // Does not require a mapserver map file to run. // Tyler Mitchell, August, 2005 // Load MapScript extension if (!extension_loaded("MapScript")) dl('php_mapscript.'.PHP_SHLIB_SUFFIX); // Create a map object. Provide empty string if not // using an existing map file $oMap = ms_newMapObj(""); // Set size of the output map image $oMap->setSize(600,300); // Set the geographic extents of the map. $oMap->setExtent(-180,-90,180,90); // Create a map symbol, used as a brush pattern // for drawing map features (lines, points, etc.) $nSymbolId = ms_newSymbolObj($oMap, "circle"); $oSymbol = $oMap->getsymbolobjectbyid($nSymbolId); $oSymbol->set("type", MS_SYMBOL_ELLIPSE); $oSymbol->set("filled", MS_TRUE); $aPoints[0] = 1; $aPoints[1] = 1; $oSymbol->setpoints($aPoints); // Create a data layer and associate it with the map. // This is the raster layer showing some cloud imagery $oLayerClouds = ms_newLayerObj($oMap); $oLayerClouds->set( "name", "clouds"); $oLayerClouds->set( "type", MS_LAYER_RASTER); $oLayerClouds->set( "status", MS_DEFAULT); $oLayerClouds->set( "data","data/global_clouds.tif"); // Create another layer to hold point locations $oLayerPoints = ms_newLayerObj($oMap); $oLayerPoints->set( "name", "custom_points"); $oLayerPoints->set( "type", MS_LAYER_POINT); $oLayerPoints->set( "status", MS_DEFAULT); // Open file with coordinates and label text (x,y,label) $fPointList = file("data/points.txt"); // For each line in the text file foreach ($fPointList as $sPointItem) { $aPointArray = explode(",",$sPointItem); // :TRICKY: Although we are creating points // we are required to use a line object (newLineObj) // with only one point. I call it a CoordList object // for simplicity since we aren't really drawing a line. $oCoordList = ms_newLineObj( ); $oPointShape = ms_newShapeObj(MS_SHAPE_POINT); $oCoordList->addXY($aPointArray[0],$aPointArray[1]); $oPointShape->add($oCoordList); $oPointShape->set( "text", chop($aPointArray[2])); $oLayerPoints->addFeature($oPointShape); } // Create a class object to set feature drawing styles. $oMapClass = ms_newClassObj($oLayerPoints); // Create a style object defining how to draw features $oPointStyle = ms_newStyleObj($oMapClass); $oPointStyle->color->setRGB(250,0,0); $oPointStyle->outlinecolor->setRGB(255,255,255); $oPointStyle->set( "symbolname", "circle"); $oPointStyle->set( "size", "10"); // Create label settings for drawing text labels $oMapClass->label->set( "position", MS_AUTO); $oMapClass->label->color->setRGB(250,0,0); $oMapClass->label->outlinecolor->setRGB(255,255,255); // Render the map into an image object $oMapImage = $oMap->draw( ); // Save the map to an image file $oMapImage->saveImage("worldmap.png"); ?> Here's the list of points to add to the map, saved in points.txt: -118.35,34.06,Angie -118.40,34.03,Ray -111.99,33.52,Alice -95.45,29.75,David 144.85,-37.85,Mark The output of the script is shown in Figure 9-3. To take this example a step further, you could set up the portion of code that draws these pointson any mapas a separate class. Then you could call this class from other PHP scriptse.g., scripts that take coordinates as user inputand have them drawn on your map. 9.2.4. Learning MoreTo learn more about MapServer and other open source geospatial technologies, there are many great places to get started. The community actively uses mailing lists and IRC discussion channels and even holds annual conferences. Figure 9-3. Map showing points and labels taken from a text file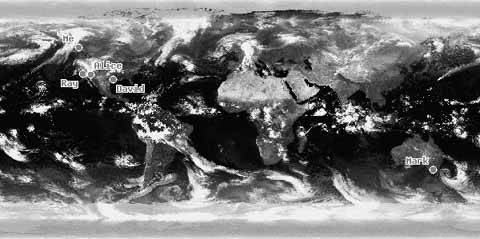 To find other users in your area, ask on a mailing list. The MapServer mailing list tends to be a focal point for many other projects, as they tend to be intertwined, so it might be the best place to look for help. Web Mapping Illustrated (O'Reilly) covers a wide range of information including MapServer, spatial databases, OGC web services, data conversion, map projections, and much more. Other books on related (open source) subjects include Mapping Hacks (O'Reilly), Beginning MapServer (Apress), and Pragmatic GIS (Pragmatic Bookshelf, not yet released). Tyler Mitchell 9.2.5. See Also
|

EAN: 2147483647
Pages: 163