Hack56.Maintain the Gain
Hack 56. Maintain the Gain
Use gain controlling filters to maintain a consistent level throughout your podcast. When you start your sound editing application and open a sound file, the display that you see is an amplitude graph. The horizontal axis of the graph represents time, and the vertical axis of the graph represents the amplitude of the signal. If the signal almost reaches the top and bottom of the graph, it will be loud, if it's close to the center of the graph, it will be soft. Figure 8-17 shows a sound sample in Audacity [Hack #50]. The selected portion is loud, and the other half is relatively quiet in comparison. The amplitude of a signal is rated in decibels (dB). A soft signal is in the 20 dB range, a loud signal approaches 6 dB, 2 dB signals are very loud, and 0 dB signals are clipped in the digital world. Using sound tools, you can alter the amplitude of a signal with various filters and effects. You need to keep two key things in mind when you are working the amplitude of a signal. First, you should have a target dB range in mind. For music, I recommend somewhere between 6 and 2 dB. For the spoken word, I recommend 6 to 12 dB. This means that your loudest signal should be no more than 6 dB, and your softest signal that isn't silence should be at least 12 dB. Of course, these are personal preferences and you should come up with a range that's comfortable for your show. Figure 8-17. A loud portion of a signal selected in Audacity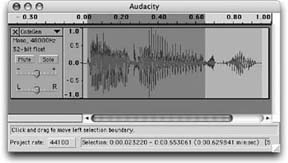 The second thing to keep in mind is that 0 dB in the digital world is where signals clip. This means that sound above 0 dB will be clipped to 0 dB as a flat line. This creates nasty noise artifacts. Don't clip digital signals. Analog tapes can be overdriven to create an appealing, powerful sound; digital signals sound bad when they clip. It's interesting to note that approaches to amplitude management differ between genres. Classical music, as an example, uses the full recording dynamic range from very soft to extremely loud. This is because absolute fidelity to the music is of paramount importance. Talk shows take the other extreme: signals are boxed into a zone (e.g., -12 dB to -6 dB) so that the listener can concentrate on what someone is saying and not worry about the volume of his iPod. 8.8.1. Gain EnvelopingA good sound editor provides a mechanism for editing the gain of an individual track over its duration. This is called gain enveloping, or just enveloping. With this feature, you draw a curve over the signal. Where the curve is high the sound will be at 100% gain, where you draw the curve down toward the bottom the sound will fade to 0%. Most envelope features allow you to draw either lines or curves: lines are a steady drop, and curves give you a smoother fade feel. Figure 8-18 shows the example signal flattened by attenuating the first portion of the signal and letting the rest of the signal go out at 100%. Figure 8-18. Using Audacity gain enveloping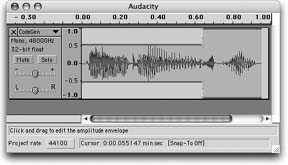 In Audacity, enveloping is one of the editing modes on the signal window. You adjust the envelope first by creating a new control point by clicking the current envelope. Then you drag the control point around to squeeze and expand the signal as you see fit. 8.8.1.1 Automation.Old-school sound engineers use the term automation to describe enveloping. The old mixing consoles [Hack #14] with lots of faders could record the positions of those faders over the course of the song and then replay them during playback. The feature is called automation and it does exactly the same thing that we now do in software with gain enveloping. If you want to use faders to control the levels on a signal during playback, Behringer (http://www.behringer.com/) and others sell inexpensive Musical Instruments Digital Interface (MIDI) mix boxes such as the BCF2000 (~$239). This box has a set of eight faders, among other controls, that you can attach through software to the amplitude of any track in your session. As you play back the mix, adjusting the fader will set the gain envelope in the software. If you play the mix again, you will see the fader move during playback, just the way you did it before. 8.8.2. Compression and LimitingWorking with enveloping either by drawing the lines yourself or through MIDI controls is a time-consuming process. Compression filters do this gain management automatically for you. The function of a compressor is to attenuate signals that go over a set threshold. Loud signals are compressed by a user-settable ratio to bring them in the target dB range if they go over the threshold. There are four basic compression parameters:
Figure 8-19 shows the compressor that's built into Audacity. The Threshold control defines the level above which the signal will be compressed. Here I have it set to 7 dB, so anything between 7 dB and 0 dB will be compressed. The ratio is 2:1, so anything above 7 dB will be cut in half. Figure 8-19. The Audacity Compression filter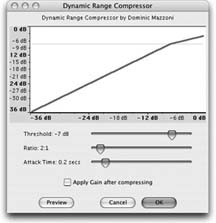 Some people find compression confusing because it seems to both compress and expand the signal. That's because compression is a two-stage filter. The Threshold and Ratio controls will only ever attenuate signal. But most compressors have an output gain that will boost the entire signal after the compression. You control Audacity's compressor with the "Apply Gain after compressing" checkbox. For spoken-word work in podcasts, I recommend a fairly fast-attack time of around 5 ms. A slower release of 50 ms gives you a natural feel coming out of the compression. A ratio of around 2:1 is not too harsh, but it will avoid clipping. Set the cutoff level to the top end of your ideal gain box. For example, if your ideal signal goes between 12 dB and 6 dB, set it to around 6 dB. Compression levels of 8:1 or 10:1 sound squashed and unnatural. 8.8.2.1 Limiters.A limiter is a simple compressor that has a ratio of 10:1 or above. It's used as a last resort to avoid clipping the signal. 8.8.2.2 Expanders.A less common filter is an expander, which is the inverse of a compressor. An expander will boost signals that fall below a certain threshold. This is handy when you have a signal that fluctuates between too quiet and just right. 8.8.2.3 Hardware.Compression and limiting are the effects that you should think about getting hardware for, even in a home studio. A software compressor will help you tone down a bright signal in post-processing, but it won't help you fix signals that were clipped by the audio input device. If you put a hardware compressor between the microphone and the digital conversion device, you can avoid unnecessary clipping. Some digitizing devices, such as the Edirol UA-25 [Hack #12], come with an optional limiter built in to avoid clipping. 8.8.3. Maximizing and NormalizationA normalizing or maximizing filter seeks to take all of the signal, both the highs and the lows, and compress them into a boxed range of dBs. It's a useful last step in processing to get the overall level of the show to be where you want it. Maximizing is used by music producers who want a very loud sound. If you look at some music in a sound editing program, it will look like one enormous box that peaks out at around 2 dB to leave headroom for stations that don't have their levels set properly. This boxing effect leads to distortion that can feel unnatural for spoken-word podcasts. 8.8.4. Noise GateA noise gate is a simple filter that reduces the signal to silence if there is no significant input. When you talk into your microphone, the gate reads the presence of a signal and opens up, letting the sound pass. As you stop talking, the filter sees that there is no input and closes the gate, which returns the signal to absolute silence. This can be a very handy filter in noisy conditions. There are several controls on noise gate, and they vary from gate to gate. In general, you will have a cutoff control that tells the filter what it should consider a significant signal. You will also have a speed control that affects the speed at which the gate closes after you stop speaking. In noisy environments, you will want to set that to a fast setting to block out as much noise as possible. In quieter environments, set this to a slower setting to maintain a smoother sound. Noise gating is not strictly a gain control feature, but using a noise gate can eliminate background noise between voice segments, allowing you to add more gain to the overall recording without increasing the noise. 8.8.5. See Also
|
EAN: 2147483647
Pages: 144