Validation Tables
Defining and Establishing Business Rules
You'll define and establish business rules for the database during this stage of the design process. Remember that you must base these rules on the manner in which your organization perceives and uses its data, which (as you well know) will depend on the way the organization functions or conducts its business. The best approach to this task is to define and establish the field specific business rules first, followed by the relationship specific business rules. This approach helps you to remain focused on the type of rule you're defining. It also keeps you from jumping back and forth between different types of business rules, which can often lead to confusion and some amount of frustration.
Working with Users and Management
Once again, you'll work with the representative group of users and management. Schedule new meetings with them so that you can work together to define and establish the appropriate business rules for the database. Working as a group enables you to make certain that the constraints imposed by the business rules you define are meaningful and that there is no confusion or ambiguity as to the necessity of imposing each constraint. If you or anyone in the group has some doubt about a constraint, you can discuss the effect it will have on the field or relationship involved and the advantages and disadvantages of imposing the constraint. Then, you can decide whether to keep the rule or disregard it completely based on the results of your discussion.
Defining and Establishing Field Specific Business Rules
Begin the process of establishing business rules for the database by working on field specific rules. You define and establish each rule using these steps:
-
Select a table.
-
Review each field and determine whether it requires any constraints.
-
Define the necessary business rules for the field.
-
Establish the rules by modifying the appropriate field specification elements.
-
Determine what actions test the rule.
-
Record the rule on a Business Rule Specifications sheet.
Let's now take a look at each step in greater detail.
Step 1: Select a Table
It doesn't matter which table you start with because you'll eventually apply this procedure to every table within the database. If you choose a table with a familiar structure, however, you can focus a little more on learning the steps within the procedure. This extra effort will pay dividends when you begin to work with tables containing fields that bear closer attention and examination.
Think about the subject the table represents and then pose these questions:
How does the organization use information based on or related to this subject?
What relationships does this table have to itself or to other tables in the database?
When necessary, consult the final table list and read the description for this table, and refer to any relationship diagrams that incorporate this table. The answers to these questions will be useful to you while you're defining rules for this table, and focusing on the table in this manner prepares you for the next step.
Step 2: Review Each Field and Determine Whether It Requires Any Constraints
Examine the Field Specifications sheet for each field and determine whether you should apply a constraint to any of its elements. Keep the questions from Step 1 in mind as you review a given specification sheet, and then pose this question:
Based on how the table is used within the database, is a constraint necessary for any element within this specification?
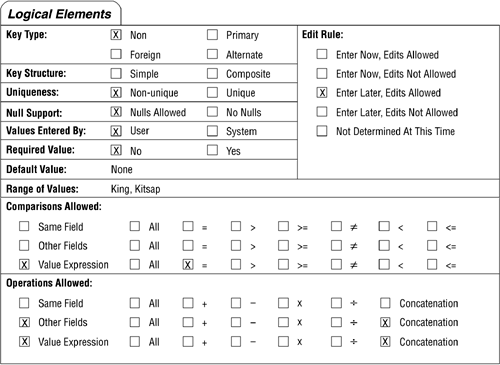
If the answer is no, move on to the next field; otherwise , go on to the next step. For example, assume you're working with the C UST C OUNTY field in a CUSTOMERS table and you have just posed the question about the need for a constraint. (Figure 11.6 shows the current Logical Elements category for this field.)
Figure 11.6. Current settings for the Logical Elements category of the C UST C OUNTY field.
You should move on to the next step if you receive an answer such as this:
"Well, the boss wants to begin tracking our customers by county, so we must make certain we record a county for every customer. In fact, we've just added Pierce County and Snohomish County to our sales region, so it'll be imperative that the county names get recorded."
This response clearly is a yes, so you will go on to define business rules for this field in the next step.
Step 3: Define the Necessary Business Rules for the Field
You define the appropriate business rules for the C UST C OUNTY field by identifying the constraints implied by the response in Step 2. Then you transform each constraint into a rule.
The response in Step 2 suggests two possible constraints that you should impose upon the C UST C OUNTY field: A county name is required for each customer, and the range of values for this field is limited to four specific counties (the two currently on the field specification and the two new counties indicated in the response). Here are two statements you might use to begin transforming these constraints into business rules:
A county must be associated with each customer.
The only counties that can be entered into this field are King, Kitsap, Pierce, and Snohomish.
Once you've defined the appropriate business rules, you can move on to Step 4.
Step 4: Establish the Rules by Modifying the Appropriate Field Specification Elements
Establish each business rule you defined in Step 3 by modifying the appropriate elements on the Field Specifications sheet. (Remember that some rules may affect more than one element.) First, however, you must identify which elements of the field specifications the rule affects. For example, consider the first business rule you defined for the C UST C OUNTY field in Step 3:
A county must be associated with each customer.
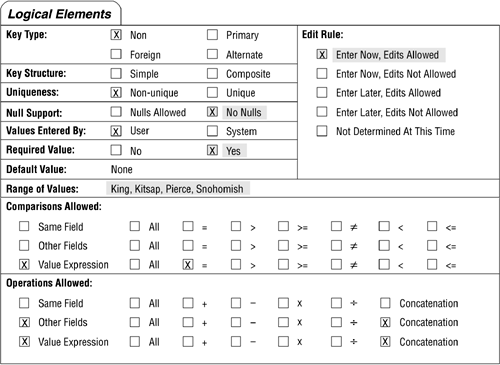
You can deduce that the rule affects the Required Value, Null Support, and Edit Rule elements because it explicitly states that a county "must be associated" with a customer. Now you can make the appropriate modifications to these elements. In this particular case, you'll set Required Value to "Yes," Null Support to "No Nulls," and Edit Rule to "Enter Now, Edits Allowed."
As you can see, it's important for you to examine each business rule very carefully in order to determine which field specification elements it's going to affect. When you first begin to define business rules, it's best to have a Field Specifications sheet handy so that you can refer to it as necessary. Many of the elements will come to mind more easily as you become more experienced at establishing business rules.
Now, consider the next business rule in the example:
The only counties that can be entered into this field are King, Kitsap, Pierce, and Snohomish.
This business rule affects the Range of Values element, and you'll now revise its setting to "King, Kitsap, Pierce, and Snohomish." Figure 11.7 shows the revised Logical Elements category of the Field Specifications sheet for the C UST C OUNTY field.
Figure 11.7. Revised settings for the Logical Elements category of the C UST C OUNTY field.
Step 5: Determine What Actions Test the Rule
The constraint the business rule imposes is tested when you attempt to perform one of three actions: inserting a record into the table or an entry into a field, deleting a record from the table or a value within a field, or updating a field's value. Now that you've established a business rule and understand the constraint it will impose, determine what actions test the rule by identifying when a violation of the rule is most likely to occur. You can make this a relatively easy task by asking yourself the following questions:
Will this rule be violated if I enter a new record into this table?
Will this rule be violated if I do not enter a new record into this table?
Will this rule be violated if I delete a record from this table?
Will this rule be violated if I enter a value into this field?
Will this rule be violated if I do not enter a value into this field?
Will this rule be violated if I update the value of this field?
Will this rule be violated if I delete the value of this field?
Once you've determined which actions will trigger a violation of the rule, make note of them; you'll use them in the next step. This information will also help you to establish this rule in the most effective manner possible when you implement the database in your RDBMS.
In this case, the business rule for the C UST C OUNTY field will be tested when you try to insert a value into the field because the value must be within a specific range of values. The rule will also be tested when you try to delete a value in the field because the value cannot be null.
Step 6: Record the Rule on a Business Rule Specifications Sheet
You can document a given business rule for future reference by filling out a Business Rule Specifications sheet. This is something you should do for every rule, regardless of its type or category. The Business Rule Specifications sheet provides three advantages:
-
It allows you to document every database oriented business rule. This helps you ensure that you have appropriately defined and properly established each rule.
-
It allows you to document every application oriented business rule. Although you cannot establish this type of rule within the logical design of the database, you can at least indicate its basic elements. The information you document for this type of business rule will prove invaluable to you when you implement the database within your RDBMS or when you create the application program that people will use to work with the database.
-
It provides a standard method for recording all business rules. Business rules are easier to track and maintain if you record them in a consistent manner. Using a uniform format also makes it easier for you to troubleshoot business rules; every aspect of the rule appears on the specification sheet.
The Business Rule Specifications sheet contains the following items:
-
Statement . This is the text of the business rule itself. It should be clear and succinct and should convey the required constraints without any confusion or ambiguity. Here's an example of a well-framed statement:
A booking agent cannot be assigned to more than 25 entertainers.
-
Constraint . This is a brief explanation of how the constraint applies to the tables and fields. For instance, you can use the following explanation for the constraint imposed by the business rule in the preceding example:
A single record in the AGENTS table can be associated with no more than 25 records in the ENTERTAINERS table.
-
Type . Here is where you indicate whether the rule is database oriented or application oriented.
-
Category . This is where you indicate whether the rule is field specific or relationship specific.
-
Test on . Here is where you indicate which actions (insert, delete, update) will test the constraint the business rule imposes.
-
Structures Affected . Depending on the type of business rule, the constraint will affect either a field or a relationship. This is where you designate the name of the field(s) the rule will affect or the name of the table(s) involved in the relationship that the rule affects.
-
Field Elements Affected . A business rule that pertains to a field can affect one or more elements of that field's specifications. This is where you indicate the elements the rule affects.
-
Relationship Characteristics Affected . A business rule that pertains to a relationship will affect one or more of the relationship's characteristics. Here is where you indicate the characteristics that the rule affects.
-
Action Taken. Here you indicate the modifications you've made to the elements of a field specification or to a relationship diagram. It is very important that the statement you enter here be as clear and unambiguous as possible. Should a problem occur as a result of enforcing this business rule, this statement serves as accurate documentation of the steps you have taken to establish the rule. You can use this statement to make certain that these steps were actually carried out and that the rule has been properly established.
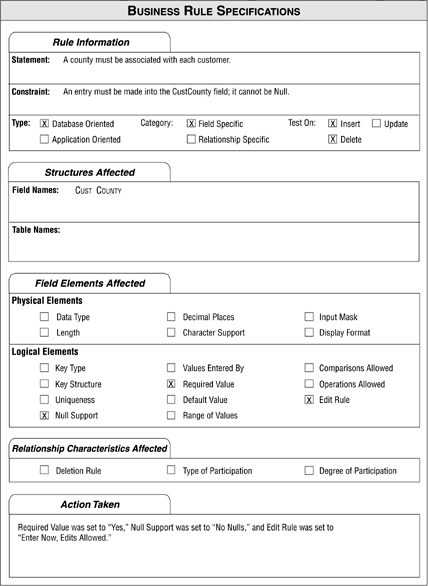
Now, fill out a Business Rule Specifications sheet for the rule you established in Step 4. Figure 11.8 shows a completed Business Rule Specifications sheet that documents the business rules you established for the C UST C OUNTY field.
Figure 11.8. An example of a Business Rule Specifications sheet.
Defining and Establishing Relationship Specific Business Rules
After defining and establishing field specific business rules, the next order of business is to tackle relationship specific business rules. The procedure for performing this task involves the following steps:
-
Select a relationship.
-
Review the relationship and determine whether it requires any constraints.
-
Define the necessary business rules for the relationship.
-
Establish the rule by modifying the appropriate relationship characteristics.
-
Determine what actions will test the rule.
-
Record the rule on a Business Rule Specifications sheet.
As you can see, this procedure is similar to the one you used for field specific business rules. Now, let's take a look at each step in more detail.
Note
You can apply this entire procedure to both self-referencing and dual-table relationships. I've based the remainder of the discussion on a dual-table relationship, however, because it is the type of relationship you are likely to work with the majority of the time.
Step 1: Select a Relationship
Which relationship you choose is a relatively trivial matter because you'll eventually apply this procedure to every relationship anyway. Once you select a specific relationship, review its relationship diagram. Then think about what the tables represent and why they are related and pose the following questions:
What kind of information do these tables provide?
Why is the relationship between these two tables important?
The answer to these questions will be help you define any necessary business rules for the relationship, and keeping them in mind will prepare you for the next step.
Step 2: Review the Relationship and Determine Whether It Requires Any Constraints
Briefly review each relationship characteristic and keep its current setting in mind. Then examine the relationship as a whole and determine whether it requires some form of constraint. As you review the relationship, remember the answers to the questions you posed in Step 1. You now pose a question such as this to help you determine whether a constraint is necessary:
Is there a need to impose some type of limitation on this relationship based on the way the organization functions or conducts its business?
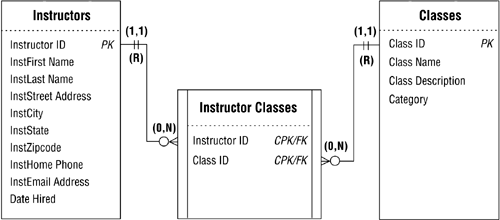
If the answer is yes, then go to the next step; otherwise, review the next relationship and perform this step once again. For example, assume you're designing a database for a small dance studio, and you're working with the relationship between the INSTRUCTORS and INSTRUCTOR CLASSES tables in Figure 11.9.
Figure 11.9. A relationship diagram for tables from a dance studio database.
Now, pose a question to help you determine whether the relationship requires a constraint.
Is there a need to impose some type of limitation on this relationship based on the way the dance studio functions or conducts its business?
Move to the next step if you receive an answer such as this:
Yes, there is. We require all instructors to teach at least one class. We limit them, however, to teaching no more than eight classes.
You'll use this response as the basis of a business rule in the next step.
Step 3: Define the Necessary Business Rules for the Relationship
Next, define an appropriate business rule based on the response you received in Step 2. Identify the constraint the response implies and then transform it into a business rule. For example, you can infer two constraints from the response: The minimum number of classes an instructor can teach is one, and the maximum number is eight. Transform these constraints into a business rule by composing a statement such as this one:
An instructor must teach one class, but no more than eight classes.
After you've defined the rule, continue with the next step.
Step 4: Establish the Rule by Modifying the Appropriate Relationship Characteristics
Establish the business rule you just defined by modifying the appropriate characteristics in the relationship diagram. Before you make any modifications, consider the business rule statement once again and identify which relationship characteristics the rule affects.
An instructor must teach one class, but no more than eight classes.
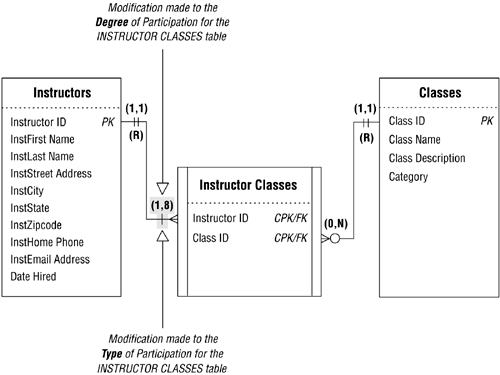
The constraint affects the number of classes an instructor can teach, so you modify the degree of participation characteristic of the INSTRUCTOR CLASSES table by setting it to "(1,8)." This rule also affects the type of participation characteristic of the INSTRUCTOR CLASSES table. You must set the table's type of participation to "Mandatory" because a single record in the INSTRUCTORS table must be associated with at least one record in the INSTRUCTOR CLASSES table. Figure 11.10 shows the revised relationship diagram with your modifications.
Figure 11.10. The revised relationship diagram that establishes the new business rule.
Step 5: Determine What Actions Will Test the Rule
As you know, the constraint the business rule imposes is tested when you attempt to insert, delete, or update a table record or field value. Now that you've established the business rule and understand how it affects the relationship, determine what actions test the rule by identifying when a violation of the rule is most likely to occur. Use the following questions to help you make your decision:
Are there circumstances under which this rule will be violated if I enter a new record into this table?
Will this rule be violated if I do not enter a new record into this table?
Will this rule be violated if I delete a record from this table?
Once you've determined which actions will trigger a violation of the rule, make note of them; you'll use them in the next step. This information will also help you to establish this rule in the most effective manner possible when you implement the database in your RDBMS.
Here's an important point to note: When you determine that a rule will be violated when you attempt to delete a record, then you must alter the current deletion rule for the relationship accordingly or add a new deletion rule to the relationship.
You learned in Chapter 10 that you don't need to worry about deleting records in the child table of a relationship because there can be no adverse effects from doing so. We must now amend this assertion by stating that an exception occurs when deleting a record in the child table would violate a required business rule. You handle this exception by establishing a Restrict deletion rule for the child table. Make absolutely certain that you keep this in mind as you're determining when a rule will be tested.
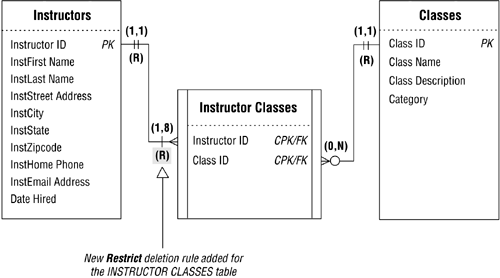
The new business rule for the dance studio database will be tested when you attempt to insert a record into the INSTRUCTOR CLASSES table; you can associate a maximum of only eight records with a particular instructor. The rule will also be tested when you attempt to delete a record from the INSTRUCTOR CLASSES table; each instructor must be associated with at least one class. As a result, you must establish a Restrict deletion rule for this table. Figure 11.11 shows the modifications you've made to this relationship's diagram.
Figure 11.11. Establishing a Restrict deletion rule for the INSTRUCTOR CLASSES table to support the new business rule.
Step 6: Record the Rule on a Business Rule Specifications Sheet
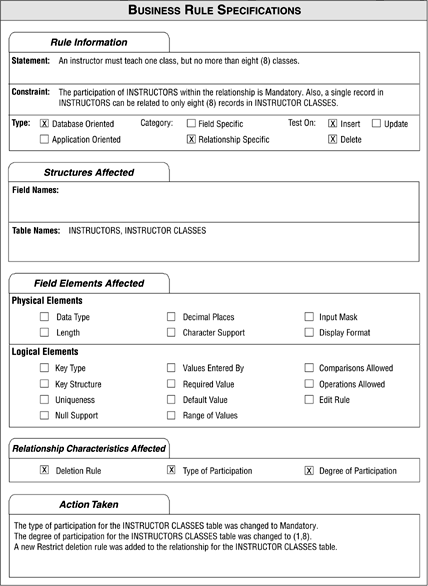
Finally, fill out a Business Rule Specifications sheet for the business rule you established in Step 4. Figure 11.12 shows the completed Business Rule Specifications sheet for your new rule.
Figure 11.12. The completed Business Rule Specifications sheet for the new business rule.
| |
| Top |
EAN: 2147483647
Pages: 203