| NFS was the most common network file system before Windows became popular, and it's definitely one of the oldest. Created by Sun back in the 1980s, NFS has a history of known security deficiencies and other shortcomings. Don't use it over an insecure network, as it doesn't encrypt data, and it's possible for a root client to have root access to the server's file systems. NFS doesn't handle file locking reliably, and it doesn't support per-user restrictions. File permissions on the NFS server are honored by the clients, which can cause confusion if the server doesn't have the same users and groups as the client machine. NFS clients may not notice when a server fails or becomes unavailable, causing the client to hang indefinitely, waiting for the server to return data. Applications attempting to read data over NFS will also, therefore, hang forever. Have I scared you off? NFS is still a good choice for simple file sharing on a local, trusted network, especially if you need to mount file systems from older Unix systems. Cygwin has no support for NFS. To start NFS (Fedora Core) Use Fedora Core's Service Configuration window to start the NFS service. 1. | Click the Applications menu at the top left of your desktop to open it.
| 2. | Select System Settings > Server Settings > Services to open the Service Configuration window.
If you're not currently logged in as root, you'll be prompted for the root password.
| 3. | Scroll down the list of services until you find the "nfs" item (Figure 6.3).
Figure 6.3. Activating NFS in the Fedora Core Service Configuration window. 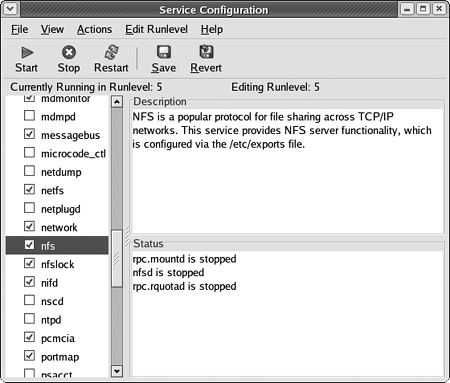
| 4. | Make sure the nfs box is checked, then click the Start button to launch the NFS services.
The services start, and the Status area is updated to show the status of the daemons (Figure 6.4).
Figure 6.4. NFS uses several daemons, shown running here. 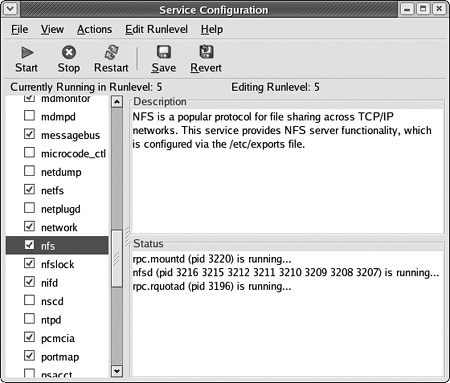
|
To install and start NFS (FreeBSD) Use FreeBSD's sysinstall utility to activate NFS. Fedora Core and Mac OS X have active NFS support by default. 1. | Log in as root.
| 2. | sysinstall
Launch the sysinstall utility.
| 3. | Press the down arrow key several times to choose the Configuration entry. Press Enter to switch to the FreeBSD Configuration Menu.
| 4. | Press the down arrow key until the Networking entry is selected, then press Enter to switch to the Network Services Menu (Figure 6.5).
Figure 6.5. FreeBSD's Network Services Menu lets you configure various networking services. 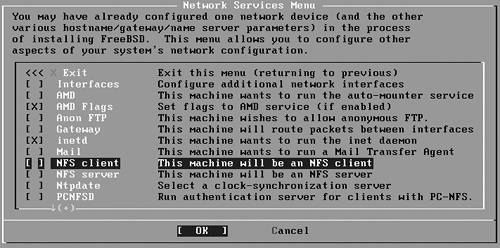
| 5. | Press the down arrow key until the "NFS client" entry is selected, then press Enter to mark it.
| 6. | Press the down arrow key until the "NFS server" entry is selected, then press Enter to mark it.
The Network Services Menu displays a Message dialog (Figure 6.6) telling you about the need for an /etc/exports file. Press Enter to create an /etc/exports file.
Figure 6.6. NFS requires an /etc/exports file for configuration. 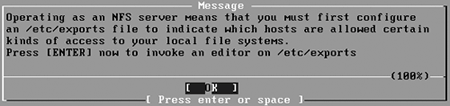
| 7. | Use the supplied vi editor session to add a basic share of the /tmp directory:
/tmp -network 192.168.0.0  -mask 255.255.255.0 -mask 255.255.255.0
This shares /tmp with all machines on the 192.168.0.* network; replace this and the network mask with something reasonable for your network. We'll be editing this later, and explaining the syntax in more detail.
| 8. | Save the file and exit the text editor to return to the Network Services Menu.
| 9. | Press Tab to move to the OK button in the Network Services Menu, and then press Enter to return to the FreeBSD Configuration Menu.
| 10. | Press X and then press Enter to return to the sysinstall Main Menu.
| 11. | Press X to exit sysinstall.
| 12. |
/etc/rc.d/rpcbind start; /etc/rc.d/nfsserver start; /etc/rc.d/nfsclient start
Start the servers that provide NFS support.
|
To share a directory with NFS The /etc/exports file controls which directories are shared through NFS, as well as how those directories are shared. 1. | Log in as root, or use su (or sudo) to become root.
| 2. | Using your favorite text editor, edit or create /etc/exports.
Lines beginning with a # character are comments.
| 3. | Add one line per directory you want to export.
/path/to/export hosts(options) /path/to/export network/mask(options)
or, for FreeBSD:
/path/to/export options hosts /path/to/export options -network network -mask mask
This exports /path/to/export to users on the specified hosts. The hosts can be specified as one or more hostnames, or a network and mask.
The options are different for each OS. Under Linux, use (ro,sync) for most of your shares (read-only, synchronized). For FreeBSD, use -ro (it's automatically synchronized).
| 4. | Tell the system to update the directories it's exporting. On Fedora Core, use the exportfs command:
exportfs -r
On FreeBSD, restart the mountd daemon:
kill -HUP $(cat /var/run/mountd.pid)
|
 Tip Tip
To mount an exported directory Use the standard mount command to mount an exported NFS directory. 1. | Use su to become root, or use sudo with the commands in the following steps. On most systems, only root can mount file systems.
| 2. | mkdir /path/to/mountpoint
If you don't already have a directory to use as a mount point, create one.
| 3. |
mount -t nfs server:/export /path/to/mountpoint
Mount export on server as the directory at mountpoint.
|
Tips Export only the most-needed data. Use read-only exports when writes aren't absolutely necessary. Under Fedora Core, use the root_squash option in /etc/exports to reduce (but not eliminate!) the risk of a root user on the client having root access on the server. FreeBSD automatically maps the root user to a user ID/group ID of -2/-2. Always use the sync option.
|