Creating Your Own CA
|
|
Now that we've explored how CAs work, let's go through the process of creating your own CA.
Choosing Which Type of CA to Install
In WS03, you can choose between two types of CA servers. Because there are distinct differences between the two, one or the other may not be appropriate, depending on the circumstances.
-
Enterprise CA Requires Active Directory. It is more automated, but because it isn't trusted, it is usually used for intranets. This is the CA you would want to install for smart card use, for example.
-
Standalone CA Less automated than an enterprise CA, it doesn't require Active Directory, and thus it doesn't pose unnecessary security risks. This type of CA is usually used for Internet certificates or when you don't have AD installed.
Tip Your CA server and web server do not have to be the same computer. In fact, the web server shouldn't be a CA, and it should never serve as your root CA.
The first thing to note about an enterprise CA is that it requires Active Directory to be installed. An enterprise CA's usefulness goes beyond IIS; for example, you would install an enterprise CA for use with domain logins, and it is required for use with smart cards. With that in mind, it's clear that this type of CA would probably not be suitable for issuing certificates to Internet and other external sources, because it would open your Active Directory domain to potential security issues. On the other hand, enterprise CA would be right at home issuing certificates to your intranet. When receiving a request, an enterprise CA can make a decision to issue or deny a certificate based on the security settings in Active Directory. Users can request certificates from the Certificates MMC snap-in or through the Certification Authority Web Enrollment (explained in detail later in the section 'Sending a Request to Your Own CA'). The revocation list is held in Active Directory as well as in a shared folder.
A standalone CA does not require Active Directory to be installed. Because of this, a standalone CA is a little more hands-on. It does not automatically issue or deny certificates, but it marks the request as pending. The certificates issued from a standalone CA would not be used for logging into a domain or for using smart cards. Users would request certificates only from the Certification Authority Web Enrollment by default. The revocation list for a standalone CA is published to a shared folder.
Root and Subordinate Certificate Authorities
You must also decide whether to install a root CA or a subordinate CA. The root CA is the most trusted CA in your enterprise. It is entirely possible to have only one CA installed. The danger of this, however, is if your root CA were to fail or become compromised, your entire enterprise certificate infrastructure would be compromised. It is recommended that you install a root CA only to issue certificates to subordinate CAs that will handle issuing certificates to everyone else. You make the decision as to what kind of CA you will run during the Certificate Services install process.
| Tip | After you install Certificate Services, you will not be able to add or remove your server from a domain or rename it. Make sure you have that worked out before you begin this process. |
Installing the Certificate Services on Your Server
You can install Certificate Services on your server through Add or Remove Programs in the Control Panel. The procedure varies, depending on which type of CA you are creating.
Installing an Enterprise Root CA
Remember that you can install an enterprise CA only if you have Active Directory.
-
In the Control Panel, double-click Add or Remove Programs.
-
Click Add/Remove Windows Components.
-
In the Windows Component Wizard, shown in Figure 10-2, click the Certificate Services checkbox.
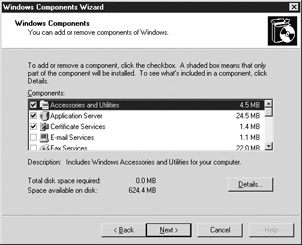
Figure 10-2: Windows Component Wizard window -
You will be warned that you will not be able to change your computer name or domain if you proceed. Click Yes in the message box.
-
Click Next.
-
Select the Enterprise Root CA radio button, and then click Next.
-
Enter some descriptive text for the name.
-
Click Next.
-
The wizard will generate the key. You are then prompted with folder information. You should leave this as the default unless you know of a need to do otherwise.
-
If you are running IIS, you'll be told that you need to stop the IIS service. If you get this message, click Yes.
-
The wizard now performs the installation steps. Click Finish.
Installing an Enterprise Subordinate CA
After you install a root CA in your domain, you can install an enterprise subordinate CA.
-
In the Control Panel, double-click Add or Remove Programs.
-
Click Add/Remove Windows Components.
-
In the wizard, click the Certificate Services checkbox.
-
You will be warned that you will not be able to change your computer name or domain if you proceed. Click Yes in the message box.
-
Click Next.
-
Select the Enterprise Subordinate CA radio button.
-
Click Next.
-
Name your CA something descriptive, and then click Next.
-
The wizard will now generate the key. You are then prompted with folder information. You should leave this as the default unless you know of a need to do otherwise.
-
Select Send The Request To An Online CA.
-
Click Browse and select your root CA. Then click OK.
-
Click Next.
-
The wizard now performs the installation steps. Click Finish.
Installing a Standalone Root CA
If you choose to use a standalone CA, you will start with installing a standalone root CA. To install Certificate Services as a Standalone Root CA, follow these steps:
-
Follow steps 1-5 in the preceding procedures.
-
Select the Stand-alone Root CA radio button (notice that the Enterprise options are grayed out if you don't have Active Directory installed).
-
You'll see the option to Use Custom Setting To Generate The Key Pair And CA Certificate. Unless you have a need to do this, you should leave this unchecked. The custom settings allow you to choose the exact CSP, hash algorithm, and key length you would like to use. The default will use the Microsoft Strong Cryptographic Provider, SHA-1, and 2048, respectively.
-
Click Next.
-
Enter some descriptive text for the Common Name-for example, the domain name or computer name.
-
Click Next.
-
The key is generated. You are then prompted with folder information. You should leave this as the default unless you know of a need to do otherwise.
-
Click Next.
-
A message box will tell you that IIS must be stopped. Click Yes.
-
The wizard then performs a number of tasks; this can take several minutes. Click Finish.
Installing a Standalone Subordinate CA
Once you've installed a standalone root CA, you can install a standalone subordinate CA:
-
Follow steps 1-5.
-
Select the Stand-alone Subordinate CA radio button, and then click Next.
-
Enter a common name for the CA (such as your computer name), and then click Next.
-
You are presented with the default folder settings; unless you have a special need, you shouldn't change them. Click Next.
-
Select Send The Request Directly to a CA Already On The Network radio button.
-
Select the radio button to save the request to a file, and enter a filename. Then click Next.
-
The wizard now configures Certificate Services. You will get a message box stating 'The Certificate Services installation is incomplete. To complete the installation, use the request file <c:\path\to\the\file\you\created.cer> to obtain a certificate from the parent CA.'
-
Open the Certification Authority snap-in by choosing Start | Administrative Tools | Certification Authority.
-
Use Certification Authority snap-in to install the certificate by right-clicking the node with the name of the CA, and then choosing Install CA Certificate.
-
Click OK in the message box.
-
Click Finish.
-
You must submit the request via the web enrollment (explained in the section 'Sending a Request to Your Own CA' later in this chapter).
-
Approve the request on the root CA.
-
After approval, return to the web enrollment page to receive your certificate.
-
Click Download Certificate Chain.
-
Save the certificate in a location you'll remember later.
-
Open the Certification Authority snap-in by choosing Start | Programs | Administrative Tools | Certification Authority.
-
Right-click your server icon, and choose All Tasks | Start Service.
-
You are asked whether you would like to install a certificate now. Click Yes.
-
Browse to and select the certificate you just downloaded. Click Open.
-
The certificate will be installed and Certificate Services will be started.
|
|
EAN: 2147483647
Pages: 193