Building a Simple ISAPI Extension
|
|
ISAPI extensions are so minimal in their stature that they may be written with no support from MFC or Active Template Library (ATL). An ISAPI extension may be written with the ISAPI extension include file httpext.h and a DLL definition export file (DEF) exporting the following two functions:
-
HttpExtensionProc
-
GetExtensionVersion
Each ISAPI extension must export these two functions. An ISAPI extension can optionally export the TerminateExtension function, too. After the DLL project is set up with these requirements, the extension should be usable by IIS. Visual Studio .NET provides a project template for an ISAPI project that launches the ISAPI Extension Wizard. This ISAPI Extension Wizard creates a class named after the project that inherits the CHTTPServer class and contains the required ISAPI functions. The ISAPI Extension Wizard also uses header files that provide more support from MFC and ATL than httpext.h offers to get the ISAPI classes and structures.
The use of the ISAPI Extension Wizard will be covered later in this chapter. Let’s examine the technique for producing an ISAPI extension with the least amount of MFC and ATL support to gain an understanding of the minimum requirements for producing a simple ISAPI extension without using the ISAPI Extension Wizard:
-
In Visual Studio .NET select File | New | Project and the New Project dialog box will open.
-
In the New Project dialog box, click the Visual C++ Projects node in the left side of the dialog box and select the Win32 project template. Name your project HelloWorld and select a location for the project to be created.
If you click the More button, the New Project dialog box will display more information about where the project will be created. The button will also change its name to Less. By default, Visual Studio creates a directory named the same name as the project in the directory set in the Location text box. All of the project files are placed in the newly created directory. As shown in Figure 17-2, the Location text box is set to C:\bookMaterial\IISBook\17ISAPIExtention\code and the project name is HelloWorld.
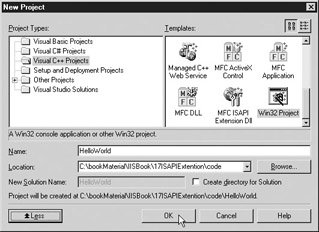
Figure 17-2: New Project dialog box with Win32 Project selected -
Click the OK button and the Win32 Application Wizard will open as shown in Figure 17-3.
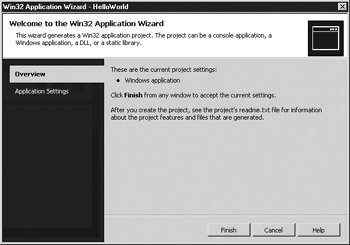
Figure 17-3: Overview in the Win32 Application Wizard -
Click the Application Settings tab on the left side of the Win32 Application Wizard.
-
Click DLL for application type as shown in Figure 17-4.
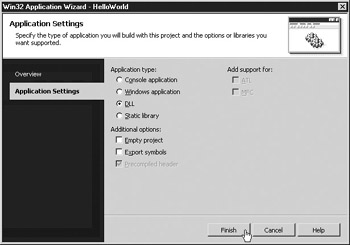
Figure 17-4: Creating a Win32 DLL project -
Click the Finish button of the Win32 Application Wizard and Visual Studio will create the directory C:\bookMaterial\IISBook\17ISAPIExtention\code\HelloWorld and place the project files in the new directory.
-
After you have created the DLL project, select the menu Project | Properties and the Property Pages window will open.
-
Select the Precompiled Header node under the C/C++ node in the left side of the Property Pages window and Visual Studio will display the properties.
-
Visual Studio .NET does not provide a project template that will produce the project without the precompiled header, so you have to choose the Win32 project template, make the project a DLL, and delete the precompiled header setting. Select the value Not Using Precompiled Headers in the Create/Use Precompiled Header property drop-down combo box as shown in Figure 17-5.
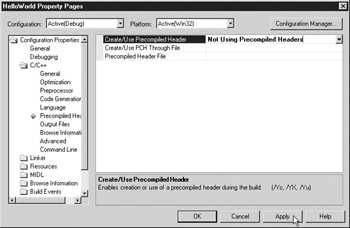
Figure 17-5: Changing the precompiled header property for the project -
Click OK on the Property Pages window. The Solution Explorer window should already be open but if it is not, select View | Solution Explorer from the menu.
-
Since the precompiled header will not be used, the stdafx files produced by the Visual Studio .NET to support the precompiled header must be removed. Select the stdafx header and implementation files in the Solution explorer, right-click and select Remove as shown in Figure 17-6.
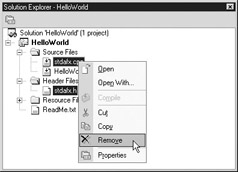
Figure 17-6: Remove the stdafx files from the project -
Next, add a DEF to the project. To do this, right-click the project name in the Solution Explorer and choose Add | Add New Item.
-
In the Add New Item dialog box, select DEF File, and name the file HelloWorld to match the project name as shown in Figure 17-7. The filename must match the DLL name otherwise the C++ compiler will throw a warning that the filenames do not match. This DEF file (definition export file) describes what functions will be exported from the DLL so that another application can load the DLL and be able to find the address of the functions.
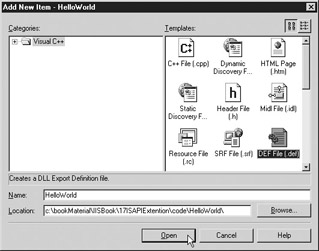
Figure 17-7: Adding a definition export file to the project -
Click the Open button on the Add New Item dialog box to add the new DEF file to the project.
The Visual Studio project templates use an intrinsic mechanism through MFC to export functions and make the ISAPI extension DLL usable by a consuming application like IIS. Visual Studio .NET does not provide a project template that will produce the project without the precompiled header, so you have to choose the Win32 project template, make the project a DLL, and delete the files and settings that are not needed. By creating a project without the MFC support, you expose yourself to some of the complexities that MFC hides. MFC also introduces some complexities of its own, however, so small projects that perform limited activities like this example, can be simplified by eliminating MFC.
The next step necessary to make the ISAPI extension usable by IIS is to configure the DEF file.
Definition Export File
After the DEF is added to the project, the library name in the file will have the same name as the project. Visual Studio .NET will issue a warning if the library name is different from the DLL name. In the case of this project, it should read
LIBRARY HelloWorld
A DESCRIPTION block may also be added to the DEF to describe the purpose of the DLL. The description should be enclosed be single quotes. The DESCRIPTION block is not necessary, but an EXPORTS block is necessary. The function names must follow the EXPORTS block. In Listing 17-1, only HttpExtensionProc and GetExtensionVersion will be exported. Listing 17-1 shows the definition export file that is used for this project. The functions may be listed in any order, but they must match the names in the implementation of the extension.
Listing 17-1: HelloWorld.def Content
LIBRARY HelloWorld DESCRIPTION 'Demonstration of a simple Hello World ISAPI extension' EXPORTS HttpExtensionProc GetExtensionVersion
ISAPI Extension Main Entry Point
The HelloWorld.cpp file must be configured to support the functions required to make the ISAPI extention work as follows:
-
In Visual Studio .NET open the HelloWorld.cpp file for editing by double-clicking on the filename in the Solution Explorer.
-
Delete the existing DLLMain function because it will not be used in this example.
-
Add the include preprocessor directive for header file httpext.h and <<string>> at the top of the code file, as shown in Listing 17-2.
-
Add the GetExtentionVersion Function (shown in Listing 17-2).
-
Add the HttpExtensionProc function (shown in Listing 17-2).
Listing 17-2: Source Code for HelloWorld.cpp
// HelloWorld.cpp : Defines the entry point for //the DLL application. #include <<httpext.h>> //for ISAPI classes and structures // tell the compiler to shut up about using STL #pragma warning(disable:4786) #include <<string>> //to build response to send back to user using namespace std; /*~~~~~~~~~~~~~~~~~~~~~~~~~~~~~~~~~~~~~~~~~~~~~~~~~~~~~~~~~~~~~~~~ Name:GetExtensionVersion In: pVer - Pointer to ISAPI structure HSE_VERSION_INFO. Out: Returns true if you want IIS to use the extension, otherwise if another value is returned, IIS will not use the extension Purpose: Called when the extension is loaded into IIS. The member variables of HSE_VERSION_INFO, dwExtensionVersion and lpszExtensionDesc should be filled with the extension version and description. Other initialization functionality could be called from this function to set up the server to use this extension. /*~~~~~~~~~~~~~~~~~~~~~~~~~~~~~~~~~~~~~~~~~~~~~~~~~~~~~~~~~~~~~~~~*/ BOOL WINAPI GetExtensionVersion(HSE_VERSION_INFO *pVer) { //ISAPI version const DWORD VERSION_NUMBER = 0.9; const char* VERSION_NAME = "Hello World"; pVer->>dwExtensionVersion = VERSION_NUMBER; strncpy( pVer->>lpszExtensionDesc, VERSION_NAME, HSE_MAX_EXT_DLL_NAME_LEN); return TRUE; } /*~~~~~~~~~~~~~~~~~~~~~~~~~~~~~~~~~~~~~~~~~~~~~~~~~~~~~~~~~~~~~~~~ Name:HttpExtensionProc In: pECB - pointer to the Extension control block structure Out: DWORD - HSE status code Purpose: main entry point for HTTP request the possible return codes are: HSE_STATUS_SUCCESS - everything worked great HSE_STATUS_SUCCESS_AND_KEEP_CONN - same as HSE_STATUS_SUCCESS since IIS 4 HSE_STATUS_PENDING - wait until effort completed HSE_STATUS_ERROR - sends a 500 error code /*~~~~~~~~~~~~~~~~~~~~~~~~~~~~~~~~~~~~~~~~~~~~~~~~~~~~~~~~~~~~~~*/ DWORD WINAPI HttpExtensionProc(EXTENSION_CONTROL_BLOCK *pECB) { //HTTP headers const char* BASIC_HEADER = "Content-type: text/html\r\n\r\n"; //output values const DWORD BUFFER_LENGTH = 4096; TCHAR szTempBuffer[BUFFER_LENGTH]; DWORD dwBufferSize = BUFFER_LENGTH; string sResponse; //start our HTML document sResponse = "<<HTML>><<HEAD>><</HEAD>><<BODY>><<P>>"; sResponse += "Hi! Hello World"; sResponse += "<</P>><</BODY>><</HTML>>"; // set content-type header strcpy(szTempBuffer, BASIC_HEADER); DWORD dwHeaderSize = strlen(szTempBuffer); pECB->>ServerSupportFunction(pECB->>ConnID, HSE_REQ_SEND_RESPONSE_HEADER, NULL, &dwHeaderSize, (LPDWORD) szTempBuffer); //write value to http response DWORD dwLength=sResponse.length(); pECB->>WriteClient( pECB->>ConnID, (PVOID)sResponse.c_str(), &dwLength, 0); //return a success code return HSE_STATUS_SUCCESS; }
GetExtensionVersion Function
The GetExtensionVersion function takes a pointer to the HSE_VERSION_INFO structure as the parameter and returns a BOOL value depending on whether or not IIS should use the ISAPI extension. If true is returned from GetExtensionVersion, the ISAPI extension will be used. If false is returned, the ISAPI extension will not be used by IIS. The GetExtensionVersion function is called when the ISAPI extension is loaded into the process space of IIS. After the ISAPI extension is loaded into IIS, GetExtensionVersion will not be called again. This function is an excellent place for code that performs a license key check or initialization procedures that will validate whether or not the extension should be used. In Listing 17-2 of HelloWorld.cpp, the GetExtensionVersion function is used only to set the version information for the ISAPI extension.
The HSE_VERSION_INFO structure contains two member variables named dwExtensionVersion and lpszExtensionDesc. The expectation is that the values for these member variables in the HSE_VERSION_INFO structure will be filled when the GetExtensionVersion function is called. In the case of the Listing 17-2, the DWORD of 0.9 is placed in dwExtensionVersion and the value of HelloWorld is placed in lpszExtensionDesc. True is always returned from this function because the ISAPI extension should always be loaded into IIS. Because this ISAPI extension is a “Hello World” program for demonstration purposes, no situation exists for which this ISAPI extension should not be loaded. If you had an ISAPI extension that required a dependency such as a valid license file, presence of another software library, or a special configuration, then you could perform that check in this function and return a value of false if the dependency check failed.
HttpExtensionProc Function
The HttpExtensionProc function takes one of the most important structures in ISAPI as a parameter. A pointer to the Extension Control Block (ECB) structure is passed into HttpExtensionProc. This structure contains the following:
-
All the data about the HTTP request
-
Data about the web instance of IIS that the request came through
-
Support functions to parse the HTTP request
-
Support functions to manage the HTTP response
In the case of Listing 17-2, however, the pointer to the ECB block is used only to send a response header to the client and to write the phrase Hi! Hello World to the client. The C++ code looks a little C-like in the structures and support functions, likely because ISAPI has not changed a lot since IIS was first produced and there was a desire to maintain backward compatibility. As a result, ISAPI has not been changed much, other than adding new functionality. The difficulty with working with ISAPI is the fact that some of the API is unsophisticated and requires that you code using some C-like conventions.
The first function called in the ECB block in the HelloWorld extension is the ServerSupportFunction. It is used to set a header in the HTTP response to indicate that the content type is text or HTML using the following string:
Content-type: text/html\r\n\r\n
Two pairs of carriage returns and linefeeds should follow all HTTP response headers. That’s why, in this Content-type header, the escape characters for newline and carriage return (\n and \r) are added to the end of the header twice.
The next function called using the ECB is the WriteClient function. The phrase Hi! Hello World is written to the web browser using this function by passing a char pointer (char*) of the string variable that holds the HTML and the phrase Hi! Hello World. WriteClient requires a void pointer (void*), however, so the char pointer is cast into a void pointer using the PVOID macro.
Deploy the HelloWorld ISAPI
If the DLL compiles, the ISAPI extension may be deployed to a web server. If you set the file location for the DLL output to a web server instance or virtual directory root, you can request the file from IIS immediately after the DLL is built. If you try to debug the DLL by pressing F5 to start the build and debug process, Visual Studio .NET will not start up your web browser and automatically request the ISAPI DLL from IIS as it would if you were debugging an ASP.NET web service. Visual Studio thinks that the project is simply a DLL so it will request that you assign an executable to consume the DLL.
| Remember | If the developer builds an ISAPI extension DLL and then tests the DLL by requesting it through IIS, the second build of the ISAPI DLL in Visual Studio .NET will likely fail to write the DLL. IIS locks the ISAPI extension DLL when it is requested from IIS, and IIS keeps it locked since the DLL is loaded into the IIS process space. The instance of the web site or the virtual directory must be unloaded or the application must be recycled to free up the ISAPI DLL. After the ISAPI DLL is freed, you can overwrite it in the build process. |
When the ISAPI DLL is requested from IIS 6 for the first time on Windows Server 2003 (WS03), the server will likely return a 404 error. A new feature of WS03 and IIS6 is the restriction of all server-side programmatic support by default, unless explicitly enabled. In previous versions of Windows Server, IIS would come loaded with all of the server-side programmatic support enabled, such as ASP. The functionality must be enabled on the server using the Web Service Extensions administrative applet in the Computer Management Microsoft Management Console (MMC) plug-in, as shown in Figure 17-8.
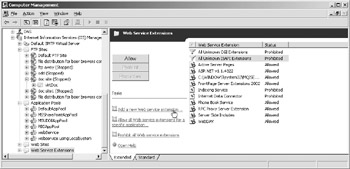
Figure 17-8: Enabling server-side programmatic functionality using the Web Service Extensions applet
Let’s set up IIS to allow requests for the HelloWorld ISAPI extension.
-
From the Web Service Extensions administrative applet in Computer Management, click the link labeled Add A New Web Service Extension. A New Web Service Extension dialog box will open.
-
Enter a name in the Extension Name text box that you want to display in the Web Service Extensions administrative applet. As shown in Figure 17-9, the name HelloWorld was entered.

Figure 17-9: New Web Service Extension dialog box -
Click the Add button to add the file path for the ISAPI extension. The Add File dialog box will open and you can enter the file path directly or use the Browse button to open the Open File dialog box.
-
Set a file path for the ISAPI extension, click OK on the Add File dialog box, and the ISAPI extension file path will appear in the New Web Service Extension dialog box.
-
Check the Set Extension Status To Allowed checkbox and click OK.
The HelloWorld extension will appear in the Web Service Extensions administrative applet in Computer Management and the status will show Allowed.
Alternatively, you can set the All Unknown ISAPI Extensions web service extension to be Allowed. This setting allows any request to any ISAPI extension to be allowed. From a security perspective, enabling this setting exposes the server to unnecessary risk, so it should be used only in environments that are isolated, such as in a development environment.
The web instance in IIS or the virtual directory must also have its execute permissions set to allow ISAPI DLLs to run. By default, the setting Execute Permissions on the Properties window for an IIS web instance or virtual directory is not set to allow scripts and executables to run.
-
Open the IIS Computer Management MMC plug-in, and right-click the web instance or virtual directory to expose its context menu.
-
Choose Properties to open the Properties window for the web instance or virtual directory.
-
Under the Virtual Directory tab for the Properties window of a virtual directory or the Home Directory tab for a web instance is an Execute Permissions combo box, as shown in Figure 17-10. Make sure that Scripts And Executables is selected.
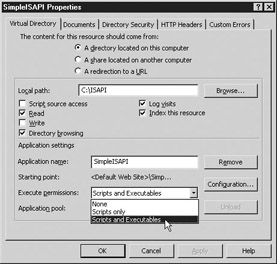
Figure 17-10: Setting the execute permissions for a virtual directory
If everything is set properly in IIS, the HelloWorld ISAPI should function. Simply request the ISAPI DLL in the URL of your web browser as though it were an HTML file, and the DLL should run. The result of the HelloWorld ISAPI sample running is shown in Figure 17-11.
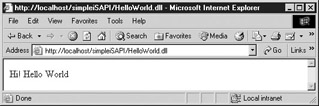
Figure 17-11: Running the HelloWorld ISAPI extension
|
|
EAN: 2147483647
Pages: 193
- Step 1.1 Install OpenSSH to Replace the Remote Access Protocols with Encrypted Versions
- Step 1.2 Install SSH Windows Clients to Access Remote Machines Securely
- Step 2.1 Use the OpenSSH Tool Suite to Replace Clear-Text Programs
- Step 6.2 Using Port Forwarding Within PuTTY to Read Your E-mail Securely
- Appendix - Sample sshd_config File