Deploying a COM DLL
|
|
Now that the clsChair class has passed the unit test in the test harness, it’s almost ready to be used in a web application. Before it can be used, however, the class must be compiled and placed on the hosting server. Here’s how to deploy class clsChair:
-
In the Project Explorer, choose the ConfigSeat project.
-
Choose File | Make ConfigSeat.dll.
-
The Make Project dialog box will open and prompt you for the file name and the location for the new DLL. Edit the filename or the file path if you want and click OK.
VB will compile the ConfigSeat project and produce a .dll file based on the name and location specified in step 3. The DLL will also be automatically registered on the host so you can use the new DLL immediately. (Registering a DLL will be covered in the next section.)
-
Copy the new DLL to the host server. The DLL does not have to reside under the web root; you can place it anywhere on the host, but it is a good idea to choose a directory that is not under the web root and that is clearly designated as a storage location for binary components for the web application. Placing COM binaries under the web root also exposes an unnecessary risk if a failure occurred in the configuration of the web server, allowing the possibility of the COM binary to be accessed and downloaded by a web user.
Using regsvr32
After copying ConfigSeat.dll to the server, the DLL must either be registered or loaded into Component Services as a COM+ application. To register a component, Microsoft created a command-line utility called regsvr32.exe. Here’s how to run the utility:
-
Open a command window, or choose Start | Run.
-
Type regsvr32 <name of COM DLL> (replacing <name of COM DLL> with the COM DLL filename). If you kept the name ConfigSeat.dll, then the command would be regsvr32 ConfigSeat.dll if your command window cursor was at the same directory that ConfigSeat.dll resides. If you are running regsvr32 from another location on the server other than the location where the COM DLL is located, you will have to type the whole file path to the .dll file in the command. For example, if ConfigSeat.dll were placed at C:\bin\, the command that should be executed is regsvr32 C:\bin\ConfigSeat.dll.
-
Press ENTER to register the COM DLL.
-
A message should pop-up in a dialog box indicating a successful registration occurred. Click OK to dismiss the dialog box.
If you want to remove the COM object DLL or replace it with another COM object DLL, you should unregister the COM object DLL and delete the file. Unregistering a COM object DLL removes the CLSID entry for the COM object DLL from the registry, thereby minimizing the entries in the registry. You can perform this action using the same steps for registering except that you must use the /u switch in the command. For example, if the file C:\bin\ConfigSeat.dll needed to be unregistered, the command would be regsvr32 /u C:\bin\ConfigSeat.dll. If you want to see the available switches for the regsvr32 command, execute the command without any parameters as follows: regsvr32. A pop-up dialog box will display the switches and how they affect the execution of regsvr32.
Using regsvr32 is not complicated, and it works without a hitch. It is an ideal solution for scenarios that don’t require management and overview of the COM object. Registering COM objects using regsvr32 is a perfectly acceptable solution for a desktop application.
Using Component Services
Deploying a COM object in Component Services is a better strategy than using regsvr32 for web applications, because the components used in a web application often require future management and component updates. Any software loaded in Component Services is called a component. Component Services provides many more features to manage a component, such as the following:
-
Updating a component without interrupting consumer utilization of the component
-
Providing statistical information about the utilization of the component
-
Masquerading operation of the component under a given set of user’s credentials
-
Distributing the component’s functionality to other hosts
-
Rolling back database transactions
To load a COM object into Component Services, a COM+ application must first be created. A COM+ application contains one or more COM objects or components. A COM+ application in Component Services should be thought of as an ideal deployable unit—ideal in terms of the consumer of the component. A COM+ application can be consumed by another process, or Component Services could provide a process under which the COM+ application could run. Starting and stopping a COM+ application will respectively enable or prohibit all of the components in the COM+ application from functioning. If you have reliable components loaded with unreliable components, the reliable components should be moved to another COM+ application that does not require as many administrative changes as the COM+ application containing the problematic DLLs. This strategy will minimize the down time for parts of the application that may not need to be taken out of commission due to the failure of one bad component. Likewise, you will be able to better manage the deployment of a component if it is isolated from the rest of the other reliable components until it proves its reliability.
Adding a New COM+ Application to Component Services
Here’s how to add a new application to Component Services:
-
Open the Component Services MMC snap-in, and expand the tree view on the left so that the COM+ Applications folder is open under the computer that will host the component.
Note The Component Services MMC can also manage Components Services on a remote host if you have administrative credentials that are valid for the remote host. Loading a component on a remote host requires that the component file reside on the remote host, however. The Component Services MMC will not move the component file to the remote host.
-
Right-click the COM+ Applications folder and choose New | Application (as shown in Figure 13-9) to launch the COM+ Application Install Wizard.
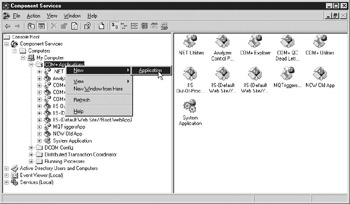
Figure 13-9: Adding a new Application in the Components Services management console -
In the first wizard screen, click the Next button.
-
In the Install Or Create A New Application screen shown in Figure 13-10, click Create An Empty Application and the wizard will advance to the Create Empty Application screen automatically.

Figure 13-10: Install Or Create A New Application screen of the COM+ Application Install Wizard -
On the Create Empty Application screen, shown in Figure 13-11, enter the name of the COM+ Application; in this case, enter New ConfigSeat Web. The name of the COM+ application has little significance programmatically; the name identifies the COM+ application in the Component Services MMC.
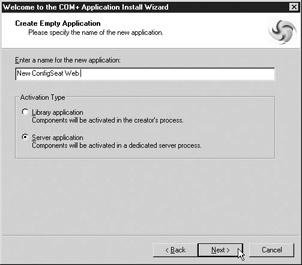
Figure 13-11: Create Empty Application screen in the COM+ Application Install Wizard -
Because the DLL ConfigSeat is a new component, select the default, Server Application, for activation type. The Activation Type setting has a profound effect on the COM+ application’s performance and reliability. For more information about this setting, please refer to the sidebar “Background on Windows Architecture and Component Services Applications.” Click the Next button to continue.
-
In the Set Application Identity screen shown in Figure 13-12, the default setting is Interactive User. You can also choose either of the built-in accounts Local Service or Network Service or you can establish an account for the COM+ application to run under. The Interactive User selection causes the COM+ application to run under the current logged-on user. You should not use Interactive User for a COM+ application hosting components that are used in a web application because the COM+ application will not run after the current logged-on user logs off from the host.
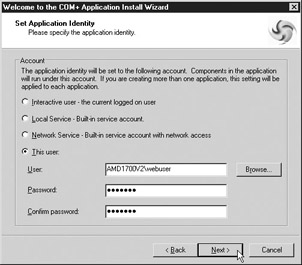
Figure 13-12: Set Application Identity screen in the COM+ Application Install WizardThe Network Service account is the default Windows user account for worker processes in IIS to run under. The Local Service account is more restrictive than the Network Service account. Both the Local Service or Network Service Windows user accounts are quite restrictive and are, therefore, very safe Windows user accounts to run applications under. For this example, a specified Windows user account will be used for the application to run under. The Windows user account named webuser was created to handle web-related services. The Windows user account webuser belongs to the users group. After the webuser password is entered and confirmed, click the Next button.
-
The Add Application Roles screen appears, as shown in Figure 13-13. As complexities of web applications increase, programmers are forced to define roles in addition to providing access control to content. Role-based security and extendible access control systems are complicated and difficult to build. Defining roles and assigning Windows user accounts to the roles as they pertain to a given COM+ application is one way that you can exploit Component Services. Roles can be created with associated Windows user accounts that enable the web application to support sophisticated access control and security schemes. You can click the Add Role button to add more roles to the COM+ application. In this case, a default role has been added, called CreatorOwner. This role is more than adequate to serve the needs of the COM+ application in this example. Click Next to continue.
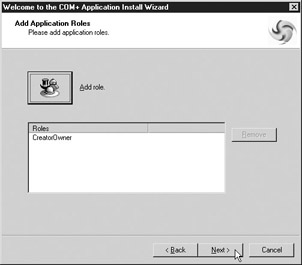
Figure 13-13: Add Application Roles screen in the COM+ Application Install Wizard -
In the Add Users To Roles screen, shown in Figure 13-14, Windows user accounts can be added to the roles that were defined in the Add Application Roles screen. By default, your Windows user account will be used for each role defined in the previous screen. You will probably never use your user account to act as a user for a role. The Windows user accounts that are added to roles are likely established to provide credentials under which processes can run. The webuser Windows user account will be the only Windows user account added to the role CreatorOwner, as shown in Figure 13-14. Click Next to continue.
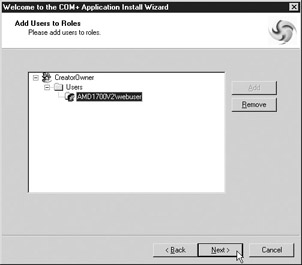
Figure 13-14: Add Users To Roles screen in the COM+ Application Install Wizard, with the webuser Windows user account added to the CreatorOwner role -
Finally, the finish screen of the wizard is presented. Click Finish, and a COM+ application is now set up and ready for a COM DLL to be placed inside.
To understand the difference between a server application and a library application in Component Services, you must understand the terms and some of the mechanics of Windows architecture. A process is an executable program that is running. The Windows operating system provides slices of time to the processor to each spawned process. A thread is work being performed within a process. A process can support more than one running thread at a time. When no threads are running in a process, the process is done, and Windows no longer provides the process with slices of time to the processor.
The more processes running, the more resources the computer utilizes to support the processes. Starting a process initially requires a great deal of server resources. Shutting down a single process has no effect on any other process, unless other processes require the shut-down process to function. Shutting down processes is usually a graceful action that does not risk the stability of the system, so distributing more work among processes uses more machine resources but offers greater reliability.
In an effort to minimize the system resource drain caused by starting and maintaining processes, programmers try to design software to load into memory under an existing process instead of requiring the computer to create a new process for the software. The comparison of Common Gateway Interface (CGI) web applications versus ASP web applications illustrates this difference. Early versions of CGI web applications generally consisted of an executable that was launched to handle each web server page request. That means that if 10 hits per minute occurred on a web page that required a CGI application to perform some work, regardless of how simple or difficult the work being performed, the server would have launched the CGI executable 10 times a minute, or 600 times per hour.
If an ASP page were performing the same functional purpose as the CGI executable, zero processes would be launched over the same period of time. Actually, only one process is launched to support an ASP to run, and the process is launched when the server starts—the process is IIS itself. ASP is an Internet Server Application Programming Interface (ISAPI) extension called ASP.DLL that runs under the process space of IIS. In the past, problems may have caused IIS to stop working after some prolonged period of time for no apparent reason. IIS failures of this sort were likely due to the fact that the IIS process had become corrupted in some way after an exception had destabilized it, after a memory leak, or following unreleased pointers. These failures were likely the result of DLLs that contained a defect being loaded into the IIS process space. This inherit design feature (or flaw) in Windows architecture has contributed to IIS being perceived as unreliable compared to other less sophisticated systems that use CGI primarily.
To produce a solution that offered greater reliability without sacrificing as much performance, as would be the case if all software was written to run under its own independent process, Microsoft created Microsoft Transaction Server (MTS) for Windows NT 4. MTS became Component Services or COM+ on the Windows 2000 platform. With each new platform, Component Services provides a few more features. The primary benefit, however, is that Component Services acts as a DLL server. A COM object DLL may be loaded into a COM+ application in Component Services and can be run in its own process, or can be run in the process space of the consuming software. A COM+ server application runs in its own process space and a library application runs in the consuming process's space. If the DLLs being consumed are reliable and do not need to be changed or updated often, they should be hosted in a library application in Component Services because the overall software solution will benefit by using less server resource and functioning with greater performance. If the DLLs are new or unreliable, or they need to be changed often, they should be hosted in a server application in Component Services because the overall software solution will benefit by not crashing if a failure occurs in the component or will not require the entire solution to be stopped in order to make an update.
Adding a New Component to a COM+ Application in Component Services
The purpose for creating the COM+ application was to enable Component Services to serve instances of the classes inside ConfigSeat.dll. The next step to deploy ConfigSeat.dll to the host server is to add ConfigSeat.dll to the COM+ application New ConfigSeat Web that was just created.
-
From the Component Services management console, right-click the Component folder under COM+ Application New ConfigSeat Web, and choose New | Component, as shown in Figure 13-15.
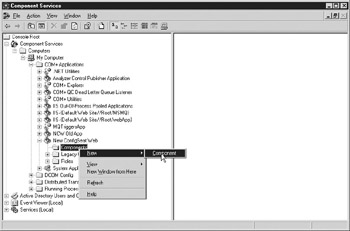
Figure 13-15: Launching the COM+ Component Install Wizard -
The welcome screen to the COM+ Component Install Wizard opens. Click the Next button to continue.
-
In the Import Or Install A Component screen, click the Install New Components button.
-
In the file selection dialog box, select the ConfigSeat.dll file and click Open.
-
The next screen, Install New Components, summarizes the components that are being added to the new COM+ application, as shown in Figure 13-16. This screen seems to have no other purpose than to allow you to open other COM DLLs to load into the COM+ application and to show you what has been chosen. You can click the Add button to get the same file selection dialog box presented in step 4. Selecting other COM DLLs will add them to lists of files and components displayed in this screen. Click Next.
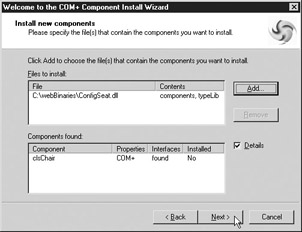
Figure 13-16: Install New Component Screen of the COM+ Component Wizard, showing the result of ConfigSeat.dll being loaded -
Click Finish. The COM+ Component Install Wizard will finish and the ConfigSeat.dll should be added to the COM+ application New ConfigSeat Web in Component Services.
Using Component Services for Role-Based Access
Component Services enables role-based access to any component loaded into a COM+ application. Windows user accounts are assigned to a role. Requests to a component in Component Services is made using Windows user account credentials. Component Services associates the consumer to a role using the Windows user account credentials provided by the consuming software. If the roles associated with the Windows user account credentials provided are associated with the requested part of the component, the consuming software will function as expected; otherwise, the consuming software will not be able to access the component as expected. The roles may be associated to a component loaded in a COM+ application at the following four levels:
-
COM+ application All components placed in the COM+ application
-
Component A specific COM object loaded into a COM+ application
-
Component’s interfaces collectively All of the methods for a COM object loaded in a COM+ application
-
Component’s method A specific method in a specific COM object loaded in a COM+ application
You have to enable the role access starting from the highest level of definable access and descend the levels until the desired access control is achieved. The lowest discrete functionality that access control may be defined as a method of a component. To enable role-based access, you have to perform the following steps:
-
Enable component-level access checks for the COM+ application.
-
Enable component-level access checks for the component.
-
Assign a role or roles to any of the following parts of the component:
-
The component itself
-
A method of the component
-
All methods of the component
-
To enable component-level access checks for a COM+ application, do the following:
-
From the Component Services management console, right-click the COM+ Application and choose Properties.
-
Select the Security tab in the Properties window.
-
Click the Enforce Component-Level Access Checks checkbox.
-
Click OK.
To enable component-level access checks for a component, you must enable component-level access checks for the COM+ application prior to performing these steps.
-
From the Component Services management console, right-click the component and choose Properties.
-
Select the Security tab in the properties window.
-
If you want to assign a role to the component as a whole, check the role in the list labeled Roles Explicitly Set For Selected Item(s). All the methods of the component will inherit this role.
If you want to assign roles to specific methods within the component, click the Enforce Component-Level Access Checks checkbox. This will enable you to further assign roles to methods of the component.
-
Click OK.
In the case of the component ConfigSeat.clsChair that was added to the COM+ application named New ConfigSeat Web, role-based access is not required. Enforce component-level access checks will not be turned on for ConfigSeat.clsChair. The COM+ application New ConfigSeat Web will be set to enforce access checks, however, so component-level access checks will be selected. If IIS was running under the default guest user account created by Windows (for example, IUSR_MyMachineName), an ASP creating the ConfigSeat.clsChair object will fail since the Internet guest account does not have access to the ConfigSeat.clsChair component. If the IIS Internet guest account were changed to a different Windows user account that had access to the ConfigSeat.clsChair component, the ASP would run correctly. To make an ASP consume the ConfigSeat.clsChair component, the web instance or virtual web instance within IIS will be set to run using the webuser account credentials.
You can configure this access by doing the following:
-
Open the Properties window for a web instance or virtual web instance, and select the Directory Security tab.
-
Click the Edit button under the Authentication And Access Control area to open the Authentication Methods window.
-
By default, the Enable Anonymous Access checkbox is selected, and the credentials of the default guest user account are placed in the User Name and Password text boxes. Type the login name webuser into the User Name text box and enter the password for webuser in the Password text box.
-
Click OK repeatedly until all of the windows that were opened from the property pages window for the web instance or the virtual web instance are closed.
The ASP pages will execute under the Windows user account webuser. When the ASP creates the ConfigSeat.clsChair component, the credentials for the webuser Windows user account will be presented to Component Services for the request. Component Services will verify that webuser is allowed to create and use the component, and the ASP will consume the functions in the ConfigSeat.clsChair component.
|
|
EAN: 2147483647
Pages: 193