Packages
|
A package is a named group of classes. Generally, the classes of a package are collected together into a directory. It is possible for package classes to appear in more than one directory, but it's hard to imagine when this would be helpful. So a package looks a lot like a directory, even though they aren't exactly the same thing.
There is another similarity: Just as a directory can contain files and subdirectories, a package can contain classes and subpackages. For example, a package called acmeproducts might contain two classes named Database and Connection. The package might also contain a subpackage called utilities, which contains three classes named ThreadPool, Mailbox, and UserProfile. Your package structure would most likely appear in the directory structure shown in Figure 9.1.
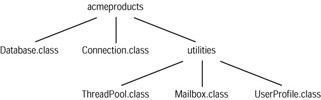
Figure 9.1: Example package/ directory structure
It's important to realize that the directory and the subdirectory shown in Figure 9.1 are not the actual package and subpackage. They are just the places where the classes of the package and subpackage are found. Soon you'll learn how to put your own classes in packages, and why you might want to do so. For now, be aware that there is more to it than just creating the right directory structure and storing the class files appropriately.
When a class is part of a package, the class has a long, formal, official name. It's important to understand this long name, even though it's rarely used. The official name of a class consists of its package structure, from top to bottom, followed by the class name as defined in the source file. All these elements are separated by periods. For example, the Mailbox class in Figure 9.1 would be defined in a file called Mailbox.java. Its full name is acmeproducts.utilities .Mailbox, because it lives in subpackage utilities, which lives in package acmeproducts. (Note that the package name is all lowercase. You are allowed to use uppercase in package names, but by convention, nobody does.)
There is yet another parallel between directories and subpackages. Even a modest laptop can have tens of thousands of files on its hard drive. If every file on the drive had to have a unique name, keeping track of which names were still available would be a horrendous task. Thanks to directories, you only have to maintain name uniqueness within directories. So you might have a directory called photos, with a subdirectory called NewYearsParty, which contains a file called JulieAndRich.jpg. If you had a housewarming party, you could create a subdirectory of photos called housewarming, and if you took a picture of Julie and Rich at the housewarming, you could store it in the housewarming subdirectory under the name JulieAndRich.jpg.
We say that a directory structure provides a namespace. A namespace is a way of organizing resources (files, classes, etc.) so that name uniqueness only has to be maintained in relatively small and manageable regions.
Packages are also namespaces. Within a package, all class names must be unique. However, names may be reused in different packages without restriction. Figure 9.2 shows a package structure that might be used by a fictional company called Stained Glass Software. This company has two product lines: database products and ray-tracing software.
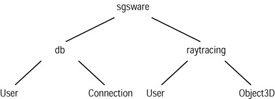
Figure 9.2: Package as namespace
Stained Glass Software has dozens of programmers, working in two divisions on opposite sides of the world. Life would be impossible if every programmer had to check with every other programmer before creating a new class, just to make sure the class name wasn't already in use. As you can see from Figure 9.2, both divisions have created a class called User. Fortunately this isn't a problem, because the two classes are in different packages, and packages are namespaces. To put this another way, one class is really called sgsware.db.User, and the other is really called sgsware.raytracing.User. You can see that packages support collision-safe naming. In the real world, a package might be developed and maintained by several workgroups, by a single workgroup, by a few individuals, or by a single person.
Creating Your Own Package
By now, we hope you're convinced that packages are a good thing. Here's how to create your own packaged classes.
You need to do two things:
-
Use the package keyword in your class source code.
-
Compile with the -d flag.
It's interesting to think about what isn't in this list. Here's what you don't have to do:
-
Create a package.
-
Create the package directory structure.
-
Move the class files into the directory structure.
Let's suppose you are the founder of Stained Glass Software. You have a new computer, fresh out of the box, and you are ready to write the sgsware.raytracing.Object3D class. This is the company's first class, so no structure has been created yet.
The first step is to create a directory where the package structure will go. Let's say you decide to put it in /products/revA. (You might be using the kind of computer that uses the backslash as a file path separator, but for simplicity we'll use forward slashes throughout this book.) After making sure that /products/revA exists, you create a directory to hold your source code. We'll call it /products/source/ray. So initially, your directory structure looks like Figure 9.3.
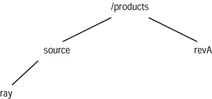
Figure 9.3: Initial directory structure
When you write your source code, you have to tell the compiler that the class belongs to the sgsware.raytracing package. To do this, you use the package keyword. Besides comments, the package declaration must be the first code in your source file:
// This class belongs to a package. package sgsware.raytracing; public class Object3D { . . . } When you compile, use the -d command line option. This should come after javac, and it should be followed by a space. After the space comes the directory where the package structure is to be stored. Since you're putting your package of classes in /products/revA (known as the destination directory), you would compile like this:
javac -d /products/revA Object3D.java
The destination directory must exist before the command is typed. The compiler realizes that the class file should be /products/revA/sgsware/raytracing/Object3D. The compiler will create any required subdirectories in the destination directory, and it will place the class file it generates in the appropriate place. So after compilation, your directory structure would look like the one shown in Figure 9.4.
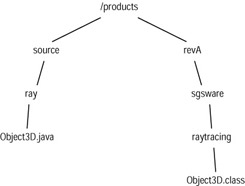
Figure 9.4: After compilation
When you want to create a second raytracing class, you can put your source file anywhere you like. However, if you put the source file anywhere other than /products/source/ray, it will only make life more baffling for yourself and others. Again, your source should declare that it belongs to the sgsware.raytracing package:
package sgsware.raytracing; public class User { . . . } When you compile, you again use the -d flag:
javac -d /products/revA User.java
This time, the compiler does not have to create a subdirectory for storing the generated class file, since that subdirectory already exists. After compilation, your directory structure looks like Figure 9.5.
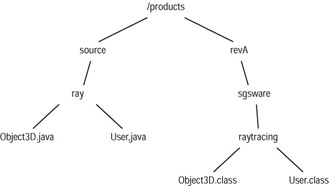
Figure 9.5: After more compilation
Now that you know how to create your own packages, let's look at how to use them.
Finding Packages: classpath
The designers of Java assumed that you would be working in an environment where you would be using lots of different packages. This was a safe assumption, since Java itself comes with lots of different packages that support functions like string manipulation, file I/O, and GUI components. Moreover, you are likely to be using other packages that you've created yourself, that are standard for your company, or that were bought from a third party. You might be developing code that uses classes from many different packages. When you compile and execute, the compiler and JVM need to know where in your file system these custom packages are located. You do this with the classpath.
The classpath is a list of directories, or classpath elements, that contain package structures. The classpath elements can be specified in two places:
-
The CLASSPATH environment variable
-
The -classpath or -cp argument of the javac or java command line
An environment variable is a variable whose scope is your computing session, rather than the interior of an program. Individual programs can read environment variables and take action accordingly. The CLASSPATH variable, which is read by both the Java compiler and JVM programs, is a list of classpath elements, separated by semicolons (;) for Windows machines and by colons (:) for other systems.
You can set CLASSPATH either by typing a command or by running a script. Running a script is easier (after you create the script). Some people prefer to set CLASSPATH in their boot or login scripts (or whatever the equivalent is on their own machines). Appendix A, "Installing Java" shows how to write a script that sets CLASSPATH to ".", which is the current working directory. Different operating systems use different commands to set an environment variable, as detailed in the appendix.
The other way to specify classpath elements is to type them into your compilation and execution command lines. You do this after the javac or java command: type -classpath, then a space, then the classpath elements you want to specify. As with CLASSPATH, if you have more than one element, they should be separated by semicolons (;) for Windows machines and by colons (:) for other kinds of machines.
Suppose you are using a Windows machine, and you have acquired and built lots of custom packages. These packages are stored in three different directories: \a\b, \c\d, and \e\f. There might be more than one package in any of these directories. The names aren't very creative, and three is an inconveniently large number of classpath elements, but it makes for a nice clear example.
Now suppose that, for some reason, you want to specify \a\b and \c\d in CLASSPATH, while specifying \e\f on the command line. You would start by setting CLASSPATH (either manually or in a script) as follows:
SET CLASSPATH=\a\b;\c\d
Then you would compile source like this:
javac -d \my\destination -classpath \e\f MyThing.java
If MyThing is your application class, and it lives in package sgsware.db, you would execute your application like this:
java -classpath \my\destination;\e\f sgsware.db.MyThing
The application class, as well as any other classes used at any time in the application, must appear in one of the classpath elements. So the MyThing.class file must be in one of the following directories:
-
\a\b\sgsware\db
-
\c\d\sgsware\db
-
\e\f\sgsware\db
Note that each of these directories consists of a classpath element, followed by a package structure.
The Java compiler and the JVM use a piece of code called a class loader. The class loader finds class files, reads them, and translates them into internal representations. The first step in the process is to find files. The class loader does this by looking in each classpath directory in turn. In each directory, it looks for a subdir that corresponds to the package of the class being loaded. So when the class loader looks for MyThing.class, it looks in each of the directories listed in the preceding bulleted list.
Now you know how to create, store, and use packages. But there is still a problem, which will be presented and solved in the next section.
Importing
You have seen that a class name is really a list of package elements, separated by periods and ending with the (short) name of the class. Packages provide a convenient way to organize software and reduce naming headaches, but there seems to be a tradeoff with what happens in your source code.
In the previous section, you considered a class called MyThing in a package called sgsware.db. The true name of class MyThing is sgsware.db.MyThing. That doesn't seem so bad until you realize that the following line of source code is not allowed:
MyThing m = new MyThing();
This line won't compile, because it doesn't use the true name of the class. The line ought to be
sgsware.db.MyThing m = new sgsware.db.MyThing();
Programming wouldn't be very much fun if you had to use full class names everywhere. Imagine what a burden it would be, if you had to do so much typing. You would soon find yourself wishing for a way to abbreviate: "I wish I could tell the compiler that every time I type MyThing, I really mean sgsware.db.MyThing." This wish is granted by Java's import feature.
Importing is a very useful feature with an unusual name. The name comes from earlier object-oriented languages, in which the functionality was a kind of symbolic importation. Now the keyword continues to be used in Java, but the functionality has more to do with abbreviation than with importation. The syntax of import is
import full.class.Name;
You can have as many import statements as you like in a source file. Imports must appear before the class declaration, as shown in the following code. It assumes that you want to use the Employee and Manager classes of a package called biz:
1. package sgsware.raytracing; 2. import biz.Employee; 3. import biz.Manager; 4. 5. public class User 6. { 7. Employee dagwood; 8. Manager dithers; 9. 10. . . . 11. } Thanks to the imports on lines 2 and 3, you can use abbreviated class names on lines 7 and 8 (and everywhere else in this source file). Without the imports, lines 7 and 8 would have to be
7. biz.Employee dagwood; 8. biz.Manager dithers;
Sometimes a source file might need to use many or all of the classes in a large package. It would be cumbersome to type in the names of all those classes, one per import line. In the spirit of supporting abbreviation, you are allowed to use an asterisk (*) in place of a class name. This causes all classes in the package to be imported. So the preceding code could be slightly shortened as follows:
1. package sgsware.raytracing; 2. import biz.*; 3. 4. public class User 5. { 6. Employee dagwood; 7. Manager dithers; 8. 9. . . . 10. } One last note on importing: A class imports all the other classes in its package automatically. So you never have to do the following:
package mypackage; import mypackage.*; . . .
Now that you understand how packages work, you have a foundation for learning about Java's various access modes. These will be presented in the next section. You also have a basis for understanding Java's core classes. These will be introduced in Chapter 12, "The Core Java Packages and Classes," and will be presented throughout the remainder of the book.
|