Applying Effects to Photos
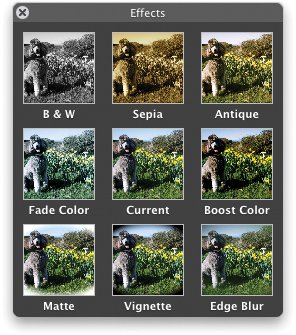
| With the Effects panel, you can alter a photo to give it a unique look. Evoke the colors of an old, faded tintype. Turn a color photo into a black-and-white one. Blur the edges of a scene to create a gauzy, romantic look. Juice up the colors in a photo or tone them down. As the tips at right describe, you can apply more than one effect to a photo, and you can apply an effect more than once. Keep in mind that applying an effect to a photo changes that photo everywhere it appearsin albums, books, slide shows, and so on. If you want to retain the previous version of a photo, be sure to duplicate it before applying an effect: select the photo and choose Duplicate from the Photos menu or use the Effective Tips Combining effects. Good cooks don't restrict themselves to just one spice. By combining effects, you can create some striking results. Some effects pair up particularly well. For a dream-like look, try combining Edge Blur with the B&W effect. For an old-fashioned look, pair the Sepia or Antique effects with the Vignette effect. To create an oval border around a photo, combine the Matte and Vignette effects. Don't be afraid to try offbeat combinations, either. It might seem contradictory to follow the Boost Color effect with the Fade Color effect, but you can get some interesting results when you do. And remember, if you paint yourself into a corner, just click the Current button in the center of the Effects panel to return to safety. When once isn't enough. You can apply most effects more than once: simply click the desired effect's button over and over again. (The two exceptions are the B&W and Sepia effects; clicking their buttons repeatedly will only wear out your mouse.) Alas, if you go too far and choose the Undo command, iPhoto removes the effect entirely instead of just undoing the last mouse click. I've gotten in the habit of counting how many times I click an effect button. That way, if I go too far and use Undo, I can retrace my stepsminus one. Refining an effect. You can refine the appearance of an effect by using the controls in the Adjust panel (discussed on the following pages). In particular, you can improve the contrast and tonal range of a black-and-white conversion by adjusting the Saturation, Tint, and Temperature sliders. For details, see page 147. A Gallery of Effects No single photo is ideally suited to every effect, but that didn't stop me from working my dog into this example. To remove the effects you've applied, click the Current thumbnail in the center of the Effects panel. B&W. Convert to black and white. Sepia. Add a warm brown cast. Antique. Simulate the faded colors of an old photo. Fade Color. Decrease a photo's color saturation (for more control, use the Adjust panel; page 146). Boost Color. Increase a photo's color saturation (for more control, use the Adjust panel; page 146). Matte. Add a soft-edged white border. Vignette. Add a soft black border. Edge Blur. Blur the edges of a photo. Tip: Try clicking this one a few times and combining it with the B&W effect. Tip The Matte and Vignette effects work best when a photo's subject is in the center of the image. For these examples, I cropped the photo before applying the effect, and I clicked the effect's button several times. |


- Chapter IV How Consumers Think About Interactive Aspects of Web Advertising
- Chapter VIII Personalization Systems and Their Deployment as Web Site Interface Design Decisions
- Chapter IX Extrinsic Plus Intrinsic Human Factors Influencing the Web Usage
- Chapter XIV Product Catalog and Shopping Cart Effective Design
- Chapter XV Customer Trust in Online Commerce