Tips for Creating Calendars
| Choosing Photos When creating a calendar, try to choose photos that relate to a given month. Use photos of a family member for the month of his or her birthday. If you have some particularly fine holiday shots, use them for the month of December. This sounds obvious, I know, but you'd be surprised how many times I see iPhoto calendars with photos that bear no relationship to the months in which they appear. Think vivid I've ordered several calendars, and in my experience, photos with soft, muted colors often print poorly. You're likely to see faint vertical stripes, sometimes called banding, in the photos. I get the best results when I use photos that have bright, vivid colors. Black-and-white photos work beautifully, too, provided they have strong contrast. Layout Techniques Laying out a calendar involves many of the same techniques behind book creation (pages 184193). You can add photos by hand, dragging them from the thumbnails area into specific months, or you can click the Autoflow button and have iPhoto sling the photos into your year as it sees fit. As with books, I prefer the manual layout technique for calendars. How many photos in a month? iPhoto's calendar themes, like its book themes, provide multiple page designs. Some designs provide for just one photo above a given month, while others allow for a half dozen or more. I like to minimize the number of photos I put on each month. Bigger photos have a more dramatic look, and they're easier to see and appreciate when the calendar is hanging on a wall at the opposite end of a room. For most of my calendars, I put just one photo on each month. That's a rule that begs to be broken, and I do break it now and then. If I have relatively low-resolution photos and iPhoto displays its yellow warning triangle, I'll switch to a page design that has smaller photo frames. Or if I have a series of photos that tells a story about a particular month, I'll choose a page design that lets me use all of those photos. Top, bottom, or both? Normally, iPhoto's calendar view displays both halves of a given monththat is, the upper portion, where your photos appear, and the lower portion, where the days and weeks are displayed. Between those two halves is the spiral binding that holds the calendar together. But when you're fine-tuning a calendar's design, you may find it useful to display only the upper or lower portions. The answer? Tear out the spiral binding. Click the single-pages View button To switch between viewing the upper or lower portion of a month, display the calendar's page thumbnails (click the Adding Photos to Dates When creating a calendar, your photo options aren't limited to just the page above each month. You can also add photos to individual dates. To commemorate a birthday, add a photo to the birthday girl's date. To never forget your anniversary, put a wedding photo on the date. (Another good way to never forget an anniversary is to forget it just once, but this method is not recommended.) To add a photo to a date, drag it from the thumbnails area of the calendar. 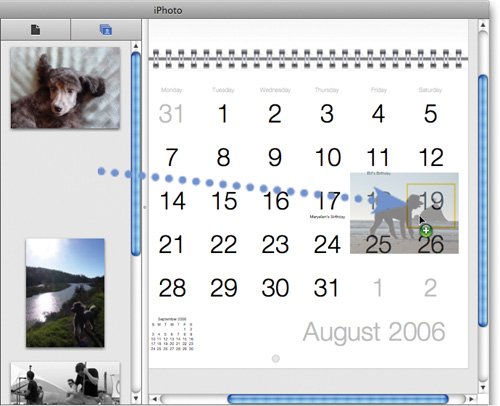 To remove a photo from a date, select the date and press the Delete key. Don't Forget the iCal Angle When creating a new calendar, you can choose to have iPhoto include event information from iCal (discussed on page 106). You can also add iCal data to an existing calendar by clicking the Settings button and checking the appropriate Use iCal Calendars box. Don't use iCal to manage your life? As I mentioned on page 107, you can download thousands of calendars from Apple's iCal site as well as iCalShare (www.icalshare.com). Because I like my calendars to include the phases of the moon, I subscribed to a lunar calendar at iCalShare. When I'm creating a new calendar, I simply check the moon-phases calendar and iPhoto does the rest. Improving Your Calendar Typography Many of the typographic tips that apply to books (pages 190191) also apply to calendars. Global formatting You can change the fonts that iPhoto uses for various elements of the calendarits dates and captions, for exampleby clicking the Settings button, then clicking Fonts. Most of the items in the Settings dialog box are self-explanatory. The two that are less than obvious are Page Text and Comments. The Page Text item controls the font in which dates, days of the week, and the month appear. The Comments item controls the formatting of custom text that you add. Local formatting. As with books, you can also override iPhoto's font settings and apply formatting to individual text items, but within limits: you can't apply local formatting to a specific date. (For example, you can't have February 14 appear in a bold red font.) You can apply local formatting only to comments and photo captions. To do so, display the item's text box (click on the date, and the text box zooms into view), then select the text and use the Fonts panel as described on pages 190191. Curl those quotes It's common to use apostrophes in calendars: Sophie's Birthday, President's Day, and so on. But iPhoto commits a cardinal typographic sin by using those heinous "typewriter quotes" instead of true typographer's quotes: Heinous: Sophie's Birthday Correct: Sophie's Birthday Fortunately, it's easy to make your quotes typographically correct. To get a true typographer's apostrophe, press Shift-Option-] (that's the right-bracket key, just above the Return key). Customizing Photos on Dates You can customize the way a photo appears on a date. 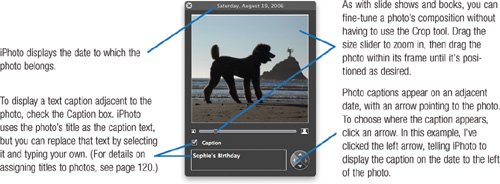 |

- Article 324 Flat Conductor Cable Type FCC
- Article 340 Underground Feeder and Branch-Circuit Cable Type UF
- Article 358 Electrical Metallic Tubing Type EMT
- Example No. D2(b) Optional Calculation for One-Family Dwelling, Air Conditioning Larger than Heating [See 220.82(A) and 220.82(C)]
- Example No. D9 Feeder Ampacity Determination for Generator Field Control