| Several core tags are provided by the JSTL XML tag library. These tags perform basic operations required by the other tags. The <x:parse> tag is used to parse XML data. When the <x:parse> tag is called, a variable is specified in which the parsed XML document will be stored. For example, consider the following code: <!-- parse an XML document --> <c:import url="http://www.site.com/students.xml" var="xml"/> <x:parse source="${xml}" var="doc"/> <!-- display using XPath expressions --> <x:out select="$doc/name"/> <!-- set a scoped variable --> <x:set var="name" scope="request" select="$ doc/students/student/name/first"/> This code begins by accessing the file http://www.site.com/students.xml. This file is loaded into the variable doc using the <c:import> tag. The <c:import> tag allows the contents of a URL to be downloaded into a scoped variable. This tag will be covered in greater detail in Chapter 9, "Accessing Internet Resources with JSTL." The contents of the downloaded XML file are then parsed using the <x:parse> tag. The resulting document is stored in the scoped variable doc. Now that the document has been parsed, we can display some of the values. We do this by using XPath expressions. These expressions are specified as the select attribute that is passed to the <x:out> and <x:set> tags. The XML document is accessed by specifying its scoped variable as part of the XPath expression using the form $doc/students/student/name/first. You will find that many of the JSTL XML tags use this form. You simply specify a select attribute that holds an XPath expression that you want to be evaluated. Now that we have seen how the core XML tags work in general, let's examine each of these tags in detail. We begin with the <x:parse> tag. Using the <x:parse> Tag The <x:parse> tag parses XML data so that it may be accessed using the other XML JSTL tags. The two forms of the <x:parse> tag are shown here: // Syntax 1: XML document specified via a String or Reader object <x:parse {xml="XMLDocument"} [filter="filter"] [system] [{var="varName" [{scope="{page|request|session|application}"] |varDom="varName"}[scopeDom="{page|request|session|application}"}]]/> // Syntax 2: XML document specified via the body content <x:parse [filter="filter"] [system] [{var="varName" [{scope="{page|request|session|application}"] scopeDom="{page|request|session|application}"}]> XML Document to parse </x:parse> The <x:parse> tag accepts the following attributes: | filter | N | Allows a filter of the type org.xml.sax.XMLFilter to be used to filter the incoming XML data. | | scope | N | Specifies the scope of the scoped variable referenced by the var attribute. | | scopeDom | N | Specifies the scope of the scoped variable referenced by the varDom attribute. | | systemID | N | Contains the URI for the parsing XML document. | | var | N | Specifies the scoped variable referenced by the varDom attribute. | | varDom | N | Specifies the scoped variable that will receive the XML document as an org.w3c.dom.Document object. | | xml | N | Specifies the XML that is to be parsed. | The first syntax is used to parse XML data from a string, which is specified by the xml attribute. You may also take the XML directly from a URL by using the xml attribute. The second syntax allows you to specify XML data as the body of the tag. The XML document will be parsed and stored in the variable referenced by the var attribute. This variable will be used in conjunction with the other XML tag commands. In addition, you can specify a scope by using the scope attribute. You may also obtain access to the newly parsed XML document as a org.w3c.dom.Document object. To obtain such an object, you have to specify a variable name by using the varDom attribute. You can also use scopeDom to specify a scope for this variable. Let's look at an example that parses XML data. The sample parsing page displays a text box and allows you to paste XML data into the text box. Our application expects XML data in the form shown in Listing 8.1. It is permissible to have more records, but you may not change the structure of the records. When you click Submit Query, the program attempts to parse the data that you just provided and display the results. You can see this program in Figure 8.2. 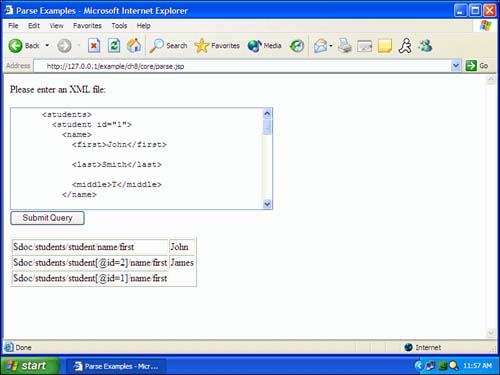
Let's now see how this program was constructed. The complete source code to this application appears in Listing 8.2. Listing 8.2 Parsing XML (parse.jsp)<%@ taglib uri="http://java.sun.com/jstl/core" prefix="c" %> <%@ taglib uri="http://java.sun.com/jstl/xml" prefix="x" %> <html> <head> <title>Parse Examples</title> </head> <body>Please enter an XML file: <br /> <form method="post"> <textarea rows="10" cols="50" name="xml"> <students> <student > <name> <first>John</first> <last>Smith</last> <middle>T</middle> </name> <grade> <points>88</points> <letter>B</letter> </grade> </student> <student > <name> <first>James</first> <last>Smith</last> <middle>K</middle> </name> <grade> <points>92</points> <letter>A</letter> </grade> </student> <student > <name> <first>Kelly</first> <last>Lane</last> <middle>A</middle> </name> <grade> <points>72</points> <letter>C</letter> </grade> </student> </students> </textarea> <br /> <input type="submit" /> </form> <c:if test="${pageContext.request.method=='POST'}"> <x:parse var="doc" xml="${param.xml}" /> <table border="1"> <tr> <td>$doc/students/student/name/first</td> <td> <x:out select="$doc/students/student/name/first" /> </td> </tr> <tr> <td>$doc/students/student[@id=2]/name/first</td> <td> <x:out select="$doc/students/student[@id=2]/name/first" /> </td> </tr> <tr> <td>$doc/students/student[@id=1]/name/first</td> <td> <x:out select="$doc/students/student[@id=1]/name/first" /> </td> </tr> </table> </c:if> </body> </html> The parsing example in Listing 8.2 operates in the two modes in which most of the form applications in this book operate. When the user first displays the page, our application displays only the form. The second half of the program does not begin until the user clicks the Submit Query button. This process begins by checking to see whether the current request was a POST, which indicates that the user has responded to the form. The following code checks to see whether the page was called as a result of the form being posted: <c:if test="${pageContext.request.method=='POST'}"> Once we determine that the user has responded to the form, we can begin to parse the file. To begin, we call the <x:parse> tag, and pass in the XML data from the form as the xml attribute: <x:parse var="doc" xml="${param.xml}" /> Now, we can begin to display the data. This <x:out> tag displays the first student's first name: <x:out select="$doc/students/student/name/first" /> This is accomplished by using the XPath expression doc/students/student/name/first. Because we have several student records, this XPath statement must decide which student to use. Whenever a collection is presented to an XPath expression, the first element will be taken unless another element is specified. XPath also allows us to get creative with our expressions. XPath can express many queries in XML data. The following <x:out> tag uses the searching feature of XPath. The XPath expression searches through all the student records and locates the student record with an attribute named id that holds the value 2. The following line of code does this: <x:out select="$doc/students/student[@id=2]/name/first" /> This <x:out> statement used the XPath $doc/students/student[@id=2]/name/first. The [@id=2] suffix to the student identifier specifies that all student records should be scanned until one is located that has an attribute named id with the value 2. Let's take a look at the <x:out> tag in greater detail. Using the <x:out> Tag You use the <x:out> tag to display data from a parsed XML document. There is one form of the <x:out> tag: <x:out select="XpathExpression" [escapeXml="{true|false}"]/> The attributes accepted by the <x:out> tag are as follows: | escapeXml | N | Specifies whether the special characters of the data displayed should be escaped. The default value is true. | | select | N | Specifies the XPath expression to be displayed. | This tag accepts an XPath expression from the select attribute. The expression will be displayed to the browser. You can select to escape the XML by using the escapeXml attribute. If you specify the value true, the characters <,>,&,', and " will be converted to their character entry codes. The <x:out> tag has the ability to display parts of the XML file. Let's look at another example. This program is similar to our earlier example, in which we retrieved the XML data from the page's form. In this example, we obtain the XML data from an external file. We'll use the same file, students.xml, shown in Listing 8.1. The output from this program appears in Figure 8.3. 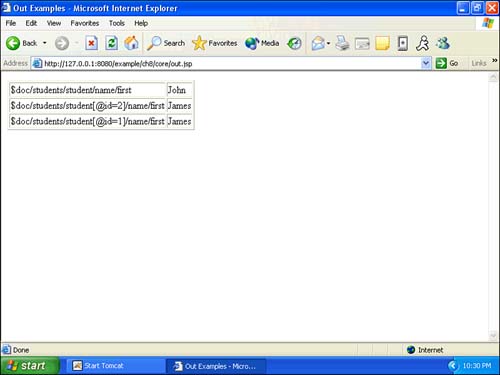
Let's discuss the differences between this page and the previous example. The Web page is shown in Listing 8.3. Listing 8.3 Using the Out Tag (out.jsp)<%@ taglib uri="http://java.sun.com/jstl/core" prefix="c" %> <%@ taglib uri="http://java.sun.com/jstl/xml" prefix="x" %> <html> <head> <title>Out Examples</title> </head> <body> <c:import var="students" url="students.xml" /> <x:parse var="doc" xml="${students}" /> <table border="1"> <tr> <td>$doc/students/student/name/first</td> <td> <x:out select="$doc/students/student/name/first" /> </td> </tr> <tr> <td>$doc/students/student[@id=2]/name/first</td> <td> <x:out select="$doc/students/student[@id=2]/name/first" /> </td> </tr> <tr> <td>$doc/students/student[@id=1]/name/first</td> <td> <x:out select="$doc/students/student[@id=1]/name/first" /> </td> </tr> </table> </body> </html> The process by which this example loads the XML data is considerably different from in the previous example. As we explained, this program loads the XML from an external file, which is stored on the same Web server as the sample program. This does not need to be the case; XSTL allows you to easily receive content from other Web sites, a concept we cover in Chapter 9. The following code loads the students.xml file for our sample program: <c:import var="students" url="students.xml" /> <x:parse var="doc" xml="${students}" /> As you can see, the XML file is first loaded into a string called students. This string is fed to the XML parser with the <x:parse> tag. The data is then displayed with the same <x:out> tags we used in our previous example. Using the <x:set> Tag The <x:set> tag works much like the <x:out> tag, except that the output is sent to a variable rather than displayed. There is one form of the <x:set> tag: <x:set select="XpathExpression" var="varName" [scope="{page|request|session|application}"]/> The <x:set> tag accepts these attributes: | scope | N | Specifies the scope for the scoped variable references by the var attribute. This attribute defaults to page scope. | | select | N | Contains the XPath expression that you want to display. | | var | Y | Specifies the scoped variable that you want to set. | You must specify the XPath expression using an attribute of the <x:set> tag. You specify the variable that you want to receive the results of the XPath expression by using the attribute var. You specify the variable's scope with the attribute scope. In addition, you have to specify the XPath expression that you would like evaluated by using the select attribute. Let's look at an example that makes use of the <x:set> tag. This program closely follows our previous examples. However, rather than simply displaying the XML elements, this program copies them to scoped variables. These values are then displayed to the user. The end result is the same as shown in Figure 8.3. Listing 8.4 shows our program. Listing 8.4 Using the Set Tag<%@ taglib uri="http://java.sun.com/jstl/core" prefix="c" %> <%@ taglib uri="http://java.sun.com/jstl/xml" prefix="x" %> <html> <head> <title>Set Examples</title> </head> <body> <c:import var="students" url="students.xml" /> <x:parse var="doc" xml="${students}" /> <x:set var="a" select="$doc/students/student/name/first" /> <x:set var="b" select="$doc/students/student[@id=2]/name/first" /> <x:set var="c" select="$doc/students/student[@id=1]/name/first" /> <table border="1"> <tr> <td>$doc/students/student/name/first</td> <td> <x:out select="$a" /> </td> </tr> <tr> <td>$doc/students/student[@id=2]/name/first</td> <td> <x:out select="$b" /> </td> </tr> <tr> <td>$doc/students/student[@id=1]/name/first</td> <td> <x:out select="$c" /> </td> </tr> </table> </body> </html> This program begins in the same way as the previous program, by loading the file students.xml: <c:import var="students" url="students.xml" /> <x:parse var="doc" xml="${students}" /> Now that the XML file has been loaded, we can use the <x:set> tags to copy the values from their XML elements to the scoped variables a, b, and c: <x:set var="a" select="$doc/students/student/name/first" /> <x:set var="b" select="$doc/students/student[@id=2]/name/first" /> <x:set var="c" select="$doc/students/student[@id=1]/name/first" /> | 