Using the Paragraph Format Window
| This section describes the more advanced paragraph formatting options of the Paragraph format window. Note The Paragraph format window doesn't let you change the font for a paragraph. To change a paragraph font style manually, you must select the entire paragraph and use character formatting (see Using the Character Formatting Window on page 202). Changing font attributes this way differs from using styles, because the paragraph style definition includes font settingswhich is yet another reason why using styles is a good idea. See Why You Should Use Styles on page 248 and Standard Paragraph Styles on page 251. Basic Paragraph FormattingYou can also access many of the following manual paragraph formatting options with right-click menus .
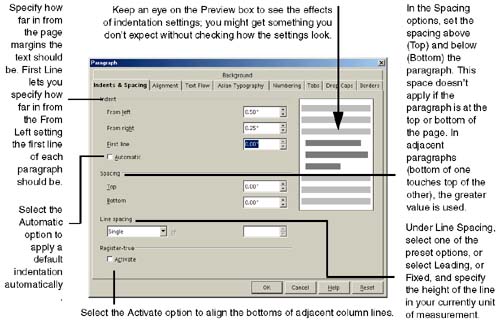
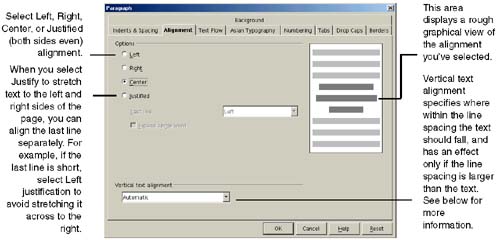
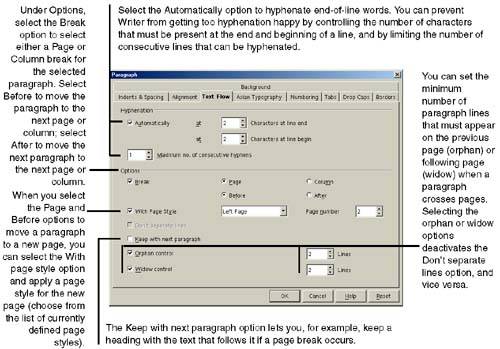
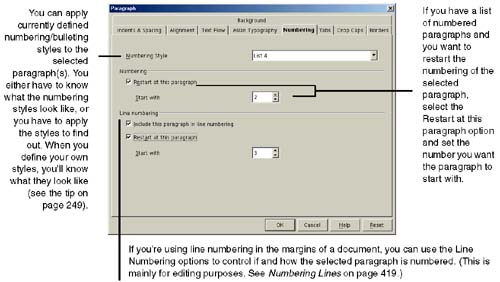
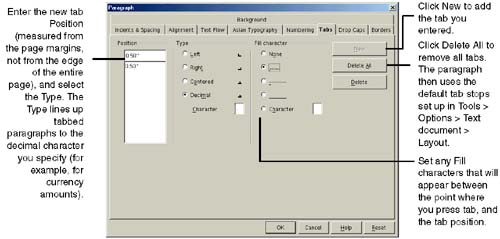
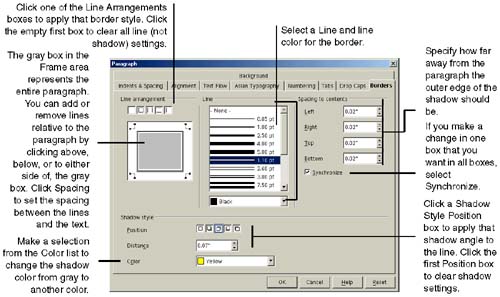
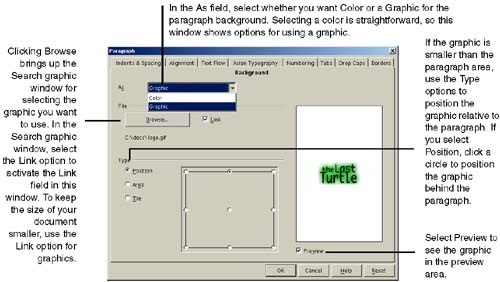
Note To specify vertical alignment within the line spacing, see Figure 7-18. Figure 7-18. The Paragraph window, Alignment tab Creating a Hanging IndentSee Figure 7-16 and make the appropriate entries in the fields under the Indent heading. You'll see the effect in the preview area. For instance, a .25 inch hanging style, you would enter .25 in the From Left field. Then enter -.25 in the First Line field. You can also choose Format > Stylist and select the Hanging Indent style. Controlling Vertical Text AlignmentThe Alignment tab in Figure 7-18 on page 212 is where you select the default settings for the vertical alignment of text characters in the text line. You can select Automatic, Baseline, Top, Middle, and Bottom. This has an effect only if your line spacing from the Indents & Spacing tab is larger then the font size. Figure 7-17 demonstrates the differences among the options. Figure 7-17. Examples of vertical text alignment options Controlling Text Flow, Page Breaks, and HyphenationFigure 7-19 provides detail on how to specify text flow. Figure 7-19. The Paragraph window, Text Flow tab The With Page Style option is quite useful, since it lets you specifying whether a specific page template or page number is to be used after a page break. For more information on switching page styles, see Applying and Switching Page Styles on page 259. Setting Up NumberingThe Numbering tab in Figure 7-20 provides detail on how to do numbering. Figure 7-20. The Paragraph window, Numbering tab Setting Up Paragraph TabsThe Tabs tab in Figure 7-21 provides detail on how to specify the tab stops. Figure 7-21. The Paragraph window, Tabs tab Use the Fill Characters option for a table of contents to create the dotted line from a TOC entry to its corresponding page number. Formatting the First Letters of a ParagraphThe Drop Caps tab in Figure 7-22 shows how to do this. Paragraph Colors, Graphics, and BordersUse the window in Figure 7-23 to specify the borders, if any, around the paragraph. Figure 7-23. The Paragraph window, Borders tab Use the window in Figure 7-24 to select a graphic to use in the background of your document, so that the standard text flows over it. Position it using the selections in the Type area of the Paragraph window. Figure 7-24. The Paragraph window, Background tab The following tips pertain to using text borders and backgrounds. Putting a box around textTo put two paragraphs within a box, such as a heading and a paragraph, add a soft return (Shift+Enter) between the paragraphs and format the heading and body text manually. Using background colors and graphicsUsing a dark or detailed graphic or color can wash out text. However, using a dark graphic or color with white font can produce nice results. Since a graphic, if it's large, can fill the entire dimensions of a paragraph, the text runs into the edges of the graphic. A background color behaves the same way. If you want to create space between the text and the edges of the graphic or color, try using a text frame inside the paragraph. See Inserting Frames and Floating Frames on page 297. |
EAN: 2147483647
Pages: 407