Setting Up and Using Internet Features
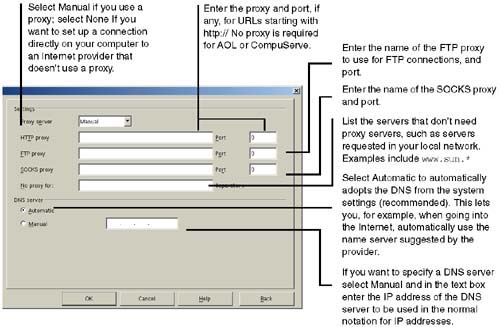
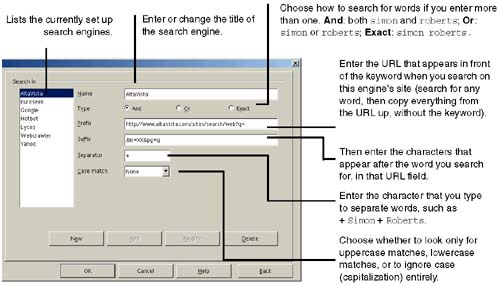
| With the removal of the Web browsing feature (kind of) and Mail, there isn't much left in the program that uses Internet settings. The features left include browsing by just typing a full HTTP URL in the Load URL field, and sending a document as an email. (Choose File > Send > Document as Email.) This ability also applies to mail merges; you can do a mail merge to paper, to email, or to files. The settings in this section help your merges to email work, too. If you're converting from 5.2, you probably don't need to enter much, if anything. If Internet features aren't working the way you want, make the appropriate changes using the procedures in this section. Setting Up Proxy Information for Internet AccessWhy proxy options? Because you can complete the rather superfluous Bringing Up a Web Page on page 438 and Using Web's Search Connection on page 438. You can probably skip this. Use the window shown in Figure 5-39 to define the settings for the proxy server. Default settings for your current proxies are often read from your system and set up automatically, so you might not need to change anything. Figure 5-39. Proxy options ProxiesThe proxy server can be manually or automatically set up to access the Internet over an interconnected network. A proxy is a computer in the network acting as a kind of clipboard for data transfer. Whenever you access the Internet from a company network and request a Web page that has already been read by a colleague, the proxy will be able to display it much more quickly as long as it's still in memory. All that needs to be checked in this case is that the page stored in the proxy is the latest version. If this is the case, the page won't have to be downloaded from the much slower Internet but can be loaded directly from the proxy. Figuring out your proxy names and portsAsk your system administrator or Internet service provider for the proxies and ports to enter. You can also check your browser for the proxies and ports you use. In Netscape, choose Edit > Preferences > Advanced > Proxies. In Internet Explorer, choose Tools > Internet Options > Connections. Depending on the provider, it may or may not be necessary to always use a proxy. For example, no proxy is required for AOL or CompuServe. Server namesAlways enter server names without the protocol prefix ( http , ftp , etc.). For example, enter starnews.stardivision rather than http://starnews.stardivision . Proxies and portsAsk your system administrator or ISP for the port for each proxy. The maximum value is 65535. If you enter a higher number, the value will be set at 0 and an error message will appear. DNS ServerYou can use the setup window to set the name of the DNS (Domain Name System). The DNS name server is there to translate the full name of the host that you enter as URL, such as www.lastturtle.com , into its 32-bit IP address. The 32-bit numbers of IP addresses are shown in a simplified way as four decimal numbers separated by dots. Each decimal number is a number from 0 to 255, and represents the first, second, third and final 8 bits of the entire 32 bits. Setting Up the Ability to Search the WebThe only reason to complete this section is so that you can then use the rather superfluous Using Web's Search Connection on page 438. You can probably skip this; we're documenting it out of an overdeveloped sense of duty. Note Sometimes you don't get the hyperlink bar, which contains features like the Search (the Web) icon and the link-creating URL fields. That is, you might have the hyperlink bar, but it's entirely blank. This can be corrected, sometimes, by reinstalling. If you don't have the hyperlink bar, though, don't worry about it. The Search feature is extraneous at best, and the Hyperlink Dialog icon is relocated to the topmost bar of your work area. (Oddly enough, even distributions without the Search icon still have the Search Setup feature.) The program lets you use any of several popular search engines to search the Internet straight from the program, without having to go to a particular search engine site. See Using Web's Search Connection on page 438 for information on how to search and selecting the search engine to use. Several search engines are already set up for you; you probably don't need to change these settings unless you need to do some tweaking, or want to add a search engine to the list.
Here are some guidelines for figuring out what the prefix (the codes the engine puts in front of what you're searching for), suffix (the code after the keyword), and the separator (what goes between multiple keywords) are for each new search engine.
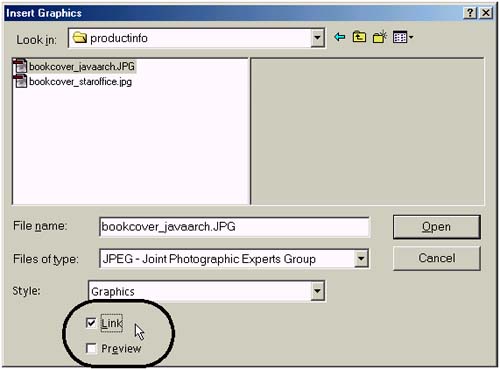
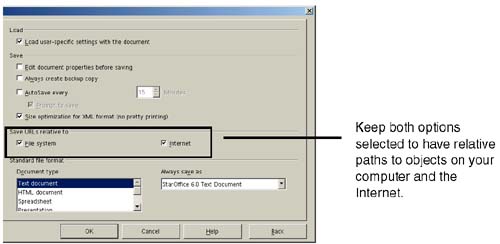
Absolute and Relative Paths, and Fixing Broken LinksThis applies to graphics and other objects you've inserted in documents via a link, and how the Relative and Absolute Path settings under Tools > Options > Load/Save > General affect object insertion. About Links and PathsWhen you insert a graphic, you can choose whether to link to the graphic where it is, by selecting the Link option in the Insert window, or to pull it into the document. (If you've inserted the graphic without marking the Link option, this whole section doesn't apply.) Inserting a link to an object is demonstrated in Figure 5-41. Figure 5-41. Option controlling whether graphics are linked to or inserted directly This is affected by the setting in Tools > Options > Load/Save > General. The window is shown in Figure 5-42. Figure 5-42. The options that control relative or absolute URLs Relative paths are just the path from the main container document like a Writer document to the inserted object. Absolute paths are from the drive letter on down. Let's say you've got the directories and files in Figure 5-43. Figure 5-43. Example files and locations If you have relative paths from the Writer and HTML documents, then your pathnames are saved as just bookcover_javaarch.jpg and bookcover_openoffice.jpg . If they're absolute, then the actual code in the files is C:\lastturtle\webpage\productinfo\bookcover_javaarch.jpg and C:\lastturtle\webpage\productinfo\bookcover_openoffice.jpg . What You Should DoIn general, you want to leave paths relative, the default value; this will make dealing with inserted graphics easier. To make things really simple, don't mark the Link option when inserting graphics, either. Note Tool tips, the Graphics window, and the Edit Links window (choose Edit > Links), always display the absolute path, even if only the relative path is saved. In HTML files, you can choose View > HTML Source to see what's actually saved in the link's HTML code. What Goes Wrong When You Have Absolute Paths and Linked Objects in DocumentsWith the file structure shown in Figure 5-43, you're fine as long as nothing changes. However, the links will be broken if any of the following happen.
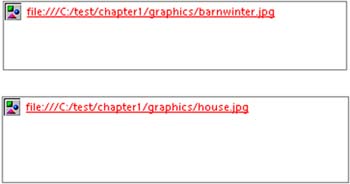
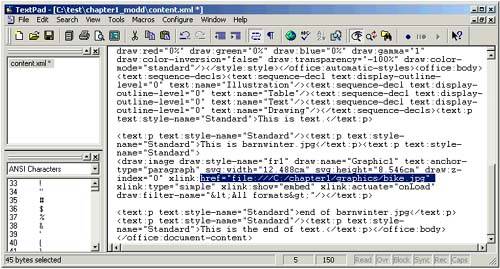
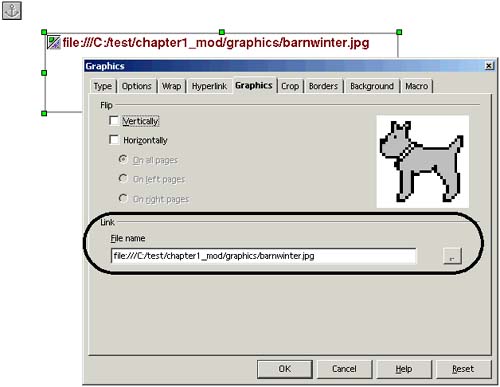
What Happens When You Switch Between Absolute and Relative Paths in the Load/Save WindowIf you insert graphics using relative paths, then go under Tools > Options and switch to absolute, the paths are now absolute. They don't stay the way you inserted them. So now if the absolute path to the graphics changes at all, the graphics are goofed up, as shown in Figure 5-44. Figure 5-44. Graphics, inserted with a link, and goofed up by changes in the absolute path You'd think, therefore, that all you have to do is go under Tools > Options again and switch to Relative, and everything will be fine. Nope. The graphics paths remain goofed up. What You Can Do to Fix Broken Links
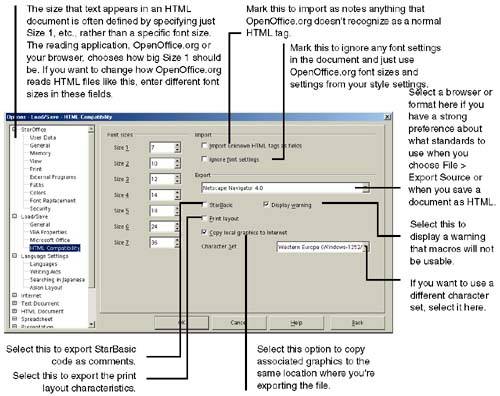
Setting Up How the Program Reads and Exports HTML FilesIf you ever save or export your documents to HTML, or if you just plain create HTML documents, take a look at the settings in Tools > Options > Load/Save > HTML Compatibility, shown in Figure 5-47. Figure 5-47. Setting HTML options See also Making an HTML Version of a Document on page 144 to see what happens when you save a document as the Web/Writer fake HTML format. Selecting the Program for the Send as Email FeatureChoose Tools > Options > OpenOffice.org > External Programs. Leave the default as is unless you've got a really good reason to change it. Sending a Document as Email
Making an HTML Version of a DocumentThis varies from application to application. However, in general you can choose File > Save As, or File > Export, and select the HTML format. You can also, in HTML, choose View > Source, then choose File > Export Source. For information on what the HTML itself is like, see What OpenOffice.org HTML Is Like on page 449. Note that when you Save As in Writer, you only get the Web (Writer) option, which is not in fact actual HTML. Not even if you make sure you add an HTML file extension. One main tipoff is that the View > Source option is not available. They often look the same way when viewed in a browser, but not always. |

EAN: 2147483647
Pages: 407