Converting Objects to Different Types
| You can do some effects, like using the Eyedropper, only to bitmaps. So how do you apply that to a polygon? Just convert it. You can apply gradients and bitmaps to text, but only if they're converted to bitmaps or 3D. To convert, just right-click on any graphic in Draw, choose Convert, and you'll see what you can convert it to. Table 30-1 summarizes those options. Metafile is a format specific to Microsoft Windows. Unless you've got a good reason, choose bitmap instead, since some of the features for editing rasters in Draw don't work with bitmaps. Table 30-1. File format conversion
Converting a Draw Object to Another Draw (Vector) Type
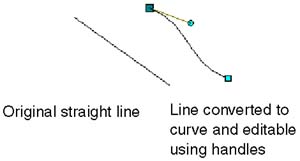
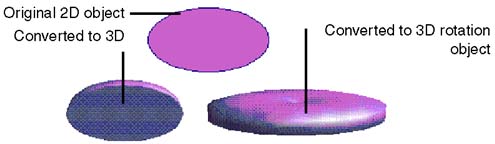
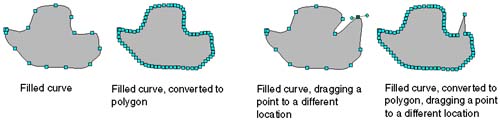
You can now edit the object based on its new type; if you converted a polygon to a curve, for instance, you can edit points using the curve icons on the object bar. Notes on the different types of conversions follow. Lines to curvesConverting a line to a curve lets you bend it and offers all standard Bezier curve editing features, such as the control handle (shown in Figure 30-43). Figure 30-43. Converting a line to a curve Polygons to 3DYou can convert any object to a 3D object or 3D rotation object; polygons and curves result in the most interesting effects (see Figure 30-44). Figure 30-44. Converting a polygon to 3D Curves to 3D RotationYou can achieve surprising effects by converting Bezier curves to 3D rotation objects (see Figure 30-45). Figure 30-45. Converting a curve to a 3D rotation object Curves to polygonsConverting a curve to a polygon is possible, but doesn't result in many useful changes. Many more points are added, dragging a point results in a pointed shape rather than a curve, and the control handle is no longer available. Figure 30-46 shows two curves converted to polygons. Figure 30-46. Converting a curve to a polygon Making Other Cool 3D Shapes By Converting Any Object to 3DThe previous procedure tells you how to convert an object to 3D with relatively interesting results. However, the 3D conversion icon on the Effects tearoff menu gives you much more flexibility. Figure 30-47 shows the contrast.
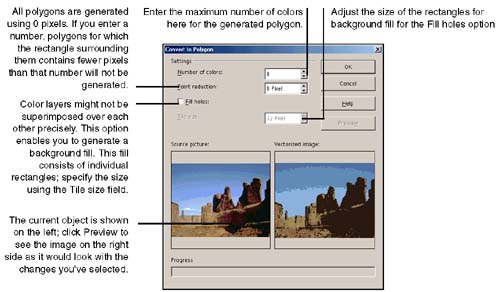
Figure 30-47. Converting to 3D using the Effects tearoff menu Converting a Raster Object (Image) to a Draw Polygon ObjectYou can convert raster objects to Draw objects such as polygons and 3D objects. For all formats but polygons, simply right-click on the object and choose Convert and the type of object you want. If you're converting a bitmap (not a raster) to a polygon, the window in Figure 30-48 will appear. Choose the appropriate options and click OK. Figure 30-48. Converting a raster image to a polygon Note If you convert a curved bitmap, such as the oval shown in Figure 30-48, then apply a different fill such as another color or pattern, the shape will change to a square or rectangle and you'll lose the original shape. Converting a Draw Object to an ImageYou can convert a Draw object (a vector graphic) to a raster type (Image object), so that it's composed of pixels rather than lines. This is useful if you want to samplechange all occurrences of a color in an image to another color. See Changing Selected Colors in Images Using the Eyedropper on page 833, as well as Chapter 31, Editing Images , on page 831. Converting by Right-ClickingYou can convert most Draw objects to a bitmap or metafile. Simply right-click on an object or objects and choose Convert > type . Using the Modify Menu
|

EAN: 2147483647
Pages: 407