Creating Your Own Lines and Arrows

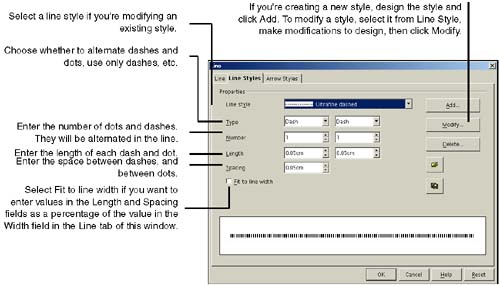
Tired of the options you get with the program? Make your own.

Creating and Modifying Lines

You can modify the preset types of lines and arrows that are displayed in the Line tab of the Line window, and elsewhere in the program. You can also create your own lines.
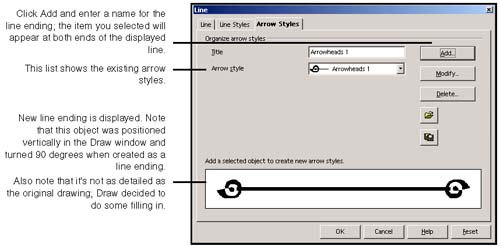
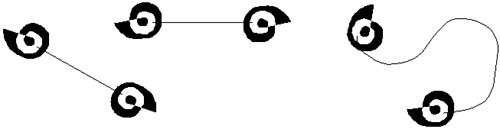
  1. Choose Format > Line, or right-click a line object and choose Line.

  2. Click the Line Styles tab.

  3. If you're modifying an existing style, select it.

    Note

    If the style you want to modify isn't displayed in the Line window, click the Load Styles icon and select the list where it is stored. See Creating and Categorizing Fills and Lines on page 792 for more information.

    graphics/loadcolorlist.jpg

  4. Define the style appropriately, as shown in Figure 30-1.

    Figure 30-1. Creating new lines

    graphics/30fig01.jpg

  5. Click Add for a new style or Modify for an existing style; enter a name and click OK.

  6. Click OK to close the window and save changes.

Creating Arrows and Other Line Endings

If you have a particular type of arrow or other line ending you want to use, it's easy to create it.

Note

This works only for real vector drawings, not bitmaps or bitmaps converted to polygons.


  1. Draw the line ending you want or bring it into a Draw document by inserting or pasting. It can be anything as long as it's a vector. The spiral at right was drawn with the freeform line tool.

    graphics/30inf01.jpg

  2. Rotate the object 90 degrees if you care which way is up. The object will be turned into a line ending flopped 90 degrees from its original position. For instance, if you've got a standard arrow that's wider than it is high, turn it 90 degrees so that it's pointing up and down.

  3. Select the object. You must select it first, or you won't have the Add button available in the Line window.

  4. Right-click the object, choose Line, and in the Line window select the Arrow Styles tab, shown in Figure 30-2.

    Figure 30-2. Creating new arrows

    graphics/30fig02.jpg

  5. Click Add and enter a new name for the line ending.

  6. The new line ending will appear in the window.

  7. Click OK to close the window and save changes.

  8. Apply the arrowhead to lines. You'll need to select the right size in the Line tab of the Line window, as usual; the default size is .12 inch. Figure 30-3 shows the example arrowhead applied to various lines.

    Figure 30-3. New arrowhead applied to straight, diagonal, and curved line

    graphics/30fig03.gif


OpenOffice. org 1.0 Resource Kit
OpenOffice.Org 1.0 Resource Kit
ISBN: 0131407457
EAN: 2147483647
Year: 2005
Pages: 407

flylib.com © 2008-2017.
If you may any questions please contact us: flylib@qtcs.net